5.1. Setup
5.1.1. Masonry Scripts
The masonry scripts are bundled with VisIt’s source code. You will need to download
the source code and extract masonry from visit/src/tools/dev. There are a few options
for downloading the source code. If you want a released version of VisIt then go to the
source code downloads page and look for the VisIt sources
link. The other option is to download from the git repository.
Once you have the source code, copy visit/src/tools/dev/masonry to a location of your choosing.
5.1.2. Configuration
In the
optsdirectory copy one of the*.jsonfiles and rename it as desired. For example:cp mb-3.1.1-darwin-10.14-x86_64-release.json mb-3.1.2-darwin-10.14-x86_64-release.jsonOpen the JSON configuration file (see Figure 5.36) created in step 1 and modify or add the following options as needed:
arch: requiredThe build architecture (e.g., darwin-x86_64).
boost_dir: optionalThe path to boost if installed on your system. This also triggers the setting of two CMake options (VISIT_USE_BOOST:BOOL and BOOST_ROOT:PATH).
branch: requiredThe git branch to checkout and build.
build_dir: optionalThe directory to place all of the files generated from the build process. If this option isn’t specified the build directory will default to
build-<json_base>(e.g., build-mb-3.1.2-darwin-10.14-x86_64-release) in your current working directory.build_types: requiredA list of builds for masonry to create.
build_visit: requiredAllows you to set the
build_visitoptions.cmake_ver: required - the CMake version to useargs: optional - arguments forbuild_visitslibs: optional - third-party libraries to buildmake_flags: optional - Make flagsbuild_xdb: optionalSet the VISIT_ENABLE_XDB:BOOL option to ON if true.
cert: required for signing/notarizationThe Developer ID signing certificate Common Name.
cmake_extra_args: optionalSpecify extra arguments for CMake.
config_site: optionalSpecify a path for the config site file.
cxx_compiler: optionalSpecify the C++ compiler
c_compiler: optionalSpecify the C compiler
entitlements: required for notarizationSpecify the location of VisIt’s entitlements file. The one used for VisIt releases is located in the
optsdirectory and is named visit.entitlements. See Hardened Runtime for more details on entitlements.force_clean: optionalRemoves all files and directories from your build folder.
git: requiredmode: required - set this option to ssh or httpsgit_uname: optional - github usernamedepth: optional - specify an integer value for a shallow clone with a history truncated to the specified number of commits.make_nthreads: optionalThe number of parallel threads to use when building the source code.
notarize: required for notarizationSpecify the options needed for notarization.
username: - Apple ID emailpassword: - App-specific password or keychain string containing the App-specific passwordasc_provider: - Provider short namebundle_id: - VisIt’s bundle identifierplatform: optionalSpecify the platform (osx or linux)
skip_checkout: optionalif you have to restart masonry and already have the source code checked out you can skip that step by setting this option to yes.
tarball: optionalSpecify the path to the source tar file. This option is currently not being used.
version: requiredThe version of VisIt you are building.
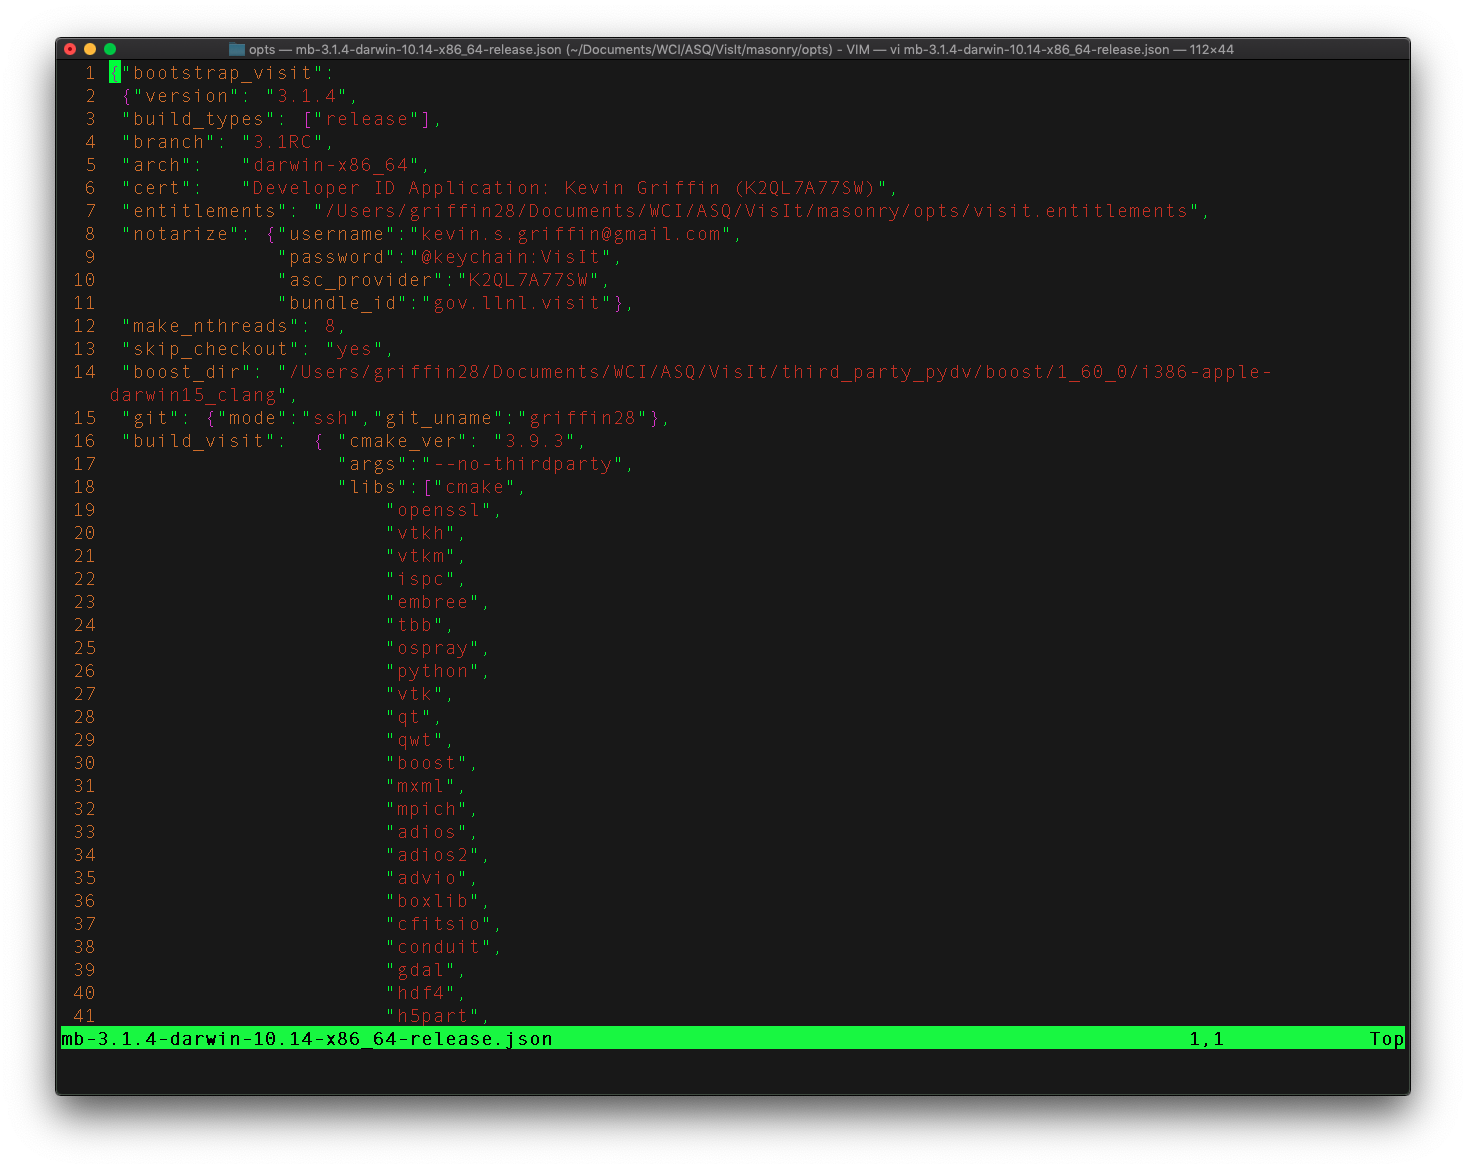
Fig. 5.36 Masonry’s JSON config file
5.1.3. Signing macOS Builds
To code sign your VisIt build, you must be enrolled in the Apple Developer Program and have a valid Developer ID certificate. Below are simple steps to get started, reference the links for more detailed information.
Enroll in the Apple Developer Program, if needed, and create your Developer ID certificates.
Install Apple certificates into your keychain
From Xcode go to the account preferences (
Xcode->Preferences->Account) and select the Manage Certificates… button.Click the + to add your certificates (see Figure 5.37).
Add the Developer ID signing certificate Common Name to the cert option in the masonry JSON configuration file.
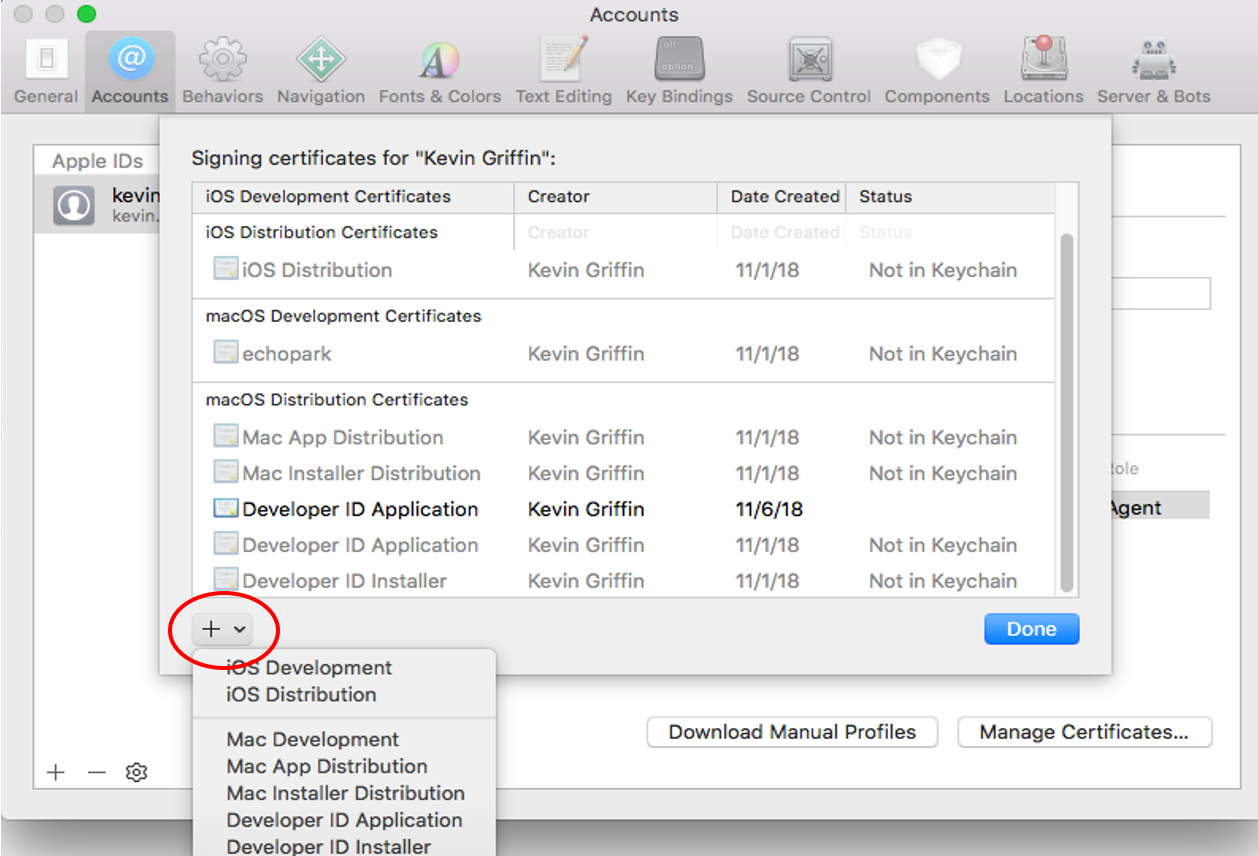
Fig. 5.37 Xcode Manage Certificates Dialog
Warning
Remain disconnected from VPN when building and code signing a VisIt release. The code signing process talks to Apple servers and validates credentials with them. If you are on VPN, the validation may fail with a message similar to:
Certificate trust evaluation did not return expected result. (5)  [leaf AnchorApple ChainLength CheckIntermediateMarkerOid CheckLeafMarkersProdAndQA]
Certificate trust evaluation for api.apple-cloudkit.com did not return expected result. No error..
Certificate trust evaluation did not return expected result. (5)  [leaf AnchorApple ChainLength CheckIntermediateMarkerOid CheckLeafMarkersProdAndQA]
Certificate trust evaluation for api.apple-cloudkit.com did not return expected result. No error..
Could not establish secure connection to api.apple-cloudkit.com
5.1.4. App-Specific Password
To create an app-specific password go to: https://appleid.apple.com/account/manage . Generate the app-specific password by navigating to: Security->App-Specific Password.
To avoid having a plain-text password in your config file, you can add the app-specific password to your macOS keychain. To do this, run the following command:
security add-generic-password -a "apple-id-email" -w "app-specific password" -s "notarizing-name"
The -s parameter is the name that this item will have in your keychain. Apple’s documentation on Customizing the Notarization Workflow provides a good overview of the notarization process and a link detailing how to generate and manage app-specific passwords.