5.1. Setup
5.1.1. Masonry Scripts
The masonry scripts are bundled with VisIt’s source code. You will need to download
the source code and extract masonry from visit/src/tools/dev. There are a few options
for downloading the source code. If you want a released version of VisIt then go to the
source code downloads page and look for the VisIt sources
link. The other option is to download from the git repository.
Once you have the source code, copy visit/src/tools/dev/masonry to a location of your choosing.
5.1.2. Configuration
In the
optsdirectory copy one of the*.jsonfiles and rename it as desired. For example:cp mb-3.1.1-darwin-10.14-x86_64-release.json mb-3.1.2-darwin-10.14-x86_64-release.jsonOpen the JSON configuration file (see Figure 5.55) created in step 1 and modify or add the following options as needed:
arch: requiredThe build architecture (e.g., darwin-x86_64).
boost_dir: optionalThe path to boost if installed on your system. This also triggers the setting of two CMake options (VISIT_USE_BOOST:BOOL and BOOST_ROOT:PATH).
branch: requiredThe git branch to checkout and build.
build_dir: optionalThe directory to place all of the files generated from the build process. If this option isn’t specified the build directory will default to
build-<json_base>(e.g., build-mb-3.1.2-darwin-10.14-x86_64-release) in your current working directory.build_types: requiredA list of builds for masonry to create.
build_visit: requiredAllows you to set the
build_visitoptions.cmake_ver: required - the CMake version to useargs: optional - arguments forbuild_visitslibs: optional - third-party libraries to buildmake_flags: optional - Make flagsbuild_xdb: optionalSet the VISIT_ENABLE_XDB:BOOL option to ON if true.
cert: required for signing/notarizationThe Developer ID signing certificate Common Name.
cmake_extra_args: optionalSpecify extra arguments for CMake.
config_site: optionalSpecify a path for the config site file.
cxx_compiler: optionalSpecify the C++ compiler
c_compiler: optionalSpecify the C compiler
entitlements: required for notarizationSpecify the location of VisIt’s entitlements file. The one used for VisIt releases is located in the
optsdirectory and is named visit.entitlements. See Hardened Runtime for more details on entitlements.force_clean: optionalRemoves all files and directories from your build folder.
git: requiredmode: required - set this option to ssh or httpsgit_uname: optional - github usernamedepth: optional - specify an integer value for a shallow clone with a history truncated to the specified number of commits.make_nthreads: optionalThe number of parallel threads to use when building the source code.
notarize: required for notarizationSpecify the options needed for notarization.
username: - Apple ID emailpassword: - App-specific password or keychain string containing the App-specific passwordasc_provider: - Provider short namebundle_id: - VisIt’s bundle identifierplatform: optionalSpecify the platform (osx or linux)
skip_checkout: optionalif you have to restart masonry and already have the source code checked out you can skip that step by setting this option to yes.
tarball: optionalSpecify the path to the source tar file. This option is currently not being used.
version: requiredThe version of VisIt you are building.
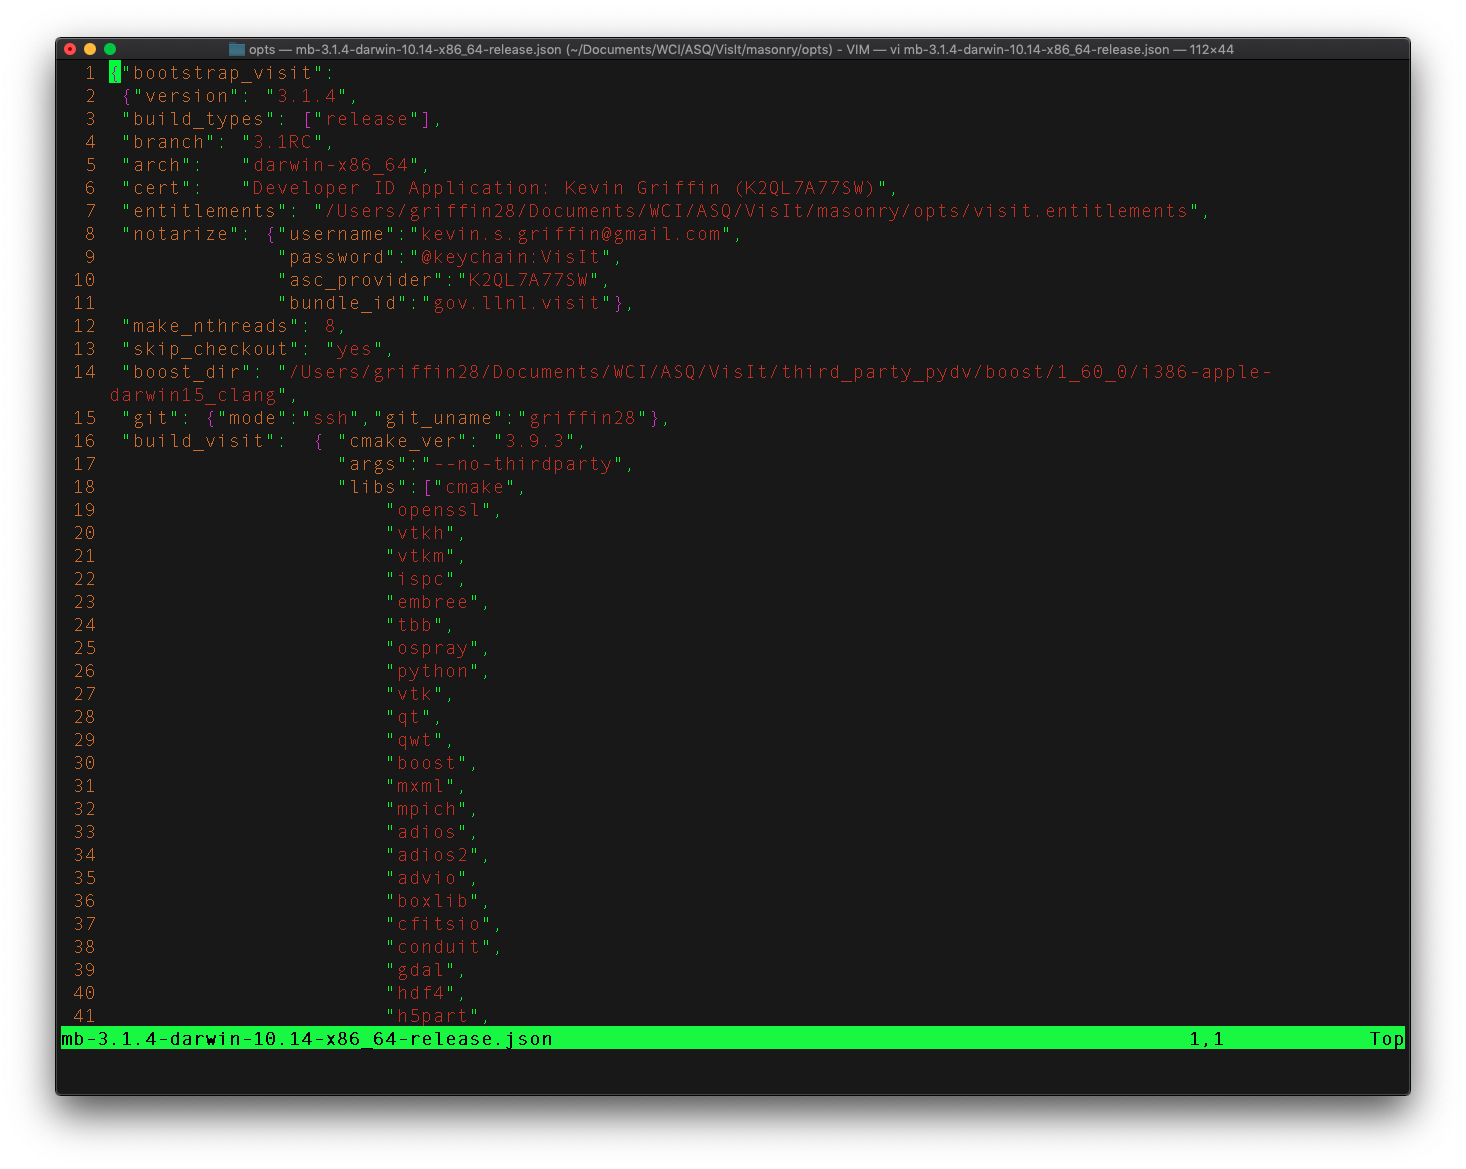
Fig. 5.55 Masonry’s JSON config file
5.1.3. You Might Have to Adjust your PATH
There are cases where individual package’s configuration processes wind up executing tools in your path ($PATH) to help set variables used in compilation.
For example, the MPICH configuration winds up using pkg-config, if it is found in your path, to help set CPPFLAGS and LDFLAGS.
In one case, libxml2 was installed in both /opt/local/lib and in /usr/lib but because /opt/local/bin was first in $PATH, /opt/local/bin/pkg-config was used to set paths for libxml2 to /opt/local/include and /opt/local/lib.
This results in a build of MPICH using non-system libxml2 which will fail the macOS (otool -L) @rpath validation checks on each of the shared libs VisIt is built with later.
The solution is to be sure your $PATH variable is set such that nothing non-standard can be found in your path prior to running masonry.
One way to do this is to echo $PATH | tr ':' '\n' to display, line-by-line, each path defined in $PATH and then remove from that list all non-standard (for example, anything beginning with /opt) paths
set STD_PATH=`echo $PATH | tr ':' '\n' | grep -v '/opt' | tr '\n' ':'`
env PATH=$STD_PATH python3 src/tools/dev/masonry/bootstrap_visit.py src/tools/dev/masonry/opts/mb-3.3.0-darwin-10.14-x86_64-release.json
Sometimes, it is useful to get tracing information from the masonry scripts. Python has a built in tracing feature. To use it, invoke the python interpreter with the tracing module like so…
env PATH=$STD_PATH python3 -m trace --trace src/tools/dev/masonry/bootstrap_visit.py src/tools/dev/masonry/opts/mb-3.3.0-darwin-10.14-x86_64-release.json | tee trace.out
or
env PATH=$STD_PATH python3 -m trace --trace src/tools/dev/masonry/bootstrap_visit.py src/tools/dev/masonry/opts/mb-3.3.0-darwin-10.14-x86_64-release.json >& trace.out
The first command will result in unbuffered output to the screen and file. The second will buffer the output to the file.
5.1.4. What Can Go Wrong?
Apart from commonly encountered issues building each third party library built by a bv_xxx.sh script, there are many other ways getting the macOS release ready can fail.
There are at least 3 levels of certifications (from your macOS keychain) involved.
The Apple Root Certificate Authority (CA) certificates (
Apple Root CAorApple Root CA - G2orApple Root CA - G3Apple Worldwide Developer Relations Certificate Authority certificates (also called the intermediate certificate authority)
Developer ID Certificate Authority for the organization (Lawrence Livermore) and yourself. These all need to be correctly configured and tied to each other from the lowest level (also called a leaf certificate), yourself to the root.
Sometimes Apple expires its certificates and you may need to go get updated certificates.
Sometimes your own certificate can expire. Currently, Charles Heizer is the LLNL point of contact for adding developers and updating their expired certificates.
You might need to evaluate the validity of your certificate using Apple KeyChain Certificate Assistant to confirm its all working.
If you are VPN’d into LLNL, codesigning and notorizing a release may fail.
If you have MacPorts, Homebrew, Fink or other macOS package managers, python package builds may wind up enabling (and then creating a release that is dependent upon) libraries that are available only to users with similar package managers installed. Worse, you won’t have any idea this has happend until you give the release to another developer who has a mac that is not using said package managers and they try to use it and it doesn’t work due to missing libraries. You can use
otoolcombined withfindto try to find any cases where the release has such dependences. For example, the commandfind /Volumes/VisIt-3.3.0/VisIt.app/Contents/Resources/3.3.0/darwin-x86_64 -name '*.so -o -name '*.dylib' -exec otool -L {} \; -print | grep -v rpath
will find cases of non-rpath’d library dependencies build into either shared (
.so) or dynamic (.dylib) libraries. Note, however, that sometimes Python EGG’s contain Zip-compressed.sofiles that this check won’t find.Just removing associated stuff from your
$PATHwill not prevent these build dependencies. Fixing them likely means finding some of the individual packages inbv_python.shand addingsite.cfgfiles or otherwise finding build switches that explicitly disable the features creating the need for these dependencies.Sometimes, a python package winds up using the python interpreter in
Xcodeinstead of the one built for the release of VisIt you are preparing. For example, Sphinx can wind up getting installed with all command-line scripts using a shebang which is an absolute path toXcode’s python interpreter. We’ve added patching code tobv_python.shto help correct for this.
5.1.5. Codesigning, Notarizing and Stapling macOS Builds
There are several aspects to producing a .dmg application bundle for macOS.
The most involved of these steps is codesigning.
Codesigning involves iterating over all the libraries and executables in the bundle and doing so in a bottom-up or inside-out fashion such that the leaves of any dependency chains are codesigned first.
Its not a manual process and the masonry scripts involve quite a bit of logic (thanks Kevin Griffin) to get it right.
However, the remaining steps involving notarizing and stapling the notarization ticket to the .dmg bundle can easily be handled manually.
The masonry scripts are designed to do these steps automatically as well but they can also be handled manually if necessary.
Because Apple seems to change these processes frequently, we capture here some of the key steps.
5.1.5.1. Notarizing
Prior to November, 2023, xcrun altool was used to notarize macOS bundles.
This was changed by Apple to use xcrun notarytool.
Migrating from the old approach to the new one is straightforward.
Old way using xcrun altool…
xcrun altool --notarize-app --primary-bundle-id gov.llnl.visit --username APPLE_ID --password @keychain:APP_PASSWORD --asc-provider TEAM_ID --file /Users/miller86/visit/visit/34rc/release/build-mb-3.4.1-darwin-21-x86_64-release/notarize.release/VisIt.dmg --output-format xml
New way using xcrun notarytool…
xcrun notarytool submit --apple-id APPLE_ID --keychain-profile APP_PASSOWRD --team-id TEAM_ID /path/to/VisIt.dmg
Where APPLE_ID is your Apple Id login with Apple, APP_PASSWORD is the clear-text name for the app-specific password you created (once probably in the distant past and you can no longer remember the steps involved) in your keychain and TEAM_ID is the Apple Developer ID for LLNL.
For the APP_PASSWORD to work correctly with notarytool, you will need to copy over the app-specific password you were using for altool so that it can also be used for notarytool.
The submission process can take a while because it is uploading the (very large) .dmg file to Apple’s servers and then processing it there.
When the submission completes, you will see a message such as
Conducting pre-submission checks for VisIt.dmg and initiating connection to the Apple notary service...
Submission ID received
  id: d66044ca-5cd1-4d9a-87f7-492ce2ed9bfa
Successfully uploaded file606 MB of 606 MB)
  id: d66044ca-5cd1-4d9a-87f7-492ce2ed9bfa
  path: /path/to/VisIt.dmg
That means only that the file uploaded successfully. The notarization will not necessarily complete right away. You can check progress on the notarization by the following command
xcrun notarytool info --apple-id APPLE_ID --keychain-profile APP_PASSWORD --team-id TEAM_ID SUBMISSION_ID
which, if it is still processing the notarization request, will produce an output like so
Successfully received submission info
  createdDate: 2024-04-19T19:10:31.277Z
  id: d66044ca-5cd1-4d9a-87f7-492ce2ed9bfa
  name: VisIt.dmg
  status: In Progress
If the notarization has completed, the output will look like
Successfully received submission info
  createdDate: 2024-04-19T19:10:31.277Z
  id: d66044ca-5cd1-4d9a-87f7-492ce2ed9bfa
  name: VisIt.dmg
  status: Accepted
Finally, stapling the notarization to the .dmg file is an easy final step
xcrun stapler staple /path/to/VisIt.dmg
Processing: /path/to/VisIt.dmg
Processing: /path/to/VisIt.dmg
The staple and validate action worked!
5.1.5.2. Confirming
You can check whether
VisIt.appis properly codesigned by mounting the.dmgfile and then using this commandcodesign -v -v /Volumes/VisIt-3.3.0/VisIt.app
which should produce output like so…
/Volumes/VisIt-3.3.0/VisIt.app: valid on disk
/Volumes/VisIt-3.3.0/VisIt.app: satisfies its Designated Requirement
You can check whether
VisIt.appis properly notarized using this commandspctl -a -t exec -vv /Volumes/VisIt-3.3.0/VisIt.app
which should produce output like so…
/Volumes/VisIt-3.3.0/VisIt.app: accepted
source=Notarized Developer ID
origin=Developer ID Application: Lawrence Livermore National Laboratory (A827VH86QR)
You can get more details about why a notorization failed using the command
xcrun notarytool log --apple-id APPLE_ID --keychain-profile APP_PASSWORD --team-id TEAM_ID SUBMISSION_ID
where
SUBMISSION_IDis the id you get (printed by masonry to the logs) in theid:field of the details returned fromxcrun notarytool submitcommand. And, this should produce a lot of output like so…{ "logFormatVersion": 1, "jobId": "d66044ca-5cd1-4d9a-87f7-492ce2ed9bfa", "status": "Accepted", "statusSummary": "Ready for distribution", "statusCode": 0, "archiveFilename": "VisIt.dmg", "uploadDate": "2024-04-19T19:14:50.128Z", "sha256": "e70df42af4c576dd2a880935b7b9d15b4a3996e8da215f933c36ba8df755a7f4", "ticketContents": [ { "path": "VisIt.dmg", "digestAlgorithm": "SHA-256", "cdhash": "2c70abcb2749b8aca52f2ab028027b8a70297713" }, { "path": "VisIt.dmg/VisIt.app", "digestAlgorithm": "SHA-256", "cdhash": "68c549e036f09fc440ddfdd7b52d63f718276957", "arch": "x86_64" }, { "path": "VisIt.dmg/VisIt.app/Contents/MacOS/VisIt", "digestAlgorithm": "SHA-256", "cdhash": "68c549e036f09fc440ddfdd7b52d63f718276957", "arch": "x86_64" }, { "path": "VisIt.dmg/VisIt.app/Contents/Resources/3.4.1/darwin-x86_64/bin/qvtkopenglExample", "digestAlgorithm": "SHA-256", "cdhash": "ed30817e765bca4e115bb6d4477ed1561551ef15", "arch": "x86_64" }, . . .
5.1.5.3. A simple test application
In src/tools/dev/masnory/test, there is a very simple (and very small in size so easy to run through all the notarization steps) test macOS app bundle there, TestDmgNotarization.app and a python script test_notarize.py.
The test app is a combination of a python script that turns around and uses a function in a .dylib.
The .dylib is a universal binary so should work on Intel or Apple CPU macs.
To try it, use the command python3 test_notarize.py (or maybe with tracing enabled python3 -m trace --trace test_notarize.py) and then take the resulting .dmg file to a different macOS system and install it and try running it.
New developers should workout all the issues first using this test application.
Once all the steps work, then doing a VisIt notarization should also work.
5.1.6. Certificates for signing macOS Builds
To code sign your VisIt build, you must be enrolled in the Apple Developer Program and have a valid Developer ID certificate. Below are simple steps to get started, reference the links for more detailed information.
Enroll in the Apple Developer Program, if needed, and create your Developer ID certificates.
Install Apple certificates into your keychain
From Xcode go to the account preferences (
Xcode->Preferences->Account) and select the Manage Certificates… button.Click the + to add your certificates (see Figure 5.56).
Add the Developer ID signing certificate Common Name to the cert option in the masonry JSON configuration file.
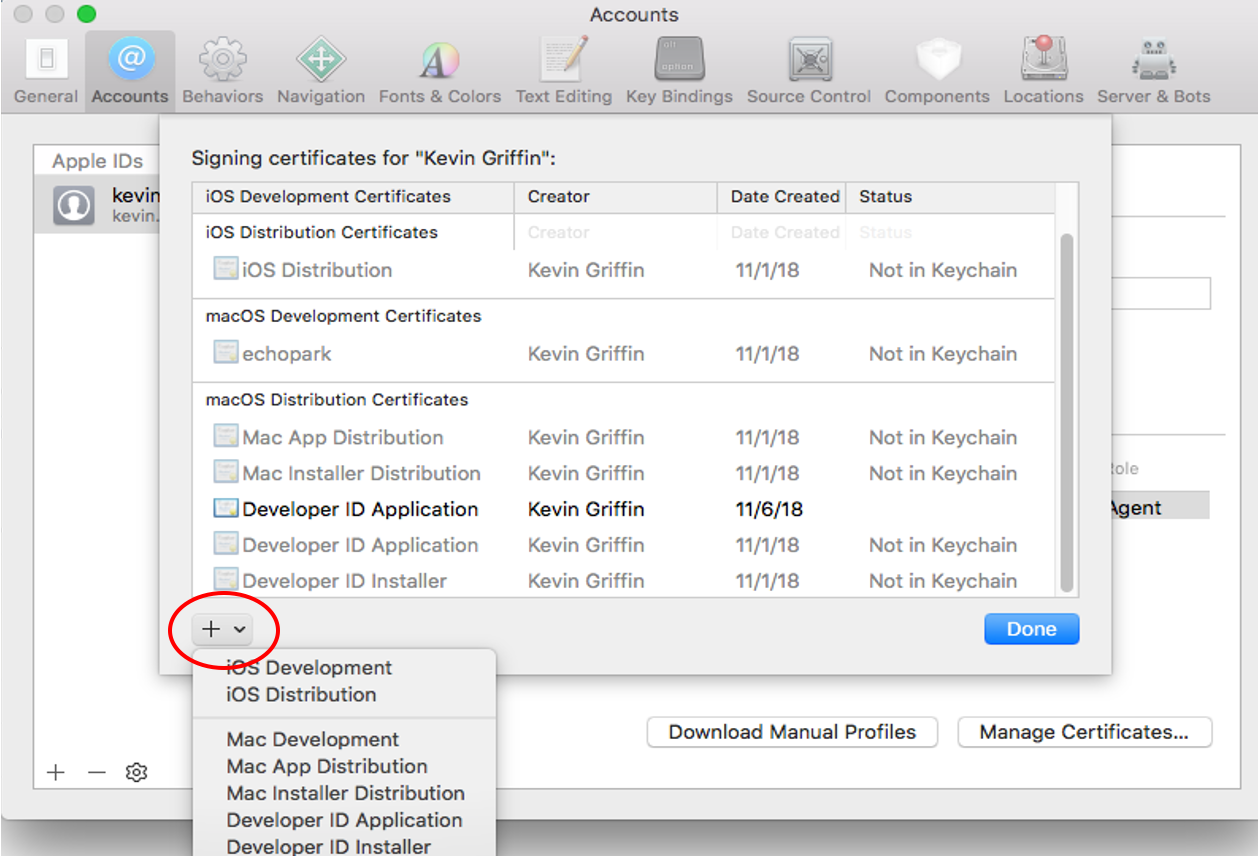
Fig. 5.56 Xcode Manage Certificates Dialog
Warning
Remain disconnected from VPN when building and code signing a VisIt release. The code signing process talks to Apple servers and validates credentials with them. If you are on VPN, the validation may fail with a message similar to:
Certificate trust evaluation did not return expected result. (5)  [leaf AnchorApple ChainLength CheckIntermediateMarkerOid CheckLeafMarkersProdAndQA]
Certificate trust evaluation for api.apple-cloudkit.com did not return expected result. No error..
Certificate trust evaluation did not return expected result. (5)  [leaf AnchorApple ChainLength CheckIntermediateMarkerOid CheckLeafMarkersProdAndQA]
Certificate trust evaluation for api.apple-cloudkit.com did not return expected result. No error..
Could not establish secure connection to api.apple-cloudkit.com
Read more about Apple’s Code Signing documentation.
5.1.7. App-Specific Password
To create an app-specific password go to: https://appleid.apple.com/account/manage . Generate the app-specific password by navigating to: Security->App-Specific Password.
To avoid having a plain-text password in your config file, you can add the app-specific password to your macOS keychain. To do this, run the following command:
security add-generic-password -a "apple-id-email" -w "app-specific password" -s "notarizing-name"
The -s parameter is the name that this item will have in your keychain. Apple’s documentation on Customizing the Notarization Workflow provides a good overview of the notarization process and a link detailing how to generate and manage app-specific passwords.