6.1. Managing vis windows
VisIt allows you to create up to 16 vis windows and to manage those vis windows, VisIt provides controls to add vis windows, remove vis windows or alter their layout. The controls for managing vis windows are located in the Main Window’s Windows menu (see Figure 6.1), as well as in the vis window’s Toolbars and Popup menu.

Fig. 6.1 Window menu
6.1.1. Adding a new vis window
You can add a new vis window in a few different ways, the first of which is by selecting the New option from the Main Window’s Windows menu. You can also click on the New window icon in the vis window’s Toolbar or you can select the New window option from the Windows submenu in the vis window’s Popup menu to add a new vis window. When you add a new window, it will be sized according to the window layout so if you have only a single, large vis window, the new vis window will also be large. You can change the window layout to shrink the vis windows so that they both fit on the screen. Vis windows are numbered 1 to 16 so the new window will have the first available number for which there is not already a window. If you have windows 1, 2, and 4, vis window 3 would be created by adding a new window. Adding a new window also makes the new window the active window.
A new vis window can also be added by cloning the active window. You can clone the active window by selecting the Clone option from the Main Window’s Windows menu or you can click the Clone window icon in the vis window’s Toolbar. When you clone the active window, VisIt creates a new window as if you had clicked the Add option but it also copies the plots, annotations, and lighting from the active window so that the new window is identical in appearance to the active window. When plots are copied to the new cloned window, they have not yet been generated so their plot list entries in the Plot list are green. You can force the plots to be generated by clicking the Draw button in the Main Window.
6.1.2. Deleting a vis window
There are four ways to delete a vis window. The first way is to select the Delete option from the Main Window’s Windows menu. When you delete a window in this manner, the active window gets deleted and VisIt makes the window with the smallest number the new active window. The second way to delete a window is to click on the close window button in the window decorations provided by the windowing system. The window decorations’ appearance varies based on the platform and windowing system used to run VisIt, but the button used to close windows is commonly a button with an X in it. An example of a close window button is shown in Figure 6.2.

Fig. 6.2 Window decorations with close button
The third way to delete a vis window is to click on the Delete window icon in the vis window’s Toolbar. The fourth way to delete a vis window is to use the Delete option in the vis window’s Popup menu. When you use the Toolbar or the Popup menu to delete a window, the window does not need to be the active window as when other controls are used.
6.1.3. Clearing plots from vis windows
The Main Window’s Windows menu provides a Clear all option that you can use to clear the plots from all vis windows. Selecting this option does not delete the plots from a vis window’s plot list but it does clear the plots so they have to be regenerated by VisIt’s compute engine. You can also clear the plots for just the active window by selecting the Plots option from the Clear submenu in the Main Window’s Windows menu (see Figure 6.3). You might find clearing plots useful when you want to make several changes to plot attributes because, unlike plots that are already generated, setting attributes of cleared plots does not force them to regenerate when you change their attributes.
In addition to clearing plots, you can also clear pick points and reference lines from a vis window. A pick point is a marker that VisIt adds to a vis window when you click on a plot in pick mode. The marker indicates the location of the pick point. A reference line is a line that you draw in a vis window when it is in lineout mode. You can clear a vis window’s pick points or reference lines, by selecting the Pick points or Reference lines options from the Clear submenu in the Main Window’s Windows menu.
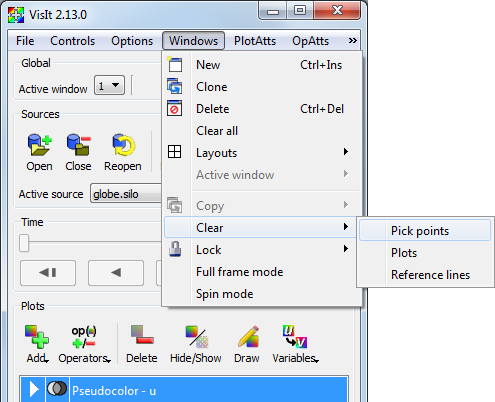
Fig. 6.3 Clear menu
6.1.4. Changing window layouts
VisIt uses different window layouts to organize vis windows so they all fit on the screen. Changing the window layout typically resizes all of the vis windows and moves them into a tiled formation. If there are not enough vis windows to complete the desired layout, VisIt creates new vis windows until the layout is complete. You can change the layout selecting a new layout from the Layouts menu located in the Main Window’s Windows menu or you can click on a layout icon in the vis window’s Toolbar.
6.1.5. Setting the active window
VisIt has the concept of an active window that is the window to which new plots are added. You can change the active window by selecting a window number from the Active window menu located near the top of the Main Window. Setting the active window updates the GUI so that it displays the state for the new active window. The Active window menu is shown in Figure 6.4. You can also set the active window using the Active window submenu in the Main Window’s Windows menu or you can click on the Active window icon in the vis window’s Toolbar.
Fig. 6.4 Active window menu
6.1.5.1. Copying window attributes
VisIt allows you to copy window attributes and plots from one window to another when you have more than one window. This can be useful when you are comparing plots generated from similar databases. The Copy menu, shown in Figure 6.5, contains options to copy the view, lighting, annotations, plots, or everything from other from other vis windows. Under each option, the Copy menu provides a list of available vis windows from which attributes can be copied so, for example, if you have two windows and you want to copy the view from vis window 1 into vis window 2, you can select the Window 2 option from the View from submenu. The list of available windows depends on the vis windows that you have created. You can copy the lighting from one window to another window by using the Lighting from submenu or you can use the Annotations from or Plots from to copy the annotations or plots, respectively. If you make a selection from the Everything from submenu, all attributes and plots are copied into the active vis window.
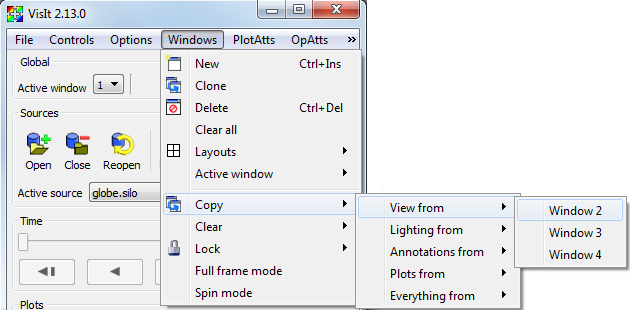
Fig. 6.5 Copy menu
6.1.5.2. Locking vis windows together
When you use VisIt to do side by side comparisons of databases, you may find is useful to lock vis windows together. Vis windows can be locked together in time so that when you change the active database timestep in one database, as when viewing an animation, all vis windows that are locked in time switch to the same database timestep. You can lock vis windows together in time by selecting the Time option from the Lock menu (see Figure 6.6) in the Main Window’s Windows menu. Any number of windows can be locked together in time and you can turn off time locking at any time.
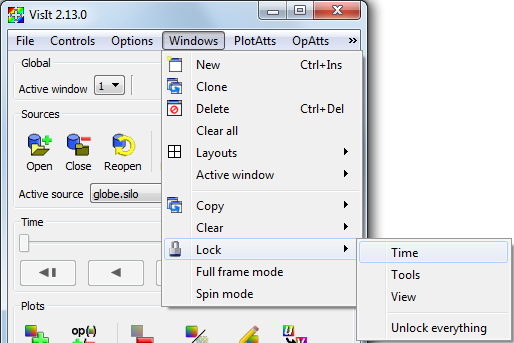
Fig. 6.6 Lock menu
You can also lock interactive tools together so that updating a tool in one window updates the tool in other windows that have enabled tool locking. This can be useful when you have sliced a database using the plane tool in more than one window and you want to be able to change the slice using plane tool in either window and have it affect the other vis windows. You can enable tool locking by selecting the Tools option from the Lock menu.
In addition to locking vis windows in time, or locking their tools together, you can also lock vis windows’ views together so that when you change the view in one vis window, other vis windows get the same view. When you change the view in a vis window that has view locking enabled, the view only effects other vis windows that also have view locking enabled and have plots of the same dimension. That is, when you change the view of a vis window that contains 3D plots, it will only have an effect on other locked vis windows if they have 3D plots. Vis windows that contain 2D plots are not affected by changing the view of a vis window containing 3D plots and vice-versa. When you enable view locking, the vis window snaps to the view used by other vis windows with locked views or it stays the same if no other vis windows have locked views. To enable view locking, select the View option from the Lock menu or click on the Lock view icon in the vis window’s Toolbar.