10.2. Keyframing
Keyframing is an advanced form of animation that allows you create animations where certain animation attributes such as view or plot attributes can change as the animation progresses. You can design an entire complex animation upfront by specifying a number of animation frames to be created and then you can tell VisIt which plots exist over the animation frames and how their time states map to the frames. You can also specify the plot attributes so they remain fixed over time or you can make individual plot and operator attributes evolve over time. With keyframing, you can make a plot fade out as the animation progresses, you can make a slice plane move, you can make the view slowly change, etc. Keyframe animations allow for quite complex animation behavior.
There is a video tutorial that demonstrates the process of creating a keyframing animation and saving it as a movie.
10.2.1. Keyframing Window
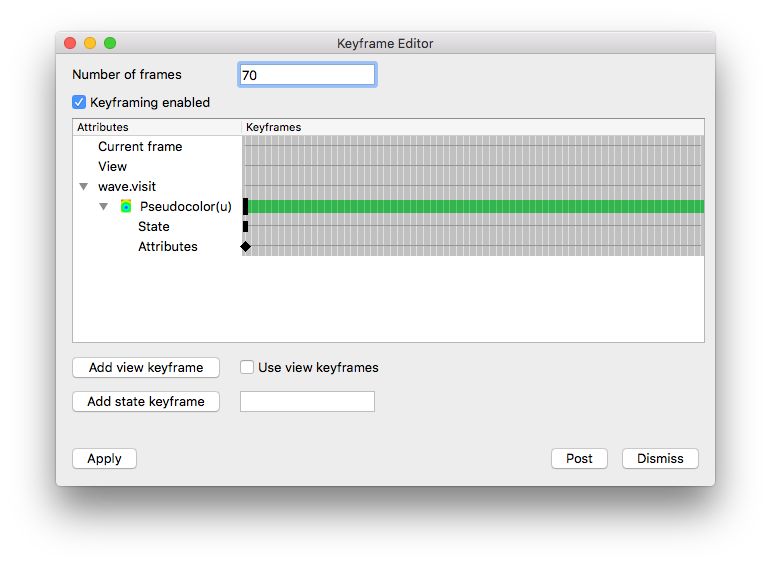
Fig. 10.4 Keyframing Window
Keyframe animations are designed using VisIt’s Keyframing Window (see Figure 10.4), which you can open by selecting the Keyframing option from the Controls menu. The window is dominated by the Keyframe area , which consists of many vertical lines that correspond to each frame in the animation and horizontal lines, or Keyframe lines , that correspond to the state attributes that are being keyframed. The horizontal lines are the most important because they allow you to move and delete keyframes and set the plot range, which is the set of animation frames over which the plot is defined.
10.2.1.1. Keyframing mode
To create a keyframe animation, you must first open the Keyframing Window and check the Keyframing enabled check box. When VisIt is in keyframing mode, a keyframe is created for the active animation state each time you set plot or operator attributes and time is set using the Animation time slider. The Animation time slider is a special time slider that is made active when you enter keyframing mode and the animation frame can only be set using it. Changing time using any other time slider results in a new database state keyframe instead of changing the animation frame.
If you have created plots before entering keyframing mode, VisIt converts them into plots that can be keyframed when you enter keyframing mode. When you leave keyframing mode, extra keyframing attributes associated with plots are deleted, the animation containing the plots reverts to a flipbook animation, and the Animation time slider is no longer accessible.
10.2.1.2. Setting the number of frames
When you go into keyframing mode for the first time, having never set a number of keyframes, VisIt will use the number of states in the active database for the number of frames in the new keyframe animation. The number of frames in the keyframe animation will vary with the length of the database with the most timestates unless you manually specify a number of animation frames, which you can do by entering a new number of frames into the Keyframing Window’s Number of frames text field. Once you enter a number of frames, the number of frames will not change unless you change it.
10.2.1.3. Adding a keyframe
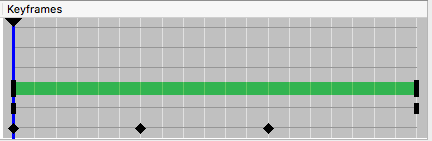
Fig. 10.5 Keyframe area
To add a keyframe, you must first have created some plots and put VisIt into keyframing mode by clicking the Keyframing enabled check box in the Keyframing Window . After you have plots and VisIt is in keyframing mode, you can add a keyframe by opening a plot’s attribute window, changing settings, and clicking its Apply button. To set a keyframe for a later frame in the animation, move the Keyframe time slider, which is located under the Keyframe area (see Figure 10.5), to a later time and change the plot attributes again. Each time you add a keyframe to the animation, a small black diamond, called a Keyframe indicator , will appear along the Keyframe line for the plot. When you play through the animation using any of VisIt’s animation controls, the plot attributes are calculated for each animation frame and they are used to influence how the plots look when they appear in the Viewer window.
10.2.1.4. Adding a database state keyframe
Each plot that exists at a particular animation frame must use a specific database state so the correct data will be plotted. When VisIt is in keyframing mode, the database state can also be keyframed so you can control the database state used for a plot at any given animation frame. The ability to set an arbitrary database state keyframe for a plot allows you to control the flow of time in novel ways. You can, for example, slow down time, stop time, or even make time flow backwards for a little while.
There are two ways to set database state keyframes in VisIt. The first way is to move the Keyframe time slider to the desired animation frame, enter a new number into the text field next to the Keyframe Window’s Add state keyframe button, and the click the Add state keyframe button. As an alternative, you can use the ** Main Window’s Time slider** to create a database state keyframe, provided the active time slider is not the Animation time slider. To set a database state keyframe using the Time slider , select a new database time slider from the Active time slider combo box and then change timestates using the Time slider . Instead of changing the active state for the plots that use the specified database, VisIt uses the information to create a new database state keyframe for the active animation frame.
10.2.1.5. Adding a view keyframe
In addition to being able to add keyframes for plot attributes, operator attributes, and database states, you can also set view keyframes so you can create sophisticated flybys of your data. To create a view keyframe, you must interactively change the view in the Viewer window using the mouse or specify an exact view in the View Window . Once the view is where you want it for the active animation frame, open the View Window and click the Make camera keyframe from view button on the Advanced tab in order to make a view keyframe. Once the view keyframe has been added, a keyframe indicator will be drawn in the Keyframing Window .
VisIt will not use view keyframes by default when you are in keyframing mode because it can be disruptive for VisIt to set the view while you are still adding view keyframes. Once you are satisfied with your view keyframes, click the Copy view from camera button on the Advanced tab in the View Window in order to allow VisIt to set the view using the view keyframes when you change animation frames.
10.2.1.6. Deleting a keyframe
To delete a keyframe, move the mouse over a Keyframe indicator and right click on it with the mouse once the indicator becomes highlighted.
10.2.1.7. Moving a keyframe
To move a keyframe, move the mouse over a Keyframe indicator , click the left mouse button and drag the Keyframe indicator left or right to a different animation frame. If at any point you drag the Keyframe indicator outside of the green area, which is the plot time range, and release the mouse button, moving the keyframe is cancelled and the Keyframe indicator returns to its former animation frame.
10.2.1.8. Changing the plot time range
The plot time range determines when a plot appears or disappears in a keyframed animation. Since VisIt allows plots to exist over a subset of the animation frames, you can set a plot’s plot range in the Keyframe area to make a plot appear later in an animation or be removed before the animation reaches the last frame. You may find it useful to set the plot range if you have increased the number of animation frames but found that the plot range did not expand to fill the new frames. To change the plot time range, you left-click on the beginning or ending edges of the Plot time range (the green band on the Keyframe line ) in the Keyframe area and drag it to a new animation frame.