13.2. Host Profiles
When VisIt launches a component on a remote computer, it looks for something called a host profile. A host profile contains information that VisIt uses to launch components on a remote computer. Host profiles allow you to specify information like the remote username, the number of processors, the parallel launch method, etc. You can have multiple launch profiles for any given host, most often a serial profile and one or more parallel profiles.
13.2.1. Host profiles window
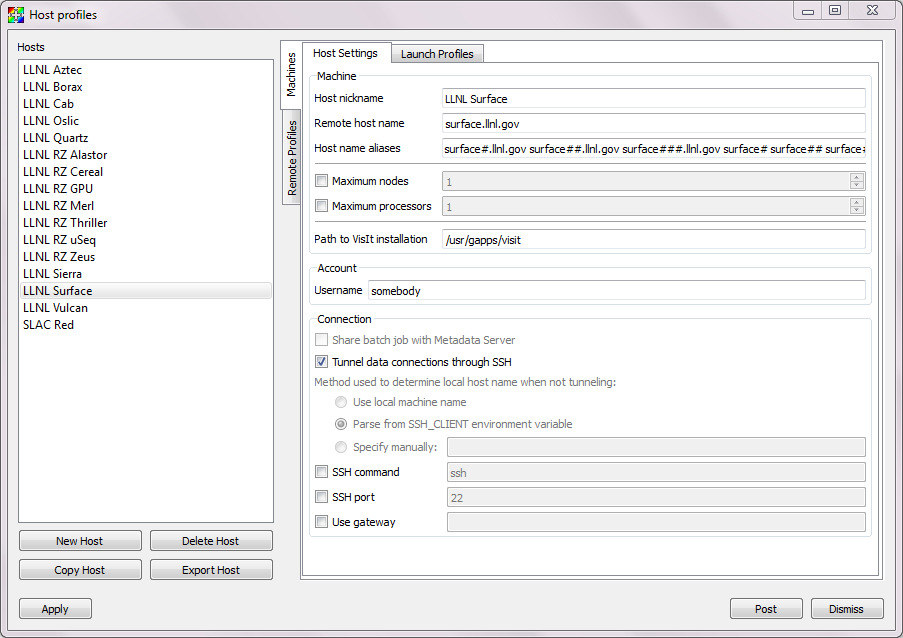
Fig. 13.5 Host profiles window
VisIt provides a Host profiles window, shown in Figure 13.5, that you can use to manage your host profiles. You can open the Host profiles window by choosing Host profiles from the Options dropdown menu. The Host profiles window is divided into two main areas. The left area contains a list of host profiles currently installed, as well as controls to create, delete, copy and export profiles. The right area contains two vertical tabs: Remote Profiles, used for installing profiles retrieved from a remote location; and Machines, which displays all attributes for the selected host profile. The Remote Profiles tab is useful for obtaining profiles that were not installed with VisIt. Machines has two sections contained in tabs displayed horizontally across the top: Host Settings and Launch Profiles. The Host Settings tab displays information for the selected machine, including the nickname, the full host name, aliases, the username, and connection information. The Launch Profiles tab displays a list of available profiles in the top section, and information for the selected launch profile in tabs on the bottom.
If the Hosts section in the left pane of the Host profiles window has no hosts listed, you have two options for installing already generated profiles. The first is to install one or more of the pre-defined host profiles shipped with VisIt while the second is to install one or more of the pre-defined host profiles from the VisIt repository. See Installing pre-defined host profiles shipped with VisIt and Installing pre-defined host profiles from the VisIt repository.
Click Apply when you are finished making changes in this window, and remember to save your settings (How to Save Settings) before exiting VisIt in order for your changes to be available in future sessions of VisIt.
13.2.1.1. Creating a new host profile
You click the New Host button to create a new host profile. The host profile will have a default name corresponding to the machine on which you are running VisIt. When you change the Host nickname the new name will be reflected in the Hosts list. See Setting general options, Managing launch profiles and Setting parallel options for more information on the available settings.
13.2.1.2. Deleting a host profile
If a host profile is no longer useful, you can click on it in the hosts list to select it and then click the Delete Host button to delete it.
13.2.1.3. Copying a host profile
To copy a host profile, select the desired source host from the Hosts list,
then click the Copy Host button at the bottom of the Hosts list. A new
host profile called Copy of XXX (where XXX is the name of the host you
chose to copy) will be added to the Hosts list. Select this new host
from the list and modify it’s Host Settings and Launch Profiles
appropriately. Once you change the Host nickname the new name will be
reflected in the Hosts list.
13.2.1.4. Exporting a host profile
The Export Host button is useful for saving a host profile installed on
your machine to share with someone else. Select the host profile you wish to
export, and click the Export Host button. The exported host will be saved
to your user VisIt directory (~/.visit/hosts on Linux). The name of the host
profile file will start with hosts_, followed by the Host nickname,
where letters are all converted to lower case and blanks are converted to
underscores, followed by “.xml”.
To share the host profile with someone else have them copy the host profile
to their VisIt directory. It is recommended that you don’t change the name
of the file, but if you do, be aware that VisIt will only recognize it as
a host profile if it starts with hosts_ of HOSTS_ and ends with
.xml or .XML.
13.2.2. Setting general options
The Host Settings tab allows you to set general attributes for all launch profiles on the host.
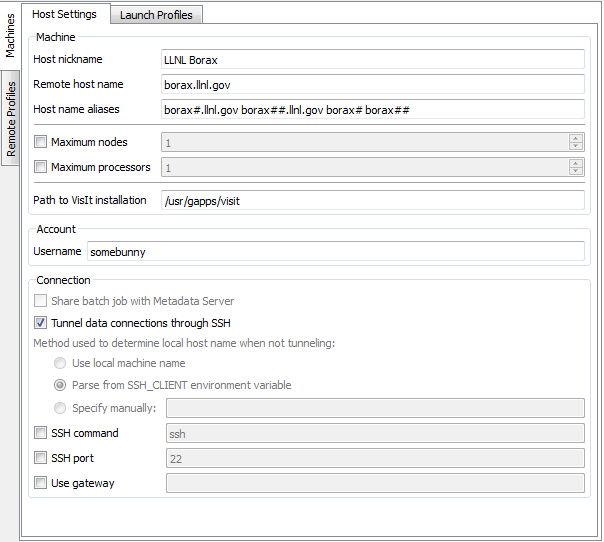
Fig. 13.6 Host Settings tab
13.2.2.1. Host nickname
Change the Host nickname to the name as you would like it to appear in the Hosts list in the left pane.
13.2.2.2. Remote host name
The Remote host name should be the fully qualified host name (hostname.domain.net).
13.2.2.3. Host name aliases
Some clustered systems have one overall host name but also have names for
the individual compute nodes that comprise the system. The compute nodes
are often named by appending the node number to the host name. For example,
if the clustered system is called cluster, you might be logged into node
cluster023. When you launch a remote component, VisIt will not find any
host profiles if the host name in the host profiles is: cluster.
To ensure that VisIt correctly matches a computer’s node name to one of
VisIt’s host profiles, you should include host name aliases in the host profile
for a clustered system. Host name aliases typically consist of the host name
with different wildcard characters appended to it. Three wildcards are
supported. The ? wildcard character lets any one character replace
it while the * wildcard character lets any character or group of
characters replace it and the # wildcard character lets any numeric
digit replace it. Appropriate host aliases for the previous example would be:
cluster#, cluster## , cluster###, etc. If you need to enter host
name aliases for the host profile, type them into the Host name aliases
text field.
13.2.2.4. Maximum nodes/processors
If the host has a maximum number of nodes and/or processors that can be allocated, these can be specified by checking the Maximum nodes or Maximum processors checkboxes and entering a number in the corresponding text fields.
13.2.2.5. Path to VisIt installation
Most of the host profiles that are installed with VisIt specify the expected
installation directory for VisIt so VisIt does not have to be in your path on
remote computers. Enter the path to VisIt on the host in the
Path to VisIt installation text field. It should be the full path up-to
but not including the bin directory.
13.2.2.6. Account
The remote user name is the name of the account that you want to use when you access the remote computer. The remote user name does not have to match your local user name and it is often the case that your desktop user name will not match your remote user name. To change the remote user name, type a new user name into the Username text field.
13.2.2.8. Determining the host name
There are many different network naming schemes and each major operating system type seems to have its own variant. While being largely compatible, the network naming schemes sometimes present problems when you attempt to use a computer that has one idea of what its name is with another computer that may use a somewhat different network naming scheme. Since VisIt users are encouraged to use client-server mode because it provides fast local graphics hardware without sacrificing computing power, VisIt must provide a way to reconcile the network naming schemes when 2 different computer types are used.
Workstations often have a host name that was arbitrarily set when the computer was installed and that host name has nothing to do with the computer’s network name, which ultimately resolves to an IP address. This condition is common on computers running MS Windows though other operating systems can also exhibit this behavior. When VisIt launches a component on a remote computer, it passes information that includes the host name of the local computer so the remote component will know how to connect back to the local computer. If the local computer did not supply a valid network name then the remote component will not be able to connect back to the local computer and VisIt will wait for the connection until you click the Cancel button in the Launch progress window.
By default, VisIt tunnels data connections through SSH. If you don’t want to
tunnel, or SSH tunneling is not working you can turn it off by unchecking
Tunnel data connections through SSH in the Connection section. If you
want VisIt to rely on the name obtained from the local computer, click on
Use local machine name. If you choose the
Parse from SSH_CLIENT environment variable option then VisIt will not pass
a host name for the local computer but will instead tell the remote computer
to inspect the SSH_CLIENT environment variable to determine the IP address
of the local computer that initiated the connection. This option usually works
if you have a local computer that does not accurately report its host name. If
you don’t trust the output of any implicit scheme for getting the local
computer’s name, you can provide the name of the local computer by typing its
name or IP address into the text field next to the Specify manually radio
button.
13.2.2.9. SSH command
VisIt uses ssh for its connections to remote computers. On Windows, VisIt
packages its own putty-based ssh program: qtssh.exe. Regardless of the
system, you can override VisIt’s SSH by clicking the SSH command checkbox
and entering the full path to the ssh command you want to use in the text box.
13.2.2.10. SSH port
VisIt uses secure shell (ssh) to launch its components on remote computers. Secure shell often uses port 22 but if you are attempting to communicate with a computer that does not use port 22 for ssh then you can specify a port for ssh by clicking the SSH port check box and then typing a new port number into the adjacent text field.
In addition to relying on remote computers’ ssh port, VisIt listens on its own ports (5600-5605) while launching components. If your desktop computer is running a firewall that blocks ports 5600-5605 then any remote components that you launch will be unable to connect back to the viewer running on your local computer. If you are not able to successfully launch VisIt components on remote computers, be sure that you make sure your firewall does not block VisIt’s ports. Windows’ default software firewall configurations block VisIt’s ports so if you run those software firewall programs, you will have to unblock VisIt’s ports if you want to run VisIt in client-server mode.
13.2.2.11. Gateway
If access to the compute nodes on your remote cluster is controlled by a gateway computer, then check the Use gateway checkbox, and enter the fully qualified name of the gateway computer in the text field. In order for VisIt to tunnel SSH connections through the gateway computer, passwordless-ssh needs to be set up from the gateway computer to the hose where you ultimately want to run VisIt. See Setting Up Password-less SSH for instructions on how to do this.
13.2.3. Managing launch profiles
The Launch Profiles tab (Figure 13.7) displays the launch profiles available for the selected host, generally a serial profile and one or more parallel profiles. There are controls for creating, deleting and copying launch profiles as well as tabs for setting the launch profile attributes.
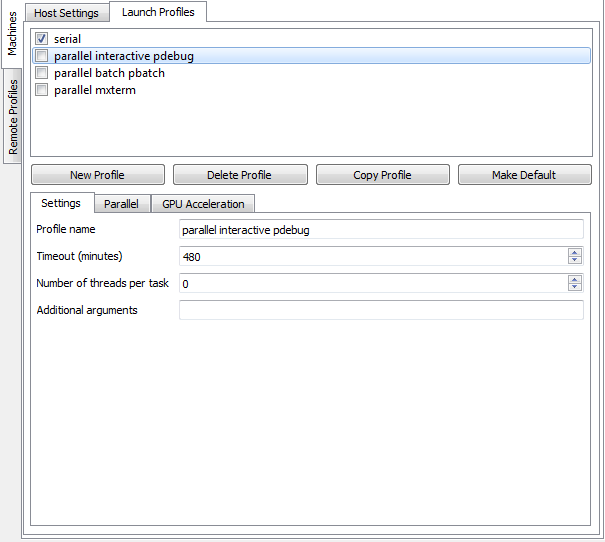
Fig. 13.7 Launch Profiles tab
13.2.3.1. Creating a new launch profile
Click the New Profile button. Give the profile an appropriate name by filling in the Profile name text box. The new name will be reflected in the profiles list as soon as it is entered. After filling out all the necessary attributes, click Apply in the lower left corner of the window in order to use the new profile immediately. The new profile to be available in future sessions of VisIt.
13.2.3.2. Deleting a launch profile
Select the profile to be deleted by clicking on its name in the list, then click the Delete Profile button. If you have made a mistake in deleting the profile, you must exit VisIt and restart. Saving your settings will make the change permanent for future sessions.
13.2.3.3. Activating a launch profile
Only one launch profile can be active for any given host. When VisIt launches a remote component, it looks for the active launch profile for the host where the component is to be launched. The currently active launch profile is the one with the box to the left of the name checked in the list of launch profile names. To activate a different launch profile, select it from the list and click the Apply button. The VCL and the metadata server use the active launch profile but VisIt will prompt you for a launch profile to use before launching a compute engine if you have more than one launch profile or your only launch profile has parallel options set for the compute engine.
13.2.3.4. Setting the timeout
The compute engine and metadata server have a timeout mechanism that causes them to exit if no requests have been made of them for a certain period of time so they do not run indefinitely if their connection to VisIt’s viewer is severed. You can set this period of time, or timeout, by typing in a new number of minutes into the Timeout text field. You can also increase or decrease the timeout by clicking on the up and down arrows next to the Timeout text field.
13.2.3.5. Setting the number of threads
If VisIt is running in threading mode, the number of threads per task can be set by typing in the desired number of threads in the Number of threads per task text field, or by utilizing the up and down arrows next to the text field.
13.2.3.6. Providing additional command line options
The Launch Profiles tab allows you to provide additional command line options to the compute engine and metadata server through the Additional arguments text field. When you provide additional command line options, you should type them, separated by spaces, into the Additional arguments text field. Command line options influence how the compute engine and metadata server are executed. For more information on VisIt’s command line options, see Startup Options.
13.2.4. Setting parallel options

Fig. 13.8 Parallel options
The chief purpose of host profiles is to make launching compute engines easier. This is even more the case when host profiles are used to launch parallel compute engines on large computers that often have complex scheduling programs that determine when parallel jobs can be executed. It is easy to forget how to use the scheduling programs on a large computer because each scheduling program requires different arguments. In order to make launching compute engines easy, VisIt hides the details of the scheduling program used to launch parallel compute engines. VisIt instead allows you to set some common parallel options and then figures out how to launch the parallel compute engine on the specified computer using the parallel options specified in the host profile. Furthermore, once you create a host profile that works for a computer, you rarely need to modify it.
To enable parallel options open the Parallel tab of the Launch Profiles tab, and click the Launch parallel engine checkbox.
13.2.4.1. Setting the parallel launch method
The parallel launch method option allows you to specify which launch program should be used to execute the parallel compute engine. This setting depends on the computer where you plan to run the compute engine and how the computer is configured. Some computers have multiple launch programs depending on which part of the parallel machine you want to use. Figure 13.9 shows some common parallel-launch options that VisIt currently supports.
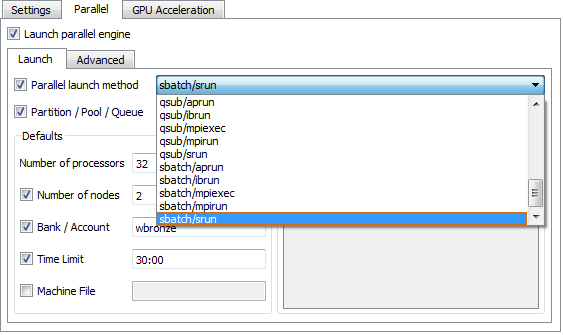
Fig. 13.9 Parallel launch method options
13.2.4.2. Setting the partition/pool/queue
Some parallel computers are divided into partitions so that batch processes might be executed on one part of the computer while interactive processes are executed on another part of the computer. You can use launch profiles to tell VisIt which partition to use when launching the compute engine on systems that have multiple partitions. To set the partition, check the Partition/Pool/Queue check box and type a partition name into the text field.
13.2.4.3. Setting the number of processors
You can set the number of processors by typing a new number of processors into the Number of processors text field in the Defaults section. When the number of processors is greater than 1, VisIt will attempt to run the parallel version of the compute engine. You can also click on the up and down arrows next to the text field to increase or decrease the number of processors. If VisIt finds a parallel launch profile, you will have the option of changing the number of processors before the compute engine is actually launched.
13.2.4.4. Setting the number of nodes
The number of nodes refers to the number of compute nodes that you want to reserve for your parallel job. Each compute node typically contains more than one processor (often 2, 4, 16) and the number of nodes required is usually the ceiling of the number of processors divided by the number of processors per node. It is only necessary to set the number of nodes if you want to use fewer processors than the number of processors that exist on a compute node. This option is not available on some computers as it is meant primarily for compute clusters. To set the number of nodes, check the Number of nodes check box and type a new number into the text field.
13.2.4.5. Setting the default bank
Some computers, if they are large enough, have scheduling systems that break up the number of processors into banks, which are usually reserved for particular projects. Users who contribute to a project take processors from their default bank of processors. By default, VisIt uses environment variables to get your default bank when submitting a parallel job to the batch system. If you want to override those settings, you can click the Bank/Account check box to turn it on and then type your desired bank into the text field next to the check box.
13.2.4.6. Setting the parallel time limit
The parallel time limit is the amount of time given to the scheduling program
to tell it the maximum amount of time, usually in minutes, that your program
will be allowed to run. The parallel time limit is one of the factors that
determines when your compute engine will be run and smaller time limits often
have a greater likelihood of running before jobs with large time limits. To
specify a parallel time limit, click the Time Limit check box and
enter a number of minutes or hours into the text field. If you want to
specify minutes, be sure to append m to the number or append an h
for hours. If you want to specify a timeout of 30 minutes, you would
type: 30m.
13.2.4.7. Specifying a machine file
When using VisIt with some versions of MPI on some clustered computers, it may be necessary to specify a machine file, which is a file containing a list of the compute nodes where the VisIt compute engine should be executed. If you want to specify a machine file when you execute VisIt in parallel on a cluster that requires a machine file, click on the Machine File check box and type the name of the machine file that you want to associate with your host profile into the text field.
13.2.4.8. Specifying constraints
Some machines constrain the processor-to-node ratio. In order to prevent accidentally requesting nodes/processors outside those constraints, they can be entered in table form by clicking the Constraints checkbox to enable the controls. Click Add row to add a new row to the table, and Delete row to remove a row from the table. For each row, enter number of nodes and appropriate associated number of processors in appropriate columns. When the launch engine dialog pops up, users won’t be able to specify node-processor combinations outside of the constraints.
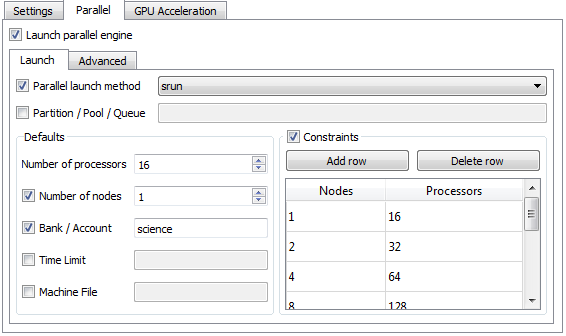
Fig. 13.10 Parallel launch constraints
13.2.5. Advanced host profile options
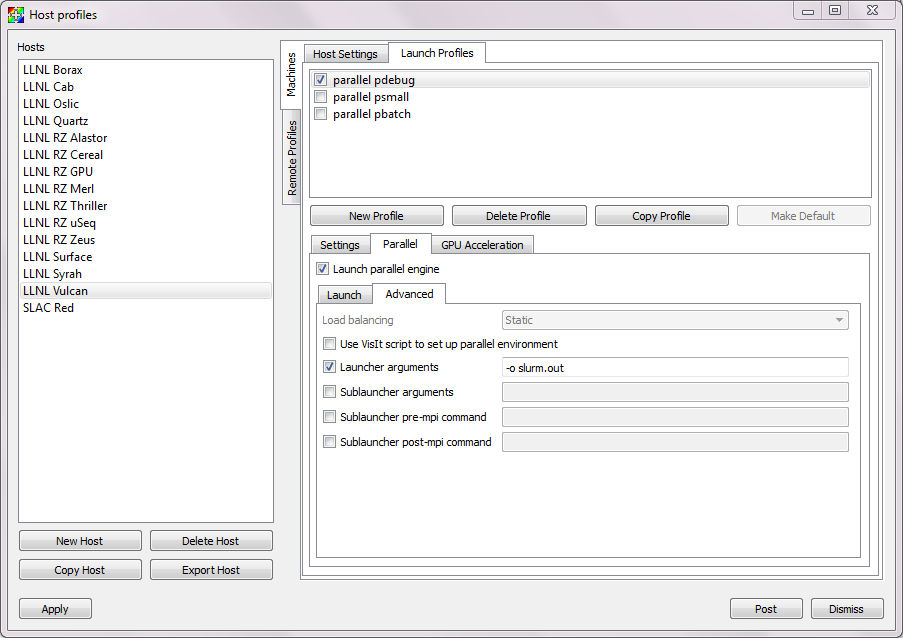
Fig. 13.11 Advanced options tab
The Advanced tab (see Figure 13.11) in the Launch Profiles tab lets you specify advanced networking options to ensure that the VisIt components running on the remote computer use resources correctly and can connect back to the viewer running on your local workstation.
13.2.5.1. Load balancing
Load balancing refers to how well tasks are distributed among computer processors. The goal is to make each computer processor have roughly the same amount of work so they all finish at the same time. VisIt’s compute engine supports two forms of load balancing. The first form is static load balancing where the entire problem is distributed among processors and that distribution of work never changes. The second form of load balancing is dynamic load balancing. In dynamic load balancing, the work is redistributed as needed each time work is done. Idle processors independently ask for work until the entire task is complete. VisIt allows you to specify the form of load balancing that you want to use. You can choose to use static or dynamic load balancing by clicking the Static or Dynamic radio buttons. There is also a default setting that uses the most appropriate form of load balancing.
13.2.5.2. Setting up the parallel environment
VisIt is usually executed by a script called: visit, which sets up the
environment variables required for VisIt to execute. When the visit script is
told to launch a parallel compute engine, it sets up the environment variables
as it usually does and then invokes an appropriate parallel launch program that
takes care of either spawning the VisIt parallel compute engine processes or
scheduling them to run in a batch system. When VisIt is used with some versions
of MPI on some clusters, the parallel launch program does not replicate the
environment
variables that the visit script set up, preventing the VisIt parallel compute
engine from running. On clusters where the parallel launch program does not
replicate the VisIt environment variables, VisIt provides an option to start
each process of the VisIt compute engine under the visit script. This ensures
that the environment variables that VisIt requires in order to run are indeed
set up before the parallel compute engine processes are started. To enable this
feature, click on the Use VisIt script to set up parallel environment
check box.
13.2.5.3. Setting launcher arguments
In addition to choosing a launch program, you can also elect to give it additional command line options to influence how it launches your compute engine. To give additional command line options to the launch program, click the Launcher arguments check box and type command line options into the text field to the right of that check box.
13.2.5.4. Setting sublauncher options
To give additional command line options to the sublauncher program, click the Sublauncher arguments, Sublauncher pre-mpi command or Sublauncher post-mpi command check box and type options into the text field to the right of that check box.
13.2.5.5. Installing pre-defined host profiles shipped with VisIt
The Setup Host Profiles And Configuration window is used to install pre-defined host profiles that are shipped with VisIt. It can be accessed from the Options dropdown. It will list all the pre-defined host profiles shipped with the installation, listed according to location. From the list, you can choose one or more locations and all the host profiles for the selected locations will be installed. However, you will need to exit and restart VisIt for them to become available for use. With this window, you can also specify a default configuration for VisIt to use. Don’t forget to click Install before dismissing the window. (Figure 13.12)

Fig. 13.12 The Host Profile Configuration Window
13.2.5.6. Installing pre-defined host profiles from the VisIt repository
The Remote Profiles tab can be used to install pre-defined host profiles from the VisIt repository. The advantage to using the VisIt repository is that it may have additional host profiles defined after a particular release of VisIt was released. To do so, click on the Remote Profiles vertical tab in the middle of the Host Profiles window. The top section of the tab allows you to choose the remote location (currently, only VisIt’s repository is available).
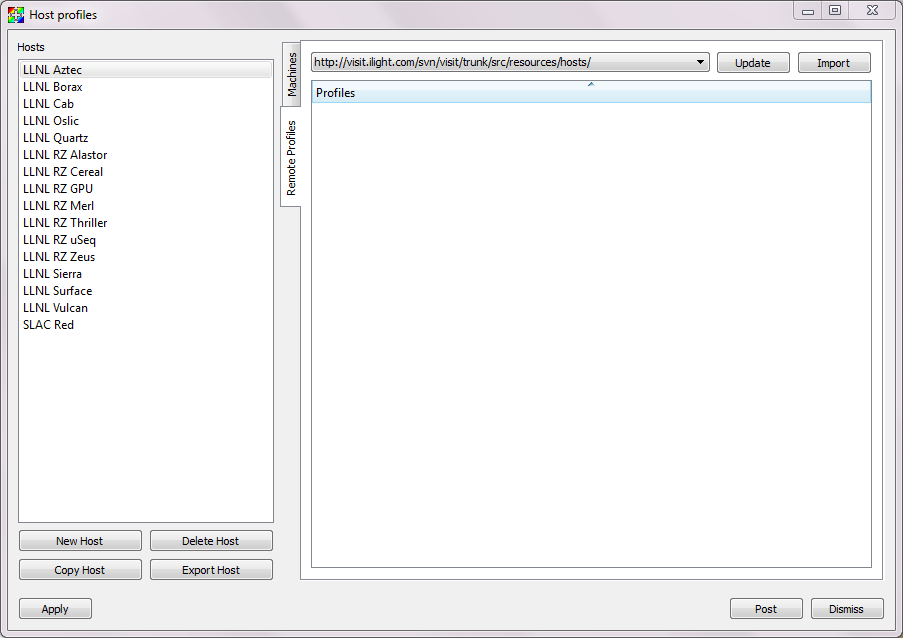
Fig. 13.13 Remote Profiles tab
If you click the Update button, the list of host profiles available from the remote location will be displayed. (Figure 13.14)
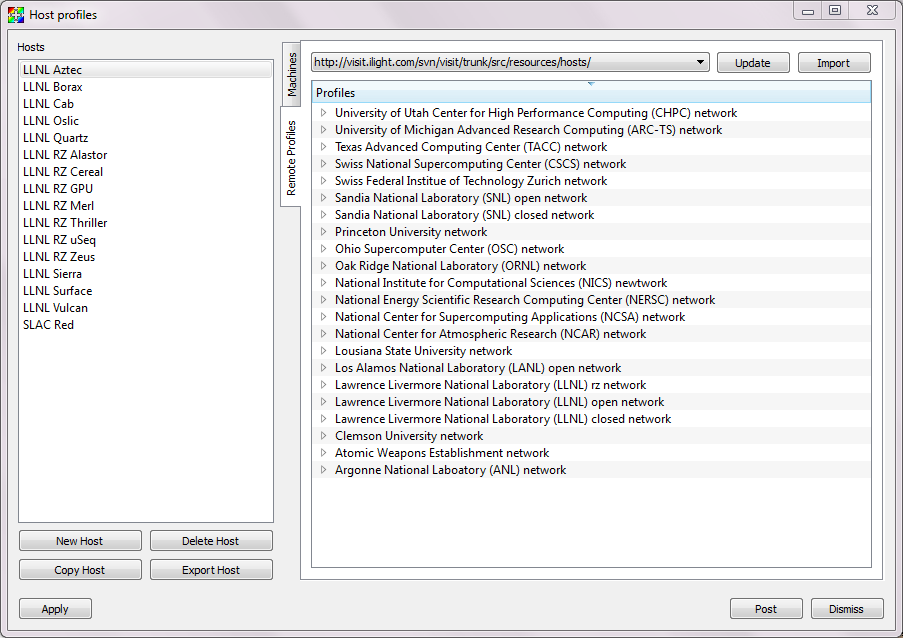
Fig. 13.14 Remote Profiles tab with updated content
Scroll through the list, clicking on the arrow next to a location to view the profiles available for that location, then highlight a profile and click the Import button. (Figure 13.15) The selected host profile will now show up in the hosts list in the left pane.
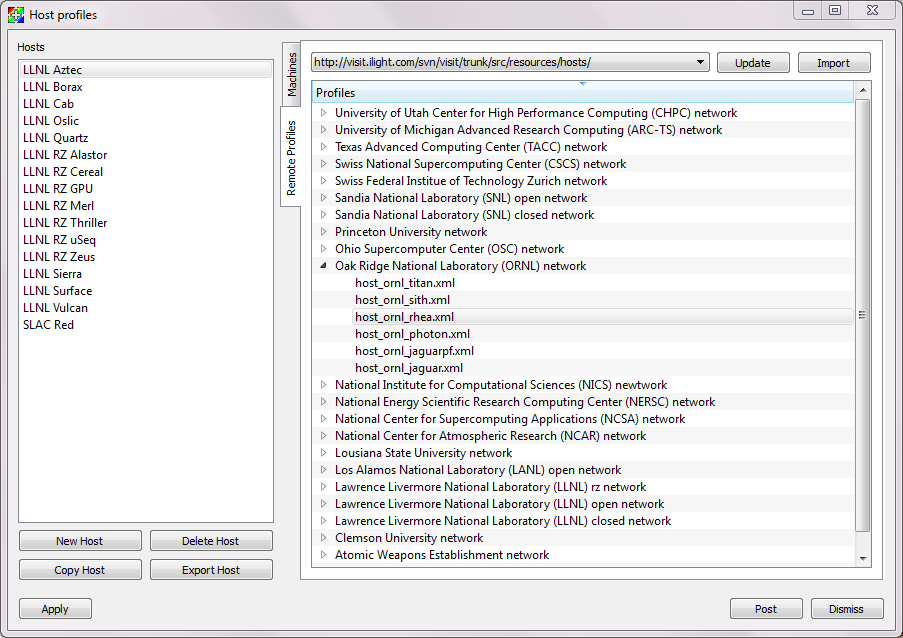
Fig. 13.15 Remote Profiles tab with host selected for import
It is important to save your settings before exiting VisIt in order to save the newly imported host profiles for future sessions.
13.2.6. Engine launch options window
The engine launch options window, shown in (Figure 13.16), is used to pick a launch profile to use when there are multiple launch profiles for a host or if there are any parallel launch profiles. When there is a single serial host profile or no host profiles, the window is not activated and VisIt launches a serial compute engine. The window’s primary purpose is to select a launch profile and set some parallel options such as the number of processors. This window is provided as a convenience so host profiles do not have to be modified each time you want to launch a parallel engine to run with a different number of processors.
The engine launch options window has a list of launch profiles from which to choose. The active profile for the host is selected by default though another profile can be used instead. Once a launch profile is selected, the parallel options such as the number of processors/nodes, processor count, can be changed to fine-tune how the compute engine is launched. After making any changes, click the window’s OK button to launch the compute engine. Clicking the Cancel button prevents the compute engine from being launched.
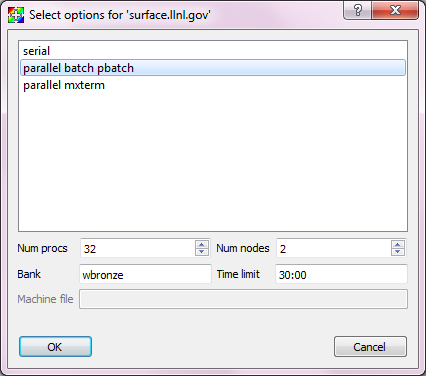
Fig. 13.16 Engine launch options window
13.2.6.1. Setting the number of processors
The number of processors determines how many processors are used by VisIt’s compute engine. Generally, a higher number of processors yields higher performance but it depends on the host platform and the database being visualized. The Num procs text field initially contains the number of processors used in the active host profile but you can change it by typing a new number of processors. The number of processors can also be incremented or decremented by clicking the up/down buttons next to the text field.
13.2.6.2. Setting batch queue options
Many compute environments schedule parallel jobs in batch queues. The engine launch options window provides a few controls that are useful for batch queue systems. The first option is the number of nodes which determines the number of smaller portions of the computer that are allocated to a particular task. Typically the number of processors is evenly divisible by the number of nodes but the window allows you to specify the number of nodes such that not all processors within a node need be active. You can set the number of nodes, by typing a new number into the Num nodes text field or you can increment or decrement the number by clicking on the arrow buttons to the right of the text field. The second option is the bank which is a large collection of nodes from which nodes can be allocated. To change the bank, you can type a new bank name into the Bank text field. The final option that the window allows to be changed is the time limit. The time limit is an important piece of information to set because it can help to determine when the compute engine is scheduled to run. A smaller time limit can increase the likelihood that a task will be scheduled to run sooner than a longer running task. You can change the time limit by typing a new number of minutes into the Time limit text field.
13.2.6.3. Setting the machine file
Some compute environments use machine files, text files that contain the names of the nodes to use for executing a parallel job, when running a parallel job. If you are running VisIt in such an environment, the engine launch options window provides a text field called Machine file. The Machine file text field allows you to enter the name of a new machine file if you want to override which machine file is used for the selected host profile.