5.4. Saving Cinema
VisIt lets you save Cinema databases in addition to saving images and movies of your plots. A Cinema database is an image-based proxy for large scale data that lets you explore the data using far fewer computational resources. Where post-processing full data might take a supercomputer, exploring a Cinema database can be done on a tablet. Cinema databases consist of images that are indexed by a JSON file or CSV file. The index file is used by the Cinema viewer (available at www.cinemascience.org) to determine a set of parameters that can be changed by the user. These parameters are used to look up corresponding image files for display in the Cinema viewer. For example, Cinema databases typically allow the user to navigate through time using a time parameter. Cinema databases also can be saved using a spherical camera that is described by phi and theta parameters to let the user see the plots from various camera angles. It is possible to create Cinema databases in situ using Libsim so Cinema databases can be created incrementally as a simulation runs. This section introduces the Save Cinema wizard and explains how to create Cinema databases from within VisIt’s GUI.
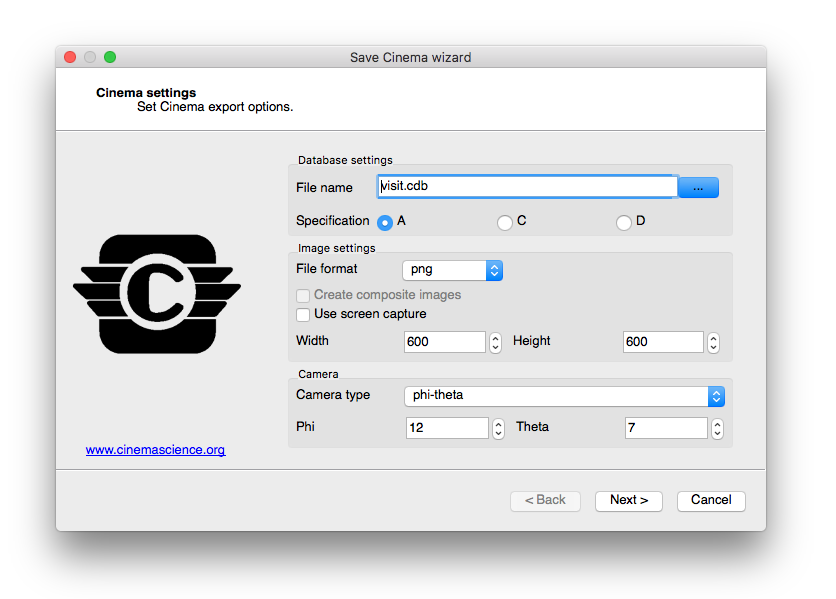
Fig. 5.31 Save Cinema wizard (screen 1)
The Save Cinema wizard (see Figure 5.31) is available in the Main Window’s Files menu. The Save Cinema wizard’s purpose is to let you set the options that are used to take the current visualizations and produce a Cinema database. Progress through the screens using the Next button until the last screen is reached. Clicking Cancel at any time will close the wizard. Clicking the Finish button will tell VisIt to produce a Cinema database with the current settings.
5.4.1. Choosing filename
Cinema databases are stored as a directory structure containing various nested directories with image files and an index file. When saving a Cinema database, you must pick the name of the top level directory under which all other files will be saved. The Save Cinema wizard contains a File name selection control that lets you select the name of the Cinema “.cdb” directory. The control can accept file names that are typed in and clicking the … button opens a filename selection window that permits a new filename to be selected.
5.4.2. Choosing specification
Cinema databases are described by specifications that dictate the format and allowable contents for the files that they contain. There are currently 3 Cinema specifications in use: A, C, D.
Specification A describes a Cinema database format that contains image files (PNG, TIFF, etc.) that are associated with various user-defined parameters such as time or camera angles in the case of a phi-theta camera. This specification is compatible with any of the VisIt plots since images of the currently set up visualizations are saved. Specification C describes a Cinema database format that adheres to a different directory structure over specification A and can contain composite images. Composite images are comprised of 3 separate files: a PNG file containing a luminance image, a ZLib-compressed file containing the Z-buffer, and a ZLib-compressed file containing a rendering of actual scalar values for the plot. Specification D is similar to specification A except that it uses a CSV file to associate image files with a set of parameters, enabling sparse sets of images.
The Save Cinema wizard contains a set of A, C, D radio buttons to let you choose the most appropriate specification for the type of Cinema database to be created.
5.4.3. Image settings
The Save Cinema wizard contains controls for image settings such as the file format, image width/height, and whether to use screen capture. The File format control lets you select the image file format to be used. Several pixel-based image file formats are available such as BMP, PNG, TIFF, and when available EXR. OpenEXR is a format from ILM that can store various image channels and data in multiple layers that can be composited later. Support for OpenEXR is optionally compiled into VisIt. The Width and Height controls allow the output image width and height to be specified when screen capture is not in use by setting the Use screen capture controls. This permits VisIt to save images in a custom size as opposed to saving images based on the current visualization window’s size. Note that using screen capture is faster for normal images since it does not require VisIt to re-render the visualizations.
5.4.4. Composite images
Specification C Cinema databases support saving composite images which consist of a luminance image, a Z image, and a scalar image. The luminance image is a gray scale image that indicates the lighting used in the scene and it is saved as a PNG image or other pixel format image. The Z image is contains the Z-buffer for the luminance image, stored as a buffer of 32-bit floating point values that have been ZLib-compressed and written to a raw binary file. The scalar image is stored the same as the Z buffer image but it contains float values that correspond to the actual scalars that were rendered in the visualization. The scalar values are used in the Cinema viewer to dynamically recolor the scene at render time. Composite images are most appropriate for surface-based VisIt plots that employ a continuous color table, such as the Pseudocolor plot. Composite images can be enabled by turning on the Create composite images check box in the Save Cinema wizard when specification C is used. When this setting is in effect, each VisIt plot will be saved to a separate “layer” in the Cinema database so it can be composited into the scene at will. Figure 5.33 shows multiple VisIt plots that have been saved as separate layers to a composite image specification C Cinema database that enables layers to be turned on and off at view time.

Fig. 5.32 Cinema viewer with composite layers
5.4.5. Choosing Camera type
Cinema databases support multiple camera types. VisIt’s Cinema export supports static cameras and phi-theta cameras. A static camera corresponds to the view that is currently in effect in the visualization and when it is used, all time states in the Cinema database will be viewed from that camera orientation. A phi-theta camera defines 2 angles, phi and theta, that define the view direction as in a spherical coordinate system. When a phi-theta camera is used, the Cinema export will save the visualization from a multitude of different camera orientations. This allows the user later in the Cinema viewer to interactively rotate around the object much as though the object was live instead of just a collection of image frames. The camera type can be selected using the Camera type control in the Save Cinema wizard and either static or phi-theta cameras can be selected. When a phi-theta camera is selected, the number of camera angles in the phi and theta dimensions can be set using the Phi and Theta controls.
5.4.6. Frame settings
The second tab in the Save Cinema wizard (see Figure 5.33) contains controls that select the range and stride of timestates that will be included in the Cinema database. Use the Frame start controls to select the beginning timestate for the Cinema database. A value of zero corresponds to the first timestate. Use the Frame end controls to set the last timestate that will be included in the Cinema database. Finally, use the Frame stride controls to set the stride that will be used between the start and end timestates, which is useful when making shorter preview databases that vary over time but do not include all timestates.
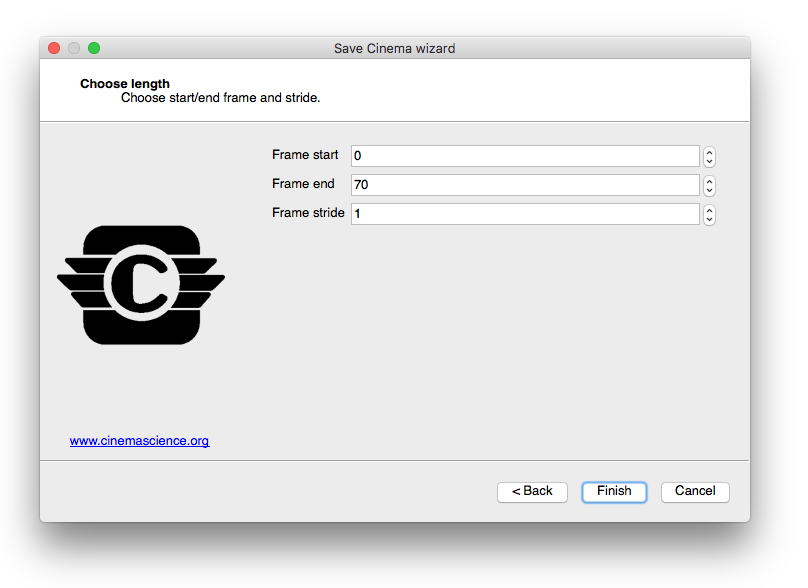
Fig. 5.33 Save Cinema wizard (screen 2)
5.4.7. Saving Cinema from Libsim
It is possible to use VisIt’s Libsim to directly save Cinema databases in situ
from an instrumented simulation. This means that the Cinema database can be generated
incrementally as the simulation runs, making it possible to periodically check
in on the simulation by viewing the Cinema database. To add Cinema support to
a simulation instrumented with Libsim, there are 3 calls that need to be made.
First, the simulation must call VisItBeginCinema, which passes the parameters
that describe the Cinema database format and returns a handle to a Cinema object.
Next, the simulation must call VisItSaveCinema to make Libsim generate and
add the appropriate images to the Cinema database, taking into account the type
of camera being used. The VisItSaveCinema function can be called repeatedly
to add new timestates to the Cinema database. It is the simulation’s responsibility
to make Libsim calls that set up VisIt plots or restore a session so there are
plots when VisItSaveCinema is called. Finally, the simulation must call
VisItEndCinema to close out the Cinema database context and free associated
memory. A working example can be found in the
batch simulation example
in VisIt’s simulation directory. The overall call structure for creating a Cinema
database looks something like this:
visit_handle h = VISIT_INVALID_HANDLE;
visit_handle hvar = VISIT_INVALID_HANDLE;
double time_value = 0.;
VisItBeginCinema(&h, "visit.cdb", VISIT_CINEMA_SPEC_A, 0,
                 VISIT_IMAGEFORMAT_PNG, 800, 800,
                 VISIT_CINEMA_CAMERA_PHI_THETA, 12, 7,
                 hvar);

while(1) /* Simulation main loop */
{
    /* Compute... */

    VisItSaveCinema(h, time_value);

}

VisItEndCinema(h);
The above code example will generate a Cinema database using the plots that have
been set up elsewhere using Libsim. Since Cinema output may sometimes serve
as the only simulation data product, it can be useful to save out additional
variables. The last argument to VisItBeginCinema is a handle to a name
list object. When the handle is set to VISIT_INVALID_HANDLE, there is
no name list and the argument does nothing. If instead, the name list is
created and filled with a list of variable names from the simulation, the
VisIt plots will have their variables changed to the variables in the name
list and Libsim will generate a Cinema database with images for each
variable. The variable becomes a parameter in the Cinema viewer. A name list
object is created and populated like this:
visit_handle hvar;
VisIt_NameList_alloc(&hvar);
VisIt_NameList_addName(hvar, "pressure");
VisIt_NameList_addName(hvar, "rho");
VisIt_NameList_addName(hvar, "energy");