5.2. Saving the Visualization Window
VisIt allows you to save the contents of any open visualization window to a variety of file formats. You can save visualizations as images so they can be imported into presentations. Alternatively, you can save the geometry of the plots in the visualization window so it can be imported into other computer modeling and visualization programs.
VisIt currently supports the image files formats: BMP, JPEG, PNG, PPM, Raster Postscript, RGB, and TIFF
VisIt currently supports the geometry file formats: Curve, Alias WaveFront Obj, PLY, POV, STL, ULTRA, and VTK
The Curve and ULTRA file formats are specially designed to store the data created from curve plots and can be used with other Lawrence Livermore National Laboratory visualization software. The Alias Wavefront Obj file format is supported so visualizations produced with VisIt can be imported into rendering programs such as Maya. VisIt can save visualizations into STL files, which are used with stereolithographic printers to fabricate three-dimensional parts. Finally, VisIt can save visualizations into the VTK (Visualization Toolkit) format so they can be read back into VisIt and used in other VTK-based applications.
When saving the geometry of plots in the visualization window into any of the afore-mentioned formats, you are performing a type of database export operation. However, saving geometry in this manner differs from exporting databases using the Export Database Window. Only the external faces of the plots are saved out when saving plot geometry whereas during a database export, 3D cells are preserved in the final exported database. The topic of exporting databases is covered later in this chapter.
5.2.1. The Save Window
You can set the Save window options before saving by selecting Set Save options… from the Main Window’s File menu. The Set save options window contains the controls that allow you to set the options that govern how visualizations are saved.
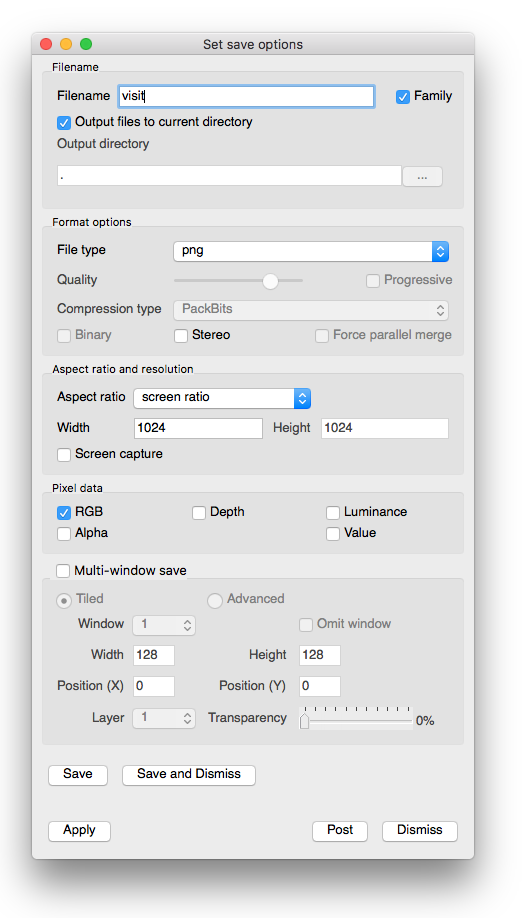
Fig. 5.1 Save Window
The Set Save options window, shown in Figure 5.1, contains four basic groups of controls. The first group, Filename, allows you to set the file information. Use the file information controls to set the name and destination. If the Family checkbox is selected, then each time an image is saved with the same name, a number will be appended to the filename that is one more than the current file with the same name. The second group, Format options, allows you to set the file type, compression type, and any optional quality parameters that may exist for the selected file type. Use the third group of controls, Aspect ratio and resolution, to specify the dimensions of the saved image. If Screen capture is checked, the aspect ratio and width/height will be ignored and the current screen image will be saved. The last group, Multi-window save, allows you to set options for each window being saved by clicking on the Window drop-down and selecting the appropriate window. When the save options are set and applied by clicking the Apply button, the active visualization can be saved either through the Save Window option in the Main Window’s File menu, by the keyboard shortcut Ctrl+S , or by clicking the Save button in the Set Save options window.
5.2.2. Selecting the output directory for saved files
On most platforms, VisIt’s default behavior is to save output files to the
current directory, which is the directory where VisIt was started. On the
Windows platform, VisIt saves images to the
location VUSER_HOME/My images. If you want to specify
a special output directory for your output files, you can turn off the
Output files to current directory check box and type in the path to the
directory where you want VisIt to save your files in the Output directory
text field. If you want to browse the file system to find a suitable directory
in which to save your images, click on the “…” button to the right of the
Output directory text field to bring up a Directory chooser dialog.
Once you select a suitable directory using the Directory chooser dialog,
the path that you chose is inserted into the Output directory text field.
5.2.3. Setting the save file name
To set the file name that will be used to save files, type a file name into the Filename text field. The file name that you use may contain a path to a directory where you want to write the saved files. If no path is specified, the saved files are written to the directory from which VisIt was launched. A file extension appropriate for the type of file being generated is automatically appended to the file name. For example, a BMP file will have a “.bmp” extension, while a JPEG file will have a “.jpeg” extension, and so on.
The file name that VisIt uses to save visualizations is based on the specified file name, the file format, and also the family toggle setting. The family toggle setting is set by checking the Family check box towards the top right part of the Save Window.
The family toggle setting allows you to save series of files that all have essentially the same name except for a number that is appended to the file name. The number increases by one each time an image is saved. If the family toggle setting is on then a file named “visit” of type TIFF will save out as “visit0000.tiff”. If the family toggle setting is off, the file will save as “visit.tiff”.
5.2.4. Setting the file type
You set the file type by making a selection from the File type menu. You can choose from image file types or geometry file types. Note that some areas of the Save Window become enabled or disabled for certain file types.
Choosing JPEG format files enables the Quality slider and the Progressive check box. These controls allow you to specify the desired degree of quality in the resulting JPEG images. A lower quality setting results in blockier images that fit into smaller files. The progressive setting stores the JPEG images in such a way that they progressively refine as they are downloaded and displayed by Web browsers.
Choosing TIFF format files enables the Compression type combo box. The available compression types are: None, PackBits, JPEG, and Deflate. When compression is enabled for TIFF files, they are smaller than they would be without compression.
Choosing STL or VTK file formats saves visualizations as geometry files instead of images and also enables the Binary check box. The Binary check box tells these formats to write their geometry data as binary data files instead of human-readable ASCII text files. In general, files written with the binary option are smaller and faster to load than their non-binary counterparts.
5.2.5. Saving images with screen capture
The Screen capture check box tells VisIt to grab the image directly off of the computer screen. This means that the saved image will be exactly the same size as the image on the screen. There are advantages and disadvantages to using screen capture. An advantage is that capturing the image from the screen does not require VisIt to redraw the image to an internal buffer before saving, which usually results in a faster save. A disadvantage of screen capture is that any other windows on top of VisIt’s visualization window occlude portions of the image. Screen capture can also be very slow over a sluggish network connection. Finally, using screen capture might not provide images that have enough resolution. Weigh the advantages and disadvantages of using screen capture for your own situation. Screen capture is on by default.
5.2.6. Setting image resolution
You set image resolution using the controls in the Aspect ratio and resolution group. These controls are disabled unless the file being saved is an image format and screen capture is not being used. You specify the image height and width by typing new values into the Height and Width text fields. If the Maintain 1:1 aspect check box is on, VisIt forces the image’s height and width to be the same, yielding a square image. Turn off this setting if you want to save rectangular images. The image resolution is ignored unless you turn off the Screen capture check box.
5.2.7. Saving stereo images
When the Stereo check box is turned on and you save an image, VisIt will save a separate image for the left eye and for the right eye. The cameras used to generate each image are offset such that when the images are played together at high rates, they appear to have more depth. To enable saving of stereo images, click the Stereo check box in the Save Window before you try to save an image.
When Family mode is not enabled, VisIt will prepend left_ and right_ designators to the saved filenames. However, when Family mode is enabled, VisIt saves the two images in sequence without any left/right designation. The left image is saved first followed by the right image. If next available number in the Family is odd, the left will be odd and right will be even. On the other hand, if next available number in the Family is even, the left will be even and right will be odd. However, the notification messages VisIt produces about the saved images may only mention the first (left) saved image filename.
5.2.8. Saving binary geometry files
Some geometry file formats such as STL and VTK have both ASCII and binary versions of the file format. The ASCII file formats are human-readable and are larger and slower for programs to process than binary formats, which are not human-readable but are smaller and quicker for programs to read. When geometry file formats support both ASCII and binary formats, the Binary check box is enabled. By default VisIt writes ASCII geometry files but you can click the Binary check box to make VisIt write binary geometry files.
5.2.9. Selecting pixel data
Normally when saving an image, VisIt will simply save the RGB pixel data into the specified image format. It is possible to request that VisIt saves additional pixel data when saving an image. This may result in additional files being saved alongside the normal image file. These additional images will share the same filename root as the image file but will have suffixes such as “value”, “depth”, or “lum”, depending on their contents. Special file formats such as OpenEXR can contain all of these additional image channels. When OpenEXR is the selected file format, a single “.exr” file will be written containing all pixel data.
The Save options window contains a Pixel data group that lets you request additional image channels. The RGB check box selects RGB pixel data. The Alpha check box tells VisIt to also request transparency information and to not render with a background when saving an image. This lets VisIt save images with a transparent background, which makes compositing such an image in front of other backgrounds far easier (see Figure 5.2). The Depth check box tells VisIt to export the depth buffer (Z-buffer) to a ZLib-compressed binary file containing 32-bit floating point numbers. The Luminance check box tells VisIt to save a luminance image, which shows how much lighting is used in various parts of the scene. The luminance image is saved to the selected image format. The Value check box tells VisIt to produce a rendering of the actual scalar values in the scene in the form of a ZLib-compressed 32-bit floating point buffer (same format as the depth image).
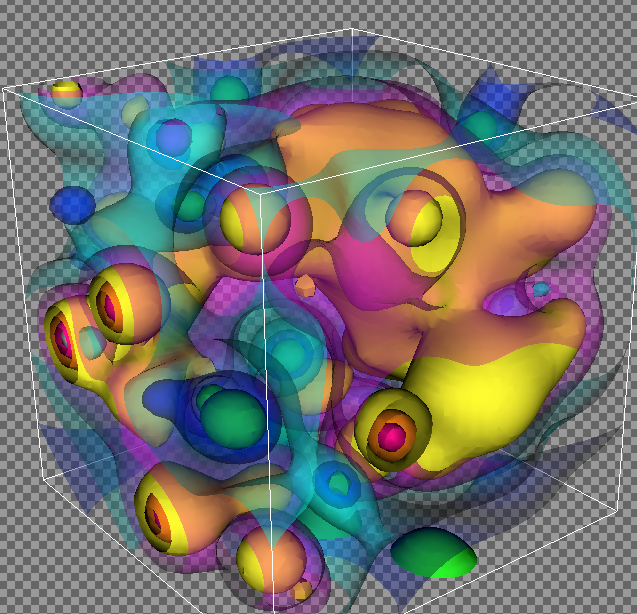
Fig. 5.2 Partially transparent plot saved to PNG with alpha channel
5.2.10. Saving tiled images
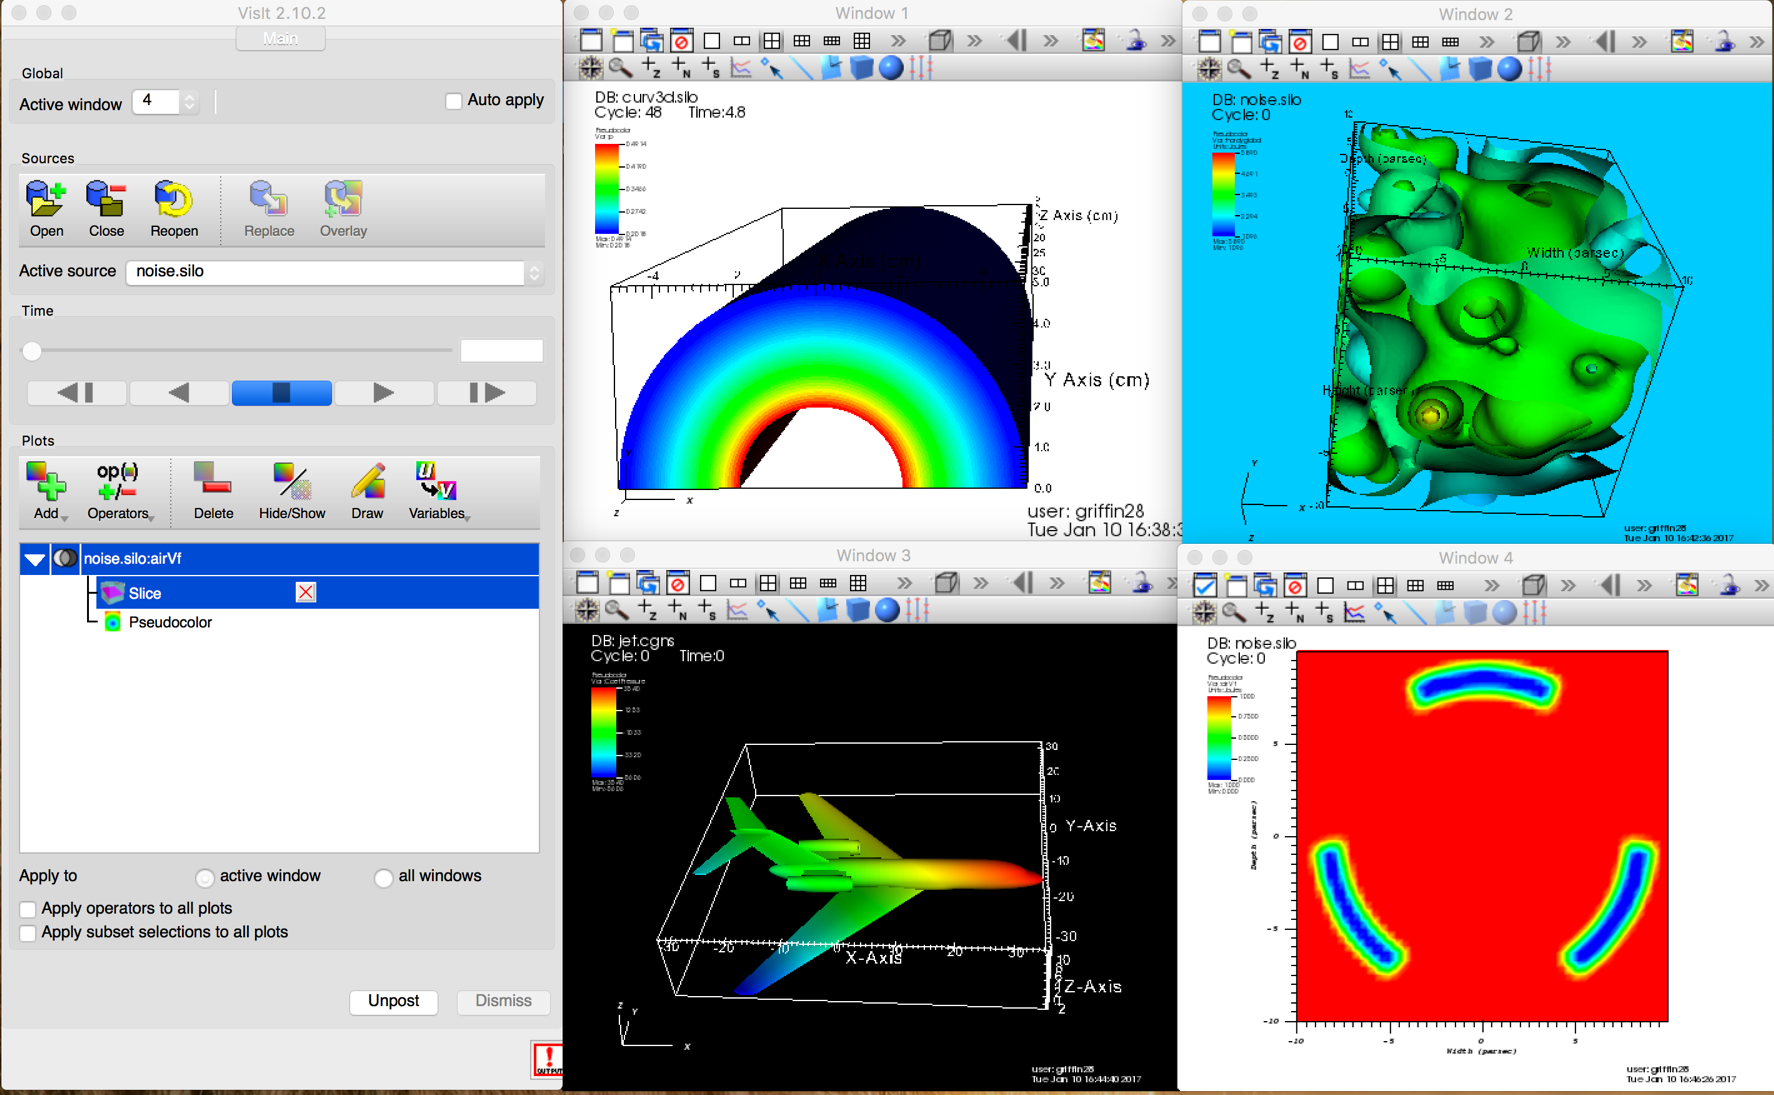
Fig. 5.3 Saving tiled images example (before)
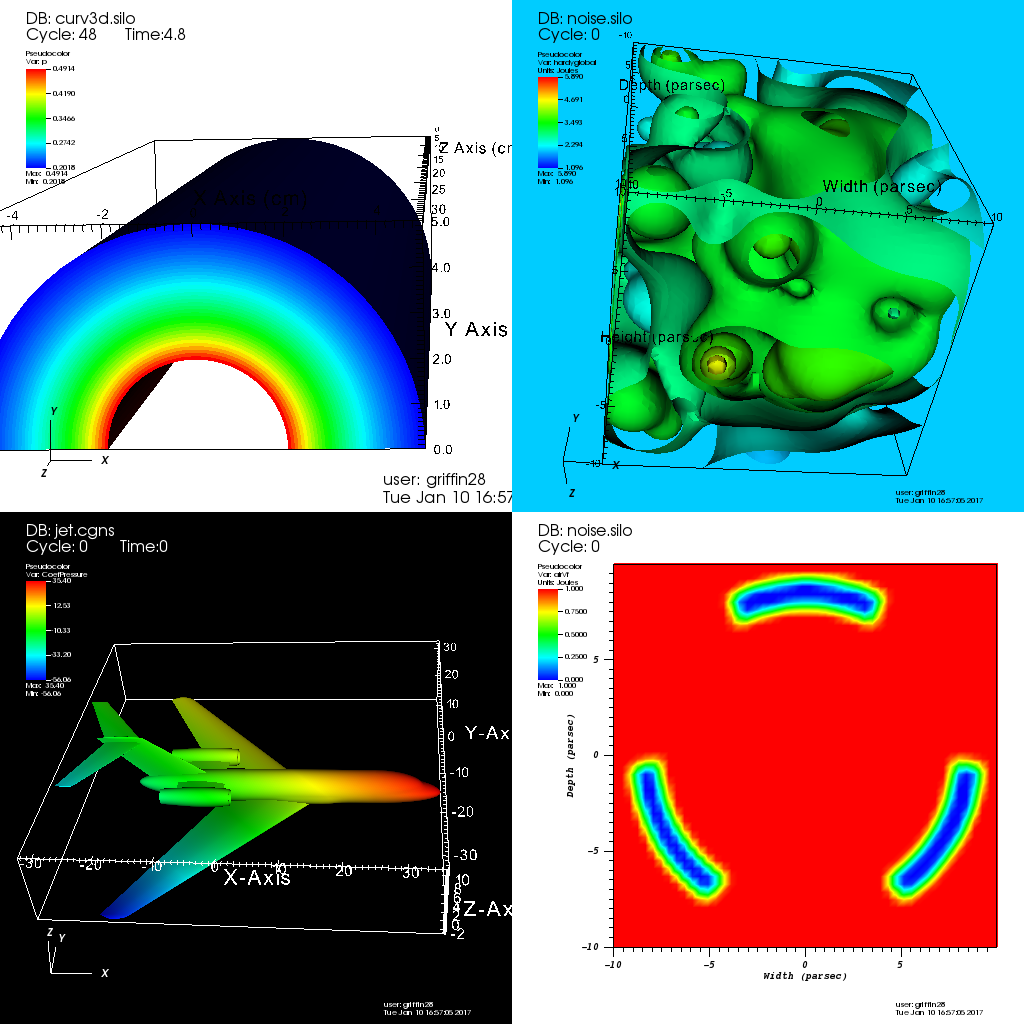
Fig. 5.4 Saving tiled images example (after)
A tiled image is a large image that contains the images from all visualization windows that have plots. If you want to save tiled images, make sure to check the Save tiled check box in the Set Save options window. To get an idea of how VisIt saves your visualization windows into a tiled image, see Figure 5.3 and Figure 5.4.