9.3. Lighting
Lighting is an important element when producing 3D visualizations because all areas of interest in the visualization should be lit so they can be easily seen. To this end, it is often necessary to have multiple light sources so all of the visualization’s important areas are bright enough. VisIt can have up to 8 light colored light sources in order to improve the look of 3D visualizations. Each light source can be positioned and colored using VisIt’s Lighting Window. It is also possible to have specular highlights in addition to multiple colored lights. For more information on specular highlights, which can make visualizations appear much more realistic, read about specular lighting in the Preferences chapter.
9.3.1. Lighting Window
You can open the Lighting Window (see Figure 9.39) by selecting the Lighting option from the Main Window’s Controls menu. The Lighting Window has two modes of operation: edit and preview. When the window is in preview mode, light sources cannot be modified, but they are all visible and illuminate the Lighting Window’s test sphere so the cumulative effect of the lights can be observed. When the window is in edit mode, light sources can be modified one at a time. You set light properties using the controls in the Properties panel and you can position lights interactively by moving them around in the lighting panel to the left of the Properties panel.
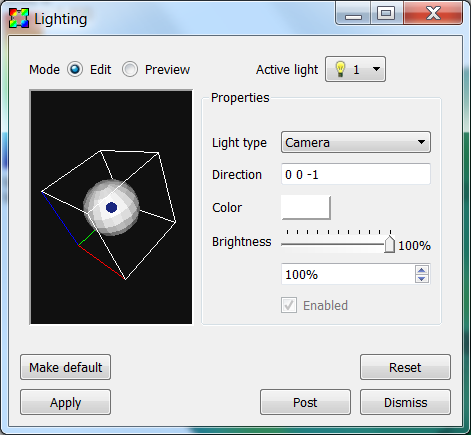
Fig. 9.39 The lighting Window
9.3.1.1. Switching between edit mode and preview mode
Changing the Mode between Edit and Preview switches the Lighting Window into the desired mode. When the Lighting Window is in edit mode, one light source at a time is shown in the lighting panel and the lights properties can be set by moving the light interactively or by settings its properties by using the controls in the Properties panel. When the Lighting Window is in preview mode, all lights are shown in the lighting panel and none of them can be modified.
9.3.1.2. Choosing the active light
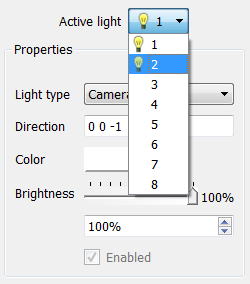
Fig. 9.40 The active light menu
The active light is the light whose properties are shown in the Lighting Window. Only the active light can be modified so you must switch active lights each time you want to make changes to a light. To change the active light, select a new light from the Active light menu (Figure 9.40). The Active light menu contains a list of eight possible lights of which only light 1 is active by default. When a light is active, it has a small light bulb icon next to it. Inactive lights have no light bulb icon. Once a new light has been selected from the Active light menu, its properties are displayed in the Lighting Window’s Properties panel.
9.3.1.3. Turning a light on
You can turn lights on and off using the Enabled check box that appears at the bottom of the Lighting Window’s Properties panel. You can only modify lights when the Lighting Window is in edit mode.
9.3.1.4. Light type
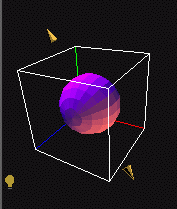
Fig. 9.41 The different kinds of lights
VisIt supports three types of lights. The first type is called an ambient light. An ambient light is a light that has no direction and contributes brightness to the entire visualization. When an ambient light is present, the lighting panel displays a small light bulb. The second type of light and the default light in VisIt is a camera light. A camera light stays fixed in space and always points the same direction regardless of how the objects in the visualization are positioned. Camera lights are represented in the lighting panel as small blue arrows. The third type of light in VisIt is the object light. An object light has a direction that is relative to the orientation of the object in the visualization. When the objects in the visualization are rotated, an object light keeps shining on the same area of the object. Object lights are represented in the lighting panel as small yellow cones. To change the light type for the active light, select a new light type from the Light type menu in the Properties panel.
9.3.1.5. Positioning a light
There are two ways to position a light. The first, and most intuitive, way is to interactively position the light by dragging it to the desired location in the lighting panel. Lights move in a sphere around the test sphere. Experiment with the motion until you are comfortable moving the light. The second way to move the light is to type a direction vector into the Direction text field. The coordinate system for specifying a direction vector is right-handed. Suppose you want to create a light that looks directly into the visualization. Since the Z-axis points directly out of the screen, the negative Z-axis points into the screen. This can be captured by entering a direction vector of: 0 0 -1. Note that ambient lights have no direction.
9.3.1.6. Light color and brightness
VisIt enables the user to vary lights both in color and in brightness.
Danger
When plotted surface colors are used to convey important information such as the magnitude of a variable or type of material, colored lighting has the potential to profoundly skew the surface colors and should be used with great care. Nonetheless, colored lighting can produce interesting effects that may be desirable for purposes aiming towards photorealism.
To change the light color, click on the light Color button and select a new color from the Color menu. Once a color is picked, you can also set the brightness for the light. The brightness is essentially a knob that allows you to dim the light. If the brightness is set completely to the right then the light will have exactly the color that was picked for it. If the brightness is not set to full intensity then the light will be dimmer. You can set the brightness by adjusting the Brightness slider in the Lighting Window.