2.2. File Open Window
The File Open Window allows you to select files and simulations by browsing file system either on your local computer or the remote computer of your choice. You can open the File Open Window by choosing the Open option from the Sources section of the main GUI panel (shown in Figure 2.1), or by Choosing the Open File option from the File dropdown menu. When the window opens, its current directory is set to the current working directory or a directory from VisIt’s preferences. See Figure 2.2.
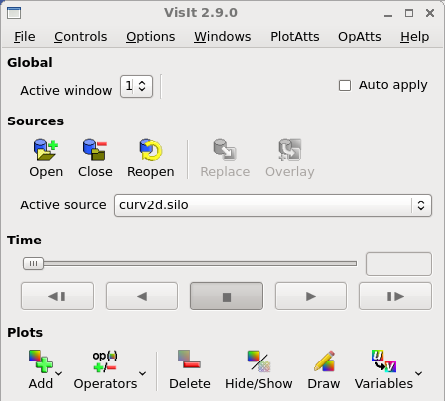
Fig. 2.1 Main gui panel showing Sources section
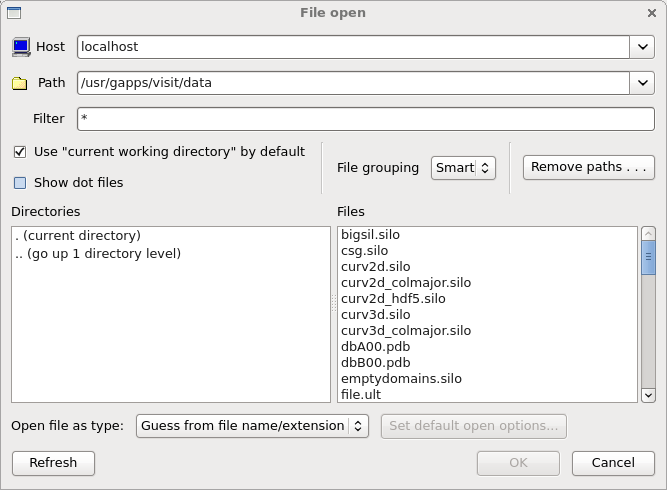
Fig. 2.2 File Open Window
2.2.1. Changing hosts
One of VisIt’s strengths is its ability to operate on files that exist on remote computers. The default host is: “localhost”, which is a name understood by the system to be the name of your local computer. To access the files on a remote computer, you must provide the name of the remote computer in the Host text field by either typing the name of a remote computer and pressing the Enter key or by selecting a remote computer from the list of recently visited hosts. To access the list of recently visited hosts, click on the down-arrow at the far right of the Host text field.
Changing the host will cause VisIt to launch a database server on the specified computer so you can access files there. Note that if you do not have an account on the remote computer, or if VisIt is not installed there, you will not be able to access files. Also note that VisIt may prompt you for a password to authenticate your access to the remote computer. To set up password-less access to remote computers, refer to Setting Up Password-less SSH.
Once a database server is running on the remote computer, its file system appears in the directory and file lists. The host name for each computer you access is added to the list of recently visited computers so that you may switch easily to computers you have recently accessed. If you installed VisIt with the provided network configurations then the list of recently visited computers also contains the hosts from the host profiles, which are covered later in this document.
2.2.2. Changing directories
To select data files, you must often change the active directory. This can be
done in two ways. The first way is to enter the entire directory path into the
Path text field and press Enter. You can use UNIX shell symbols, like the
“~” for your home directory, or the “../” to go up one directory from your
current directory. The directory conventions used depend on the type of
computer being accessed. A MS Windows computer expects directories to be
specified with a disk drive and a path with back slashes
(e.g. C:\temp\data) while a UNIX computer expects directories with forward
slashes (e.g. /usr/local/data). Keep the type of computer in mind when
entering a path. After a path has been typed into the Path text field,
VisIt will attempt to change directories using the specified path. If VisIt
cannot change to the specified directory, the Output Window will appear
with an error message and the Path text field will revert to the last
accepted value. Another way to change directories is to double click the mouse
on any of the entries in the directory list. Note that as you change
directories, the contents of the File list change to reflect the files in
the current directory. You can immediately return to any recently visited
directory by selecting a directory from the Path text field’s pull-down
menu.
2.2.3. Default directory
By default, VisIt looks for files in the current directory. This is often useful in a UNIX environment where VisIt is launched from a command line shell in a directory where database files are likely to be located. When VisIt is set to look for files in the current directory, the Use “current working directory” by default check box is set. If all of your databases are located in a central directory that rarely changes, it is worthwhile to uncheck the check box, change directories to your data directory, and save settings so the next time VisIt runs, it will look for files in your data directory.
2.2.4. Changing filters
A filter is a pattern that is applied to the files in the File list to determine whether or not they should show up in the list. This mechanism allows the user to exclude many files from the list based on a naming convention, which is useful since VisIt’s data files often share some part of their names.
The Filter text field controls the filter used to display files in the file list. Changing the filter will often change the File list as files are shown or hidden. The Filter text field accepts standard UNIX C-Shell pattern matching, where, for example, a “*” matches filter (“*”) shows all files in the File list. Note that you can specify more than one filter provided you separate them with a space.
2.2.5. Virtual databases
A virtual database is a time-varying database that VisIt artificially creates
out of smaller, single timestep databases that have related filenames.
Virtual databases allow you to access time-varying data without having to
first create a .visit :ref:`Need a reference to .visit files file. The
files that are grouped into a virtual database are determined by the file
filter. That is, only files that match the file filter are considered for
grouping into virtual databases. You can change the definition of a virtual
database by changing the file filter. A virtual database appears in the file
list as a set of filenames that are grouped under a single filename that
contains the “*” wildcard character. (Figure 2.3) When you click on
any of the filenames in the virtual database, the entire database is selected.
You can tell VisIt to not automatically create virtual databases by selecting
the Off option in the File grouping pull-down menu. When automatic file
grouping is turned off, no files are grouped into virtual databases and groups
of files that make up a time-varying database will not be recognized as such
without a .visit file. See Figure 2.4.
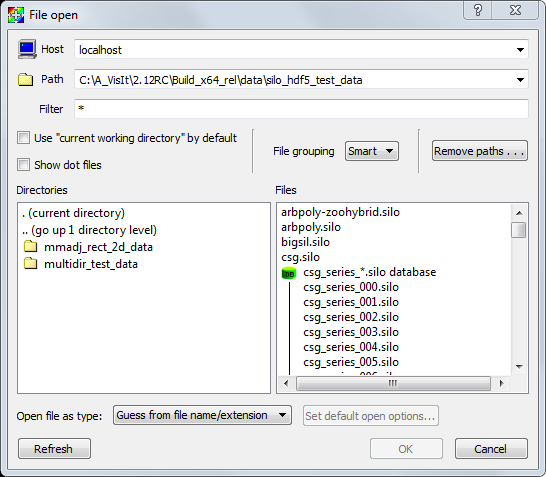
Fig. 2.3 File grouping turned on (Smart setting)
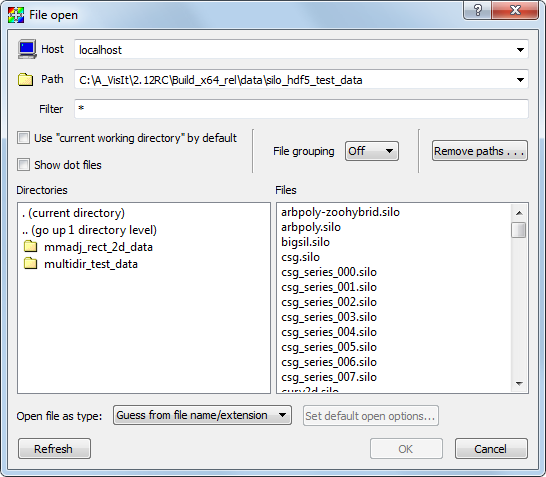
Fig. 2.4 File grouping turned off
VisIt has two levels of automatic file grouping. The default level is Smart file grouping, which enables automatic file grouping but has extra rules that prevent certain groups of files from being grouped into virtual databases. If you find that Smart file grouping does not provide the virtual databases that you expect, you can back the file grouping mode down to On or turn it off entirely.
2.2.6. Refreshing the file list
Scientific simulations often write out new data files as they run. The Refresh button makes VisIt re-read the current directory to pick up any new files added by a running simulation. If the active source is a virtual database whose definition was changed by refreshing the file list, then VisIt will close and reopen the active source so information about new timestates is made available.
2.2.7. Clearing out recently visited paths
The File Open Window maintains a list of all of the paths that have ever been visited and adds those paths to the recently visited paths list, which can be accessed by clicking on the down-arrow at the far right of the Paths text field. When you click on a path in the recently visited paths list, VisIt sets the database server’s path to the selected path retrieves the list of files in that directory. If you visit many paths, the list of recently visited paths can become quite long. Click the File Open Window’s Remove Paths button to activate the Remove Recent Paths window. The Remove Recent Paths window allows you to select paths from the recently visited paths list and remove them from the list. The Remove Recent Paths window is shown in Figure 2.5.
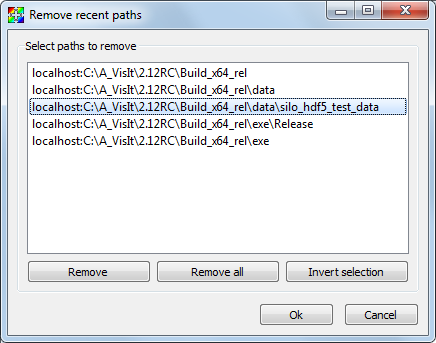
Fig. 2.5 Remove recent paths window
2.2.8. Connecting to a running simulation
Computer simulations often take weeks or months to complete and it is often necessary to visualize data from the simulation before it has completed in order to diagnose potential problems. VisIt comes with a simulation interface library that can be linked into your serial or parallel simulation application in order to provide hooks so VisIt can plot data from your running simulation. When instrumented with the VisIt simulation interface library, your simulation can periodically check for incoming VisIt connections. When VisIt successfully connects to your simulation, all of your simulation variables are available for plotting without having to write plot files to disk. During the time that VisIt is connected, your simulation acts as a VisIt compute engine in addition to its regular responsibilities. You can pause the simulation while using VisIt to interact with the data or you can choose to have the simulation continue and push new data to VisIt for plotting. For more information about instrumenting your simulation code with the VisIt simulation library interface, see the Getting Data Into VisIt manual.
VisIt currently treats simulations as though they were ordinary files. When
the VisIt simulation interface library is enabled in your application, it
writes a special file with a .sim2 extension to the .visit/simulations
directory in your home directory (%Documents%\VisIt\simulations
on Windows). Each .sim2 file encodes the time and date it was created
into the file name so you can distinguish between multiple simulations that
VisIt can potentially open. A .sim2 file contains information that VisIt
needs in order to connect via sockets to your simulation. If you want to
connect to a simulation, you must select the .sim2 files
corresponding to the simulations to which you want to connect.
(Figure 2.6). Once that is done, connecting to a
simulation is the same as opening any other disk file.
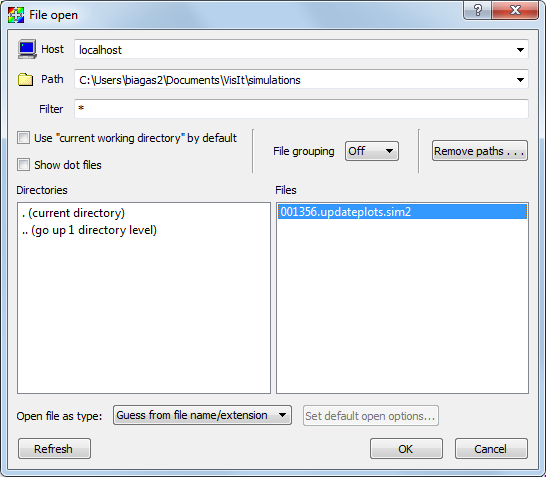
Fig. 2.6 Accessing a simulation using the File Open Window