14. Using Docker
14.1. Overview
Docker is a platform for building containers. Containers can run either Windows or Linux operating systems. Docker is available on the Mac, Windows and Linux. The rest of this tutorial will primarily be focused on running Docker on Windows. The content on installing and setting up Docker is Windows specific but the remainder of the content on creating and using containers is operating system independent.
14.2. Installing Docker on Windows
Install Docker on your system. It is free to download and install. You will need to be running Windows Professional and you will need administrator priviledges. The following link will get you started.
https://docs.docker.com/docker-for-windows/
You will need to enable experimental features to be able to use the
--squash option when building your container. You can enable experimental
features with the Settings window. Go to the Daemon tab and check the
Experimental features checkbox and press Apply. Note that this will
restart the Docker daemon, which will kill container builds or running
containers.
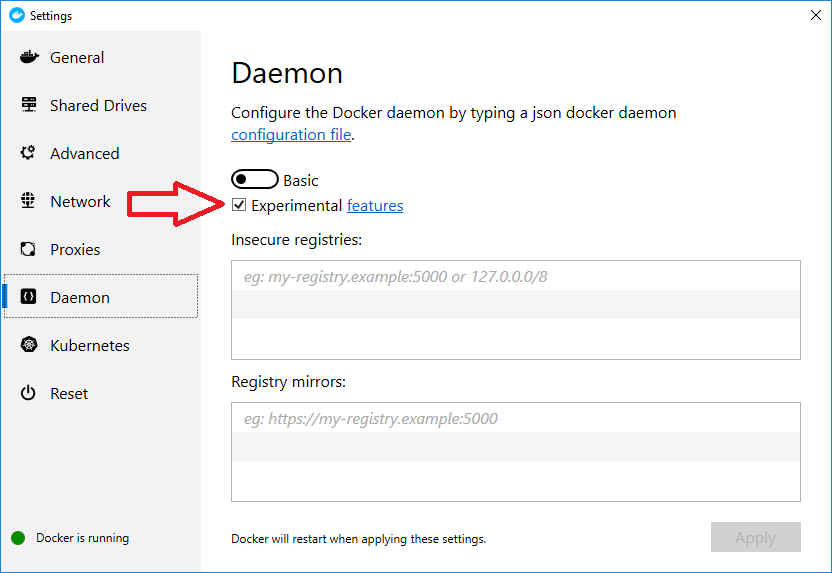
Fig. 14.4 Enabling experimental features.
If you run into problems running out of disk space, you can increase the amount of disk space allocated to Docker with the Settings window. Go to the Advanced tab and move the Disk image max size to the right to increase the amount of disk space and press Apply. Note that this will restart the Docker daemon, which will kill container builds or running containers.
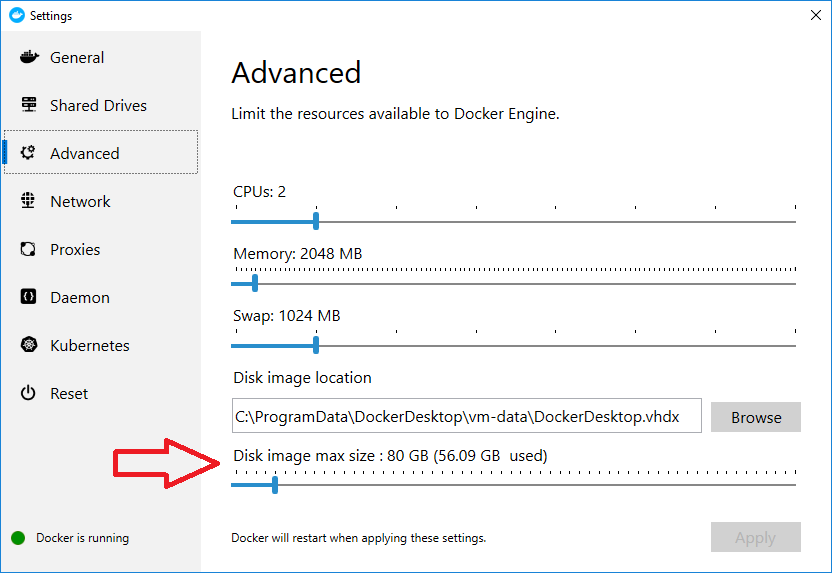
Fig. 14.5 Increasing the disk space allocated to Docker.
14.3. Creating a Docker Container
First you will want to bring up a Command window and use that to run Docker commands. Next we’ll create a folder to hold all our Docker files. We are assuming that you are at the root of the C: drive.
C:\>cd \Users\brugger1
C:\Users\brugger1>mkdir docker
C:cd docker
Now you need to copy all the relevant files to your docker folder. You must have the following files in your folder.
C:\Users\brugger1\docker>dir
 Volume in drive C is Windows
 Volume Serial Number is A8F6-9F9C

 Directory of C:\Users\brugger1\docker

09/13/2019  02:46 PM    <DIR>          .
09/13/2019  02:46 PM    <DIR>          ..
09/13/2019  02:39 PM           737,636 build_visit3_0_2
08/28/2019  01:45 PM             1,173 build_visit_docker_cleanup.py
09/12/2019  12:24 PM             1,322 Dockerfile-debian9
09/13/2019  07:27 AM             1,176 Dockerfile-fedora27
09/12/2019  03:49 PM             1,337 Dockerfile-ubuntu16
09/12/2019  12:36 PM             1,321 Dockerfile-ubuntu18
09/12/2019  12:23 PM               216 run_build_visit.sh
09/13/2019  02:39 PM       121,776,180 visit3.0.2.tar.gz
               8 File(s)    122,520,361 bytes
               2 Dir(s)  814,047,002,624 bytes free
These files can be found in the VisIt repository at GitHub in the following location.
https://github.com/visit-dav/visit/tree/develop/scripts/docker
The Dockerfile determines the type of operating system you will build your container with. The first line in the Dockerfile contains information about the operating system. Here is a link to a reference on Dockerfile.
https://docs.docker.com/engine/reference/builder/
The Dockerfile will need to be specific to the operating system since the way you install packages and do other administrative tasks will vary among different Linux operating systems, although there are only a few unique varients that the rest are built on. You can go to the Docker Hub to find Linux distributions to start with.
https://hub.docker.com/_/centos
https://hub.docker.com/_/debian
https://hub.docker.com/_/fedora
https://hub.docker.com/_/ubuntu
In this example the Dockerfile is set up to use Ubuntu 16. The Dockerfile installs all the packages needed to build VisIt and then uses build_visit to create all the third party libraries as well as the config site file. The build will take several hours. Sometimes I have had it stop sending text to the Command window, so if it looks like it is hung, it may actually be happily progressing along.
C:\Users\brugger1\docker>docker build -f Dockerfile-ubuntu16 -t visitdev:3.0.2-ubuntu16 . --squash
Start up the container and run it interactively.
C:\Users\brugger\docker>docker run -t -i visitdev:3.0.2-ubuntu16 /bin/bash
visit@bea87fee3276:~$
Now the container is ready for you to build VisIt. First, you need to copy the tar file with the source code. To do this, you will need to go to another Command window and use the container id shown in the prompt.
C:\Users\brugger\docker>docker cp visit3.0.2.tar.gz bea87fee3276:/home/visit
Now go back to the first Command window and create your distribution.
visit@bea87fee3276:~$ tar zxf visit3.0.2.tar.gz
visit@bea87fee3276:~$ cd visit3.0.2
visit@bea87fee3276:~/visit3.0.2$ mkdir build
visit@bea87fee3276:~/visit3.0.2$ cd build
visit@bea87fee3276:~/visit3.0.2/build$ /home/visit/third-party/cmake/3.9.3/linux-x86_64_gcc-5.4/bin/cmake \
   -DCMAKE_BUILD_TYPE:STRING=Release -DVISIT_INSTALL_THIRD_PARTY:BOOL=ON -DVISIT_ENABLE_XDB:BOOL=ON \
   -DVISIT_PARADIS:BOOL=ON -DVISIT_CONFIG_SITE="/home/visit/visit-config.cmake" ../src
visit@bea87fee3276:~/visit3.0.2/build$ make -j 4 package
visit@bea87fee3276:~/visit3.0.2/build$ mv visit3_0_2.linux-x86_64.tar.gz ../..
Now let’s test it to make sure we can create an image.
visit@bea87fee3276:~/visit3.0.2/build$ cd ../..
visit@bea87fee3276:~$ cp visit3.0.2/scripts/visit-install .
visit@bea87fee3276:~$ ./visit-install 3.0.2 linux-x86_64 visit
visit@bea87fee3276:~$ visit/bin/visit -cli -nowin
>>> OpenDatabase("visit/data/curv2d.silo")
>>> AddPlot("Pseudocolor", "d")
>>> DrawPlots()
>>> SaveWindow()
>>> quit()
visit@:~$
Now let’s go back to the second Command window and copy the binary distribution back out of the container and the image we created.
C:\Users\brugger\docker>docker cp bea87fee3276:/home/visit/visit3_0_2.linux-x86_64.tar.gz .
C:\Users\brugger\docker>docker cp bea87fee3276:/home/visit/visit0000.png .
At this point you can exit your container.
visit@bea87fee3276:~$ exit
C:\Users\brugger\docker>
You should view the image to verify that it was produced correctly. You now have the binary distribution for VisIt 3.0.2 for Ubuntu 16.
14.4. Creating a Dockerfile From Scratch
To create a Dockerfile from scratch it is best to do so running interactively as root with the base operating system image. You can start by installing packages that your are certain you will need. At that point you can run build_visit until it fails, determining what missing package caused the failure, installing the missing package and repeating until you have gotten build_visit to complete with the third party libraries you want to build. From that experience you can create your Dockerfile.
14.5. Useful Docker Commands
Here are some useful Docker commands to manage images and containers.
docker image ls
docker container ls --all
docker image rm <image id>
docker container rm <container id>
Docker will create a “checkpoint” after each command it executes. Everytime you partially create an image or execute a container it is saving those checkpoints. This can quickly start to consume a lot of disk space, so you should frequently list your images and containers and remove those that you no longer need.
If building an image fails and you want to take a look at what happened, you can convert the container into an image and then launch a bash shell in the image.
docker commit <container id> <image name>
docker run  -t -i <image name> /bin/bash