7. Regression Testing
7.1. Overview
VisIt has a large and growing test suite.
VisIt’s test suite involves a combination of python scripts in src/test, raw input data files in archives in the top-level data directory and data generation tools in src/tools/data/datagen.
Regression tests are run nightly and results are posted to VisIt’s test dashboard.
Testing exercises VisIt’s viewer, mdserver, engine and cli.
The GUI, however, is not exercised during regression testing and is instead tested manually.
7.2. Running regression tests
7.2.1. Where nightly regression tests are run
The regression suite is run on LLNL’s Dane Cluster. Dane runs the TOSS operating system, which is a flavor of Linux. If you are going to run the regression suite yourself you should run on a similar system or there will be differences due to numeric precision issues. If you do have to run the test suite on a different system there are options for doing fuzzy matching.
The regression suite is run on Dane using a cron job that checks out VisIt source code, builds it, and then runs the tests.
7.2.2. A note about git lfs
The regression suite relies on having a working VisIt build and test data available on your local computer.
Our test data and baselines are stored using git lfs.
Git lfs is an extension to git to effectively support large, binary files.
To run VisIt’s regression suite, git lfs needs to be installed and the command git lfs pull needs be run.
In addition, git lfs pull will likely need to be periodically rerun as various git operations update files.
Files in git lfs exist as either a pointer/proxy file or as the actual/real file. A git lfs file’s content mutates between these two state as various git (and git lfs) operations are performed. Only the pointer/proxy file, which is a small (< 150 bytes) text file, is managed in git. The actual/real file, which can be very large, is managed in git lfs. When a file is in its pointer/proxy state, its contents look something like
version https://git-lfs.github.com/spec/v1
oid sha256:4d7a214614ab2935c943f9e0ff69d22eadbb8f32b1258daaa5e2ca24d17e2393
size 12345
The command git lfs pull dereferences pointer/proxy files causing all pointer/proxy files in the currently checked out branch to be replaced with their actual/real contents.
Warning
If there are many pointer/proxy files in the current branch and/or the actual/real files to which the pointer files refer are very large, a git lfs pull operation can take a long time (many minutes or more).
The operation can be restricted to specific files using the --include and --exclude options to git lfs.
Other git operations can wind up updating the contents of an actual/real lfs file in the local checkout and replacing the file with updated pointer/proxy contents.
Being aware of these two states of a git lfs file is important because when such files are in their pointer/proxy state, various other kinds of VisIt development activities can fail indicating a problem with the file’s format. For example, expanding a data archive can fail
% make ANAME=zipwrapper_test_data.tar.xz expand
[100%] Generating _archive_expand
CMake Error: Problem with archive_read_open_file(): Unrecognized archive format
CMake Error: Problem extracting tar: /Users/miller86/visit/visit/data/zipwrapper_test_data.tar.xz
Or, as another example, using ImageMagick’s display command on an lfs’d .png file still in its pointer state can fail
% display ../test/baseline/databases/silo/silo_curvilinear_3d_surface_6.png
display: improper image header '../test/baseline/databases/silo/silo_curvilinear_3d_surface_6.png'
When this happens, it’s likely because a git lfs pull operation is again needed.
There are other telltale signs to help recognize whether an lfs’d file is in its pointer/proxy state or actual/real state.
In the examples below, xolotl_test_data.tar.xz and xyz_test_data.tar.xz are in their actual/real state while zipwrapper_test_data.tar.xz is in its pointer/proxy state.
First, in their pointer/proxy state, the files are very small text files, usually less than 150 bytes
% wc -c xolotl_test_data.tar.xz xyz_test_data.tar.xz zipwrapper_test_data.tar.xz
1294672 xolotl_test_data.tar.xz
 348584 xyz_test_data.tar.xz
    132 zipwrapper_test_data.tar.xz
The file command will show ASCII text
% file xolotl_test_data.tar.xz xyz_test_data.tar.xz zipwrapper_test_data.tar.xz
xolotl_test_data.tar.xz:     XZ compressed data
xyz_test_data.tar.xz:        XZ compressed data
zipwrapper_test_data.tar.xz: ASCII text
The file’s contents will show the lfs pointer/proxy data
% cat zipwrapper_test_data.tar.xz
version https://git-lfs.github.com/spec/v1
oid sha256:0de21481f2a2e1ddd0eb8e5bcf44e12980285455ce4724557d146c1fa884eb1e
size 6696960
A git lfs pull operation will mutate all lfs’d pointer/proxy files in the current branch to their actual/real contents.
Or, in cases where that operation might take too long, restrict it to the needed files as in
git lfs pull --include zipwrapper_test_data.tar.xz
git lfs pull --include ../test/baseline/databases/silo/silo_curvilinear_3d_surface_6.png
git lfs pull --include "*.silo"
7.2.3. How to run the regression tests manually
The test suite is written in python and the source is in src/test.
The main driver to run the whole test suite is src/test/visit_test_main.py.
Individual test .py files are in src/test/tests/<category>/*.py.
When you configure VisIt, a bash script is generated in the build directory that you can use to run the test suite out of source with all the proper data and baseline directory arguments.
cd visit-build/test/
./run_visit_test_suite.sh
Here is an example of the contents of the generated run_visit_test_suite.sh script
/Users/harrison37/Work/github/visit-dav/visit/build-mb-develop-darwin-10.13-x86_64/thirdparty_shared/third_party/python/2.7.14/darwin-x86_64/bin/python2.7
/Users/harrison37/Work/github/visit-dav/visit/src/test/visit_test_suite.py \
   -d /Users/harrison37/Work/github/visit-dav/visit/build-mb-develop-darwin-10.13-x86_64/build-debug/testdata/  \
   -b /Users/harrison37/Work/github/visit-dav/visit/src/test/../../test/baseline/   \
   -o output \
   -e /Users/harrison37/Work/github/visit-dav/visit/build-mb-develop-darwin-10.13-x86_64/build-debug/bin/visit "$@"
Once the test suite has run, the results can be found in the output/html directory.
There, you will find an index.html file entry that you can use to browse all the results.
If you want to restrict the amount of parallelism used in running the test suite you can do so with the -n command line option.
By default, the test suite will be run using all the cores on your system.
We have found that on some systems, running more than one test at a time may result in failures.
To workaround this issue you can run one test at a time.
./run_visit_test_suite.sh -n 1
If you want to run a single test or just a few tests from the test suite you can list them on the command line. The list of tests must be the last entries on the command line.
./run_visit_test_suite.sh -n 1 tests/databases/silo.py tests/databases/xdmf.py
There are a number of additional command line options to the test suite.
./run_visit_test_suite.sh -help will give you details about these options.
7.2.4. Accessing nightly regression test results
The nightly test suite results are posted to GitHub.
7.2.5. In the event of failure on the nightly run
If any tests fail, all developers who updated the code from the last time all tests successfully passed will receive an email indicating something failed. In addition, failed results should be available on the web.
7.3. How regression testing works
The workhorse script that manages the testing is visit_test_suite.py in src/test.
Tests can be run in a variety of ways called modes.
For example, VisIt’s nightly testing is run in serial, parallel and scalable,parallel,icet modes.
Each of these modes represents a fundamental and relatively global change in the way VisIt is doing business under the covers during its testing.
For example, the difference between parallel and scalable,parallel,icet modes is whether the scalable renderer is being used to render images. In the parallel mode, rendering is done in the viewer.
In scalable,parallel,icet mode, it is done, in parallel, on the engine and images from each processor are composited with IceT.
Typically, the entire test suite is run in each mode specified by the regression test policy.
The mode is specified with the -m command line option.
For example, to run in scalable,parallel,icet mode use:
./run_visit_test_suite.sh -n 1 -m "scalable,parallel,icet"
For simplicity, we maintain baselines only for one blessed platform which is conveniently accessible to the core development team. Running the test suite anywhere else requires the use of fuzzy matching to ignore minor differences. Use of these options on platforms other than the currently adopted testing platform will facilitate filtering big differences (and probably real bugs that have been introduced) from differences due to platform or configuration.
There are a number of different categories of tests.
The test categories are the names of all the directories under src/test/tests.
The .py files in this directory tree are all the actual test driver files that drive VisIt’s CLI and generate images and text to compare with baselines.
In addition, the src/test/visit_test_main.py file defines a number of helper Python functions that facilitate testing including two key functions; Test() for testing image outputs and TestText() for testing text outputs.
Of course, all the .py files in src/test/tests subtree are excellent examples of test scripts.
When the test suite finishes, it will have created a web-browseable HTML tree in the html directory. The actual image and text raw results will be in the current directory and difference images will be in the diff directory. The difference images are essentially binary bitmaps of the pixels that are different and not the actual pixel differences themselves. This is to facilitate identifying the location and cause of the differences.
Adding a test often involves:
adding a
.pyfile to the appropriate test category subdirectory insrc/test/tests,optionally adding the expected baseline files to
test/baselinesand, depending on the test,optionally adding any necessary input data files to the top-level
datadirectory.
Warning
Steps b) and c) can almost never be avoided for tests involving new database plugins.
However, in almost all other cases, steps b) and c) can and probably should be avoided.
Instead, developers are encouraged to adopt new practices and use new testing features where tests and their expected outcomes are programmatically included in just the .py, so there is no need for separate baseline files and/or new data files.
The test suite will find your added .py files the next time it runs.
So, you don’t have to do anything special other than adding the .py file.
One subtlety about the current test modality is what we call mode specific baselines. In theory, it should not matter what mode VisIt uses to produce an image or numerical/textual output. The results should be identical across modes. In practice there is a long list of things that can contribute to subtle pixel differences images and small numerical differences in text. This has lead to mode specific baselines. In the baseline directory, there are subdirectories with names corresponding to modes we currently run. When it becomes necessary to add a mode specific baseline, the baseline file should be added to the appropriate baseline subdirectory.
In some cases, we skip a test in one mode but not in others.
Or, we temporarily disable a test by skipping it until a given problem in the code is resolved.
This is handled by the --skiplist argument to the test suite.
We maintain a list of the tests we currently skip and update it as necessary.
The default skip list file is src/test/skip.json.
7.3.1. Types of Test Results
VisIt’s testing system, visit_test_main.py, uses three different methods
to process and check results.
Test()andTestAutoName()which processes.pngimage filesTestText()andTestTextAutoName()which process.txttext files.TestValueXX()(whereXX``==>``EQ,LT,LE, etc.) which processes no files and simply checks actual and expected values passed as arguments.TestPOA()andTestFOA()which integrate directly with python if-then-else and try-except logic.
The Test() and TestText() methods both take the name of a file.
To process a test result, these methods output a file produced by the current test run and then compare it to a blessed baseline file stored in
test/baseline.
The TestAutoName() and TestTextAutoName() methods are preferred and perform the equivalent work of Test() and TestText() but generate the names of the baseline files automatically.
The auto-naming algorithm requires that the .py file be structured such that calls to TestAutoName() and/or TestTextAutoName() are made from within only top-level functions in the .py file.
Auto naming does not work if these methods are called from either the top/main of the .py file or from functions two or more levels deep.
Auto naming catenates the .py file’s name with the name of the top-level function from which the call was made and adds an index/count.
Below, we outline the preferred structure for a VisIt test .py file.
The file is divided into top-level functions and calls to the various TestXXX() methods are issued from within one of these top-level functions.
Each top-level function performs one or more related tests involving common or highly similar setup.
Each top-level function is then invoked from the .py file’s main body.
Each top-level function should return to main leaving the VisIt session in largely the same state as before the top-level function was invoked.
This includes deleting all associated plots, closing all associated databases, and possibly resetting any other relevant global state such as the view, lights, color table, SIL selection, etc.
Given a python file named gorfo.py structured as below, the resulting auto generated names (and section names) are indicated in the associated comments.
def histogram():
    ...
    TestAutoName() # Uses baseline file named 'gorfo_histogram_0' and calls TestSection('histogram')
    ...
    TestAutoName() # Uses baseline file named 'gorfo_histogram_1'
    ...
    TestValueEQ(name,bval,cval) # Compares baseline value, bval, to current value, cval

def curve():
    ...
    TestAutoName() # Uses baseline file named 'gorfo_curve_0' and calls TestSection('curve')
    ...
    TestAutoName() # Uses baseline file named 'gorfo_curve_1'

#
# Main code
#

# Run the Histogram tests
histogram()

# Run the curve tests
curve()
The one down side to using the auto-naming methods is that later restructuring of the python code can lead to changes in names of the baseline files. Existing, top-level functions can be moved relative to each other without issue. New tests can be added without issue. But, removing earlier tests from a function or moving tests relative to each other within a function leads to baseline file name changes.
When they can be used, the TestValueXX() are a little more convenient because they do not involve storing data in files and having to maintain separate baseline files.
Instead the TestValueXX() methods take both an actual (current) and expected (baseline) result as arguments directly coded in the calling .py file.
A good example of using TestValueXX() can be found in src/test/tests/database/boxlib.py.
#
# Test double precision is working by reading a known double precision
# database and ensuring we get expected min/max values within 15 digits
# of accuracy.
#
DeleteAllPlots()
CloseDatabase(data_path("boxlib_test_data/3D/plt00000.cartgrid.body.small/Header"))
OpenDatabase(data_path("boxlib_test_data/2D/plt0000000/Header"))
AddPlot("Pseudocolor", "temperature1")
DrawPlots()
SetQueryOutputToValue()
TestValueEQ("temperature1 min", Query("Min"), 295.409999999999968, 15)
TestValueEQ("temperature1 max", Query("Max"), 295.410000000000082, 15)
DeleteAllPlots()
CloseDatabase(data_path("boxlib_test_data/2D/plt0000000/Header"))
Likewise, the TestPOA() (pass on arrival) and TestFOA() (fail on arrival) methods are convenient ways to implement a test based primarily upon python logic itself with if-then-else or try-except blocks.
These methods are useful for cases where the majority of logic for determining a passed or failed test exists primarily as the python code itself being executed.
A good example is the src/test/tests/quickrecipes/working_with_annotations.py tests
  try:
    # using gradient background colors {
    # Set a blue/black, radial, gradient background.
    a = AnnotationAttributes()
    a.backgroundMode = a.Gradient
    a.gradientBackgroundStyle = a.Radial
    a.gradientColor1 = (0,0,255,255) # Blue
    a.gradientColor2 = (0,0,0,255) # Black
    SetAnnotationAttributes(a)
    # using gradient background colors }
    TestValueEQ('using gradient background colors error message',GetLastError(),'')
    TestPOA('using gradient background colors exceptions')
  except Exception as inst:
    TestFOA('using gradient background colors exception "%s"'%str(inst), LINE())
    pass
While there may be many instances of TestFOA() (many ways a given bit of logic can fail) with the same name argument in a given sequence of logic for a single test outcome, they can be differentiated by a unique tag (typically the LINE() method identifing the line number.
However, there should be only a single TestPOA() (the one way a given bit of logic can succeed) instance with the same name for the associated test outcome.
As VisIt testing has evolved, understanding and improving productivity related to test design has not been a priority.
As a result, there are likely far more image test results than are truly needed to fully vet all of VisIt’s plotting features.
Or, image tests are used unecessarily to confirm non-visual behavior like that a given database reader is working.
Some text tests are better handled as TestValueXX() tests and other text tests often contain 90% noise text unrelated to the functionality being tested.
This has made maintaining and ensuring portability of the test suite more laborious.
Because image tests tend to be the most difficult to make portable, a better design would minimize image tests to only those needed to validate visual behaviors, text tests would involve only the essenteial text of the test and a majority of tests would involve value type tests.
The above explanation is offered as a rational to justify that whenever possible adding new tests to the test suite should use the TestValueXX() or TestPOA()/TestFOA() approach as much as practical.
7.3.2. More About TestValueXX and TestPOA/FOA Type Tests
The TestValueXX() methods are similar in spirit to Test() and TestText() except operates on Python values passed as args both for the current (actual) and the baseline (expected) results.
The values can be any Python object.
When they are floats or ints or strings of floats or ints or lists/tuples of the same, these methods will round the arguments to the desired precision and do the comparisons numerically.
Otherwise they will compare them as strings.
TestValueEQ(case_name, actual, expected, prec=5):Passes if
actual == expectedwithin specific precision otherwise fails.TestValueNE(case_name, actual, expected, prec=5):Passes if
actual != expectedwithin specific precision otherwise fails.TestValueLT(case_name, actual, expected, prec=5):Passes if
actual < expectedwithin specific precision otherwise fails.TestValueLE(case_name, actual, expected, prec=5):Passes if
actual <= expectedwithin specific precision otherwise fails.TestValueGT(case_name, actual, expected, prec=5):Passes if
actual > expectedwithin specific precision otherwise fails.TestValueGE(case_name, actual, expected, prec=5):Passes if
actual >= expectedwithin specific precision otherwise fails.TestValueIN(case_name, bucket, expected, eqoper=operator.eq, prec=5):Passes if bucket contains expected according to
eqoperequality operator. Fails otherwise.TestFOA(name, tag='unk')Fail on arrival with test case outcome name the concatenation of
nameandtag. Whenever python execution arrives at a line withTestFOA(), the test is considered a failure. Typically,tagisLINE()to indicate the python line number where failure occured. A given bit of test logic (e.g. a test case) can have manyTestFOA()calls of the samenamebut with differenttag.TestPOA(name)Pass on arrival with test case outcome name just
name. Whenever python execution arrives at a line withTestPOA(), the test is considered a pass. A given bit of test logic (e.g. a test case) should have only oneTestPOA()call.
For some examples, see test_values_simple.py and atts_assign.py.
7.3.3. Filtering Image Differences
There are many alternative ways for both compiling and even running VisIt to produce any given image or textual output. Nonetheless, we expect results to be nearly if not perfectly identical. For example, we expect VisIt running on two different implementations of the GL library to produce by and large the same images. We expect VisIt running in serial or parallel to produce the same images. We expect VisIt running on Ubuntu Linux to produce the same images as it would running on macOS. We expect VisIt running in client-server mode to produce the same images as VisIt running entirely remotely.
In many cases, we expect outputs produced by these alternative approaches to be nearly the same but not always bit-for-bit identical. Minor variations such as single pixel shifts in position or slight variations in color are inevitable and ultimately unremarkable.
When testing, it would be nice to be able to ignore variations in results attributable to these causes. On the other hand, we would like to be alerted to variations in results attributable to changes made to the source code.
To satisfy both of these goals, we use bit-for-bit identical matching to track the impact of changes to source code but fuzzy matching for anything else. We maintain a set of several thousand version-controlled, baseline results computed for a specific, fixed configuration and test mode of VisIt. Nightly testing of key branches of development reveals any results that are not bit-for-bit identical to their baseline.
These failures are then corrected in one of two ways. Either the new result is wrong and additional source code changes are required to ensure VisIt continues to produce the original baseline. Or, the original baseline is wrong and it must be updated to the new result. In this latter situation, it is also prudent to justify the new result with a plausible explanation as to why it is expected, better or acceptable as well as to include such explanation in the commit comments.
7.3.3.1. Mode specific baselines
VisIt testing can be run in a variety of modes; serial, parallel, scalable-parallel, scalable-parallel-icet, client-server, etc. For a fixed configuration, in most cases baseline results computed in one mode agree bit-for-bit identically with the other modes. However, this is not always true. About 2% of results vary with the execution mode. To handle these cases, we also maintain mode-specific baseline results as the need arises.
The need for a mode-specific baseline is discovered as new tests are added. When testing reveals that VisIt computes slightly different results in different modes, a single mode-agnostic baseline will fail to match in all test modes. At that time, mode-specific baselines are added.
7.3.3.2. Changing Baseline Configuration
One weakness with this approach to testing is revealed when it becomes necessary to change the configuration used to compute the baselines. For example, moving VisIt’s testing system to a different hardware platform or updating to a newer compiler or third party library such as VTK, may result in a slew of minor variations in the results. Under these circumstances, we are confronted with having to individually assess possibly thousands of minor image differences to rigorously determine whether the new result is in fact good or whether some kind of issue or bug is being revealed.
In practice, we use fuzzy matching (see below) to filter out minor variations from major ones and then focus our efforts only on fully understanding the major cases. We summarily accept all minor variations as the new baselines.
7.3.3.3. Promise of Machine Learning
In theory, we should be able to develop a machine-learning approach to filtering VisIt’s test results that enable us to more effectily attribute variations in results to various causes. A challenge here is in developing a sufficiently large and fully labeled set of example results to prime the machine learning. This would make for a great summer project.
7.3.3.4. Fuzzy Matching Metrics
Image difference metrics are reported on terminal output and in HTML reports.
- Total Pixels (
#pix) : Count of all pixels in the test image
- Non-Background (
#nonbg) : Count of all pixels which are not background either by comparison to constant background color or if a non-constant color background is used to same pixel in background image produced by drawing with all plots hidden. Note that if a plot produces a pixel which coincidentally winds up being the same color as the background, our accounting logic would count it as background. We think this situation is rare enough as to not cause serious issues.
- Different (
#diff) : Count of all pixels that are different from the current baseline image.
- % Diff. Pixels (
~%diff) : The precentage of different pixels computed as
100.0*#diff/#nonbg- Avg. Diff (
avgdiff) : The average luminance (gray-scale, obtained by weighting RGB channels by 1/3rd and summing) difference. This is the sum of all pixel luminance differences divided by
#diff.
7.3.3.5. Fuzzy Matching Thresholds
There are some command line arguments to run tests that control fuzzy matching. When computed results match bit-for-bit with the baseline, a PASS is reported and it is colored green in the HTML reports. When a computed result fails the bit-for-bit match but passes the fuzzy match, a PASS is reported on the terminal and it is colored yellow in the HTML reports.
- Pixel Difference Threshold (
--pixdiff) : Specifies the acceptable threshold for the
#diffmetric as a percent. Default is zero which implies bit-for-bit identical results.- Average Difference Threshold (
--avgdiff) : Specifies the acceptable threshold for the
avgdiffmetric. Note that this threshold applies only if the--pixdiffthreshold is non-zero. If a test is above thepixdiffthreshold but below theavgdiffthreshold, it is considered a PASS. Theavgdiffoption allows one to specify a second tolerance for the case when thepixdifftolerance is exceeded.- Numerical (textual) Difference Threshold (
--numdiff) : Specifies the acceptable relative numerical difference threshold in computed, non-zero numerical results. The relative difference is computed as the ratio of the magnitude of the difference between the current and baseline results and the minimum magnitude value of the two results.
The command line with --pixdiff=0.5 --avgdiff=0.1 means that any result with fewer than 0.5% of pixels that are different is a PASS and anything with more than 0.5% of pixels different but where the average pixel gray-scale difference is less than .1 is still a PASS.
7.3.3.6. Testing on Non-Baseline Configurations
When running the test suite on platforms other than the currently adopted baseline platform or when running tests in modes other than the standard modes, the --pixdiff and --avgdiff command line options will be very useful.
For numerical textual results, there is also a --numdiff command line option that specifies a relative numerical difference tolerance in numerical textual results.
The command line option --numdiff=0.01 means that if a numerical result is different but the magnitude of the difference divided by the magnitude of the expected value is less than 0.01 it is considered a Pass.
When specified on the command line to a test suite run, the above tolerances wind up being applied to all test results computed during a test suite run.
It is also possible to specify these tolerances in specific tests by passing them as arguments, for example Test(pixdiff=4.5) and TestText(numdiff=0.01), in the methods used to check test outputs.
Finally, it may make sense for developers to generate (though not ever commit) a complete and validated set of baselines on their target development platform and then use those (uncommitted) baselines to enable them to run tests and track code changes using an exact match methodology.
7.3.4. Tips on writing regression tests
Whenever possible, add only new
TestValueXX()type tests.Test images in which plots occupy a small portion of the total image are fraught with peril and should be avoided. Images with poor coverage are more likely to produce false positives (e.g. passes that should have failed) or to exhibit somewhat random differences as test scenario is varied.
Except in cases where annotations are being specifically tested, remember to call TurnOffAllAnnotations() as one of the first actions in your test script. Otherwise, you can wind up producing images containing machine-specific annotations which will produce differences on other platforms.
When setting plot and operator options, take care to decide whether you need to work from default or current attributes. Methods to obtain plot and operator attributes optionally take an additional
1argument to indicate that current, rather that default attributes are desired. For exampleCurveAttributes()returns default Curve plot attributes whereaseCurveAttributes(1)returns current Curve plot attributes which will be the currently active plot, if it is a Curve plot or the first Curve plot in the plot list of the currently active window whether it is active or hidden. If there is no Curve plot available, it will return the default attributes.When writing tests involving text differences and file pathnames, be sure that all pathnames in the text strings passed to
TestText()are absolute. Internally, VisIt testing system will filter these out and replace the machine-specific part of the path withVISIT_TOP_DIRto facilitate comparison with baseline text. In fact, the .txt files that get generated in the current dir will have been filtered and all pathnames modified to haveVISIT_TOP_DIRin them.Here is a table of python tests scripts which serve as examples of some interesting and lesser known VisIt/Python scripting practices:
Script |
What it demonstrates |
|---|---|
tests/faulttolerant/savewindow.py |
|
tests/databases/itaps.py |
|
tests/databases/silo.py |
|
tests/rendering/scalable.py |
|
tests/rendering/offscreensave.py |
|
tests/databases/xform_precision.py |
|
7.3.5. Rebaselining Test Results
A python script, rebase.py, in the test/baseline dir can be used to rebaseline large numbers of results.
In particular, this script enables a developer to rebase test results without requiring access to the test platform where testing is performed.
This is becase the PNG files uploaded (e.g. posted) to VisIt’s test results dashboard are suitable for using as baseline results.
To use this script, run ./rebase.py --help.
Here is an example workflow to rebaseline a set of results that were originally committed from macOS and are subtley different on the tier 1 testing platform we use for nightly testing…
First, go to the test dashboard and browse for any failed results. Ensure you are browsing the current results from the previous evening. Failing results will appear something like what is shown below…
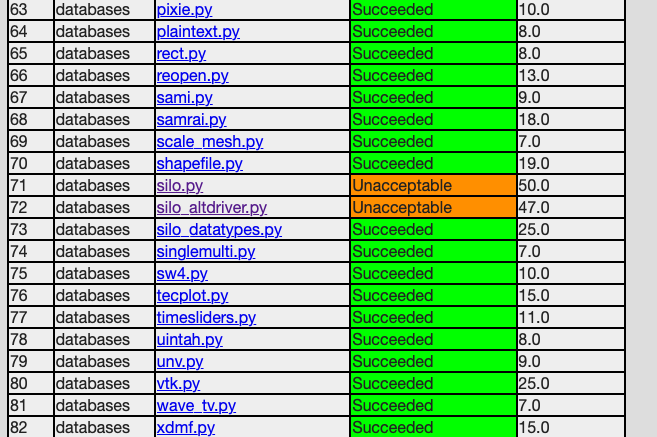
Be sure to scroll through the entire table of results to find all failures.
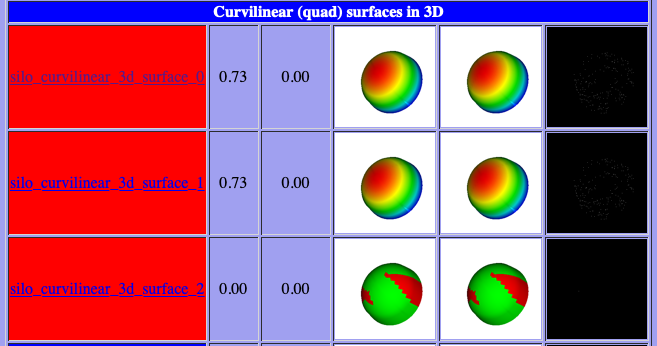
To learn more about which specific tests are failing, click into them and they will appear something like what is shown below…
To learn even more specific details about each failing case, click into them to find details which will appear something like what is shown below…
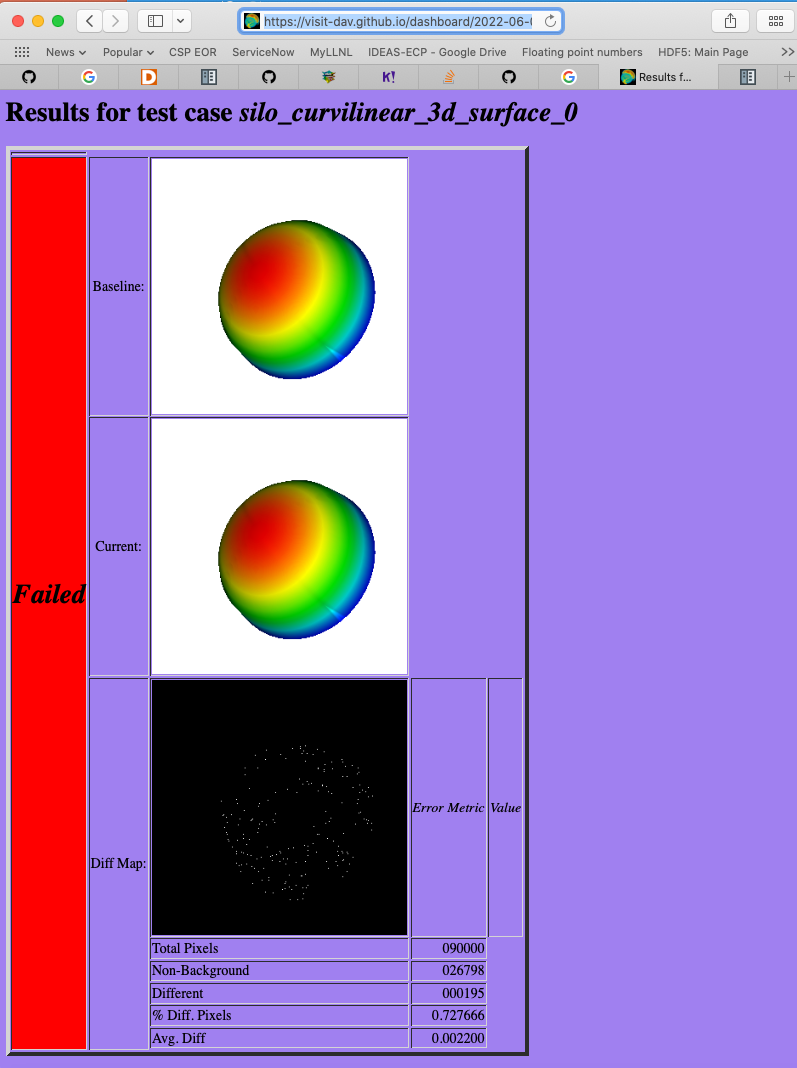
Take note of some of the components of the URL of these cases. This information is needed if the results need to be rebaselined.

If after examining the results, the new results are deemed the correct ones, the baselines need to be updated.
Use rebase.py for that.
That python script is designed to be launched as a standalone application.
So, the invocation looks something like…
% ./rebase.py -c databases -p silo -m serial -d '2022-06-02-22:00' "silo_curvilinear_3d_surface_*"
Copying file "silo_curvilinear_3d_surface_4.png"
Warning: dramatic change in size of file (old=129/new=5939)"databases/silo/silo_curvilinear_3d_surface_4.png"!
Copying file "silo_curvilinear_3d_surface_5.png"
Warning: dramatic change in size of file (old=129/new=3988)"databases/silo/silo_curvilinear_3d_surface_5.png"!
Copying file "silo_curvilinear_3d_surface_1.png"
Warning: dramatic change in size of file (old=130/new=24466)"databases/silo/silo_curvilinear_3d_surface_1.png"!
Copying file "silo_curvilinear_3d_surface_0.png"
Warning: dramatic change in size of file (old=130/new=24467)"databases/silo/silo_curvilinear_3d_surface_0.png"!
Copying file "silo_curvilinear_3d_surface_2.png"
Warning: dramatic change in size of file (old=130/new=11474)"databases/silo/silo_curvilinear_3d_surface_2.png"!
Copying file "silo_curvilinear_3d_surface_3.png"
Warning: dramatic change in size of file (old=129/new=2842)"databases/silo/silo_curvilinear_3d_surface_3.png"!
The reason for the warnings, above, is that the local files are the LFS pointer files.
If a git lfs pull had been done ahead of time (which is not necessary), then the local files would have been the actual .png image files and not the LFS’d pointer files.
Once rebase.py is used, don’t forget to push the changes in a new PR back to the repository.
7.4. Test data archives
Testing VisIt requires input datasets. Because of the wide variety of data formats and readers VisIt supports, we have a wide variety of test data archives. A tar-compatible archive format using the highest and commonly available compression are the two basic requirements for data archives in our development workflow.
Our practice is to store test data archives as maximally xz compressed, tar-compatible archives.
We use xz (e.g. lzma2) compression instead of the more familiar gzip compression because xz is known to compress 2-3x smaller and because in most circumstances only VisIt developers (not users) are burdened with having to manage any additional tooling if needed.
Any data archives for users, we make available in a choice of compressed formats which include the more familiar gzip compression.
The CMakeLists.txt file in the top-level data directory is designed to be useable independently of the rest of the VisIt source code tree.
After running cmake there, the command make help-archive explains how to use some convenient make targets for managing data archives.
We define four convenient make targets for creating, expanding and listing data archives.
The archive target uses python’s tarfile module to create a maximally xz compressed archive.
On some platforms, that operation may fail.
If it does, an error message is reported informing the user to use the fbarchive target instead.
The fbarchive target is a fall-back if the archive target fails.
It uses CMake’s run a command line tool feature to run cmake -E tar cvfJ but may not compress the resultant archive as well.
Users are not required to use these targets but they are highly recommended to ensure optimal compression and portability of the resulting data archives.
Sometimes, bulk operations on all the test data archives may take a while and developers may desire better or faster tooling. In this case, developers may wish to manipulate the archive and compression tooling directly. For example, this command pipe on linux…
tar cvf - my_test_data | xz -9e -T0 - > my_test_data.tar.xz
…will create a maximally compressed (-9e) archive of my_test_data using multi-threaded xz compression where the number of threads will be chosen (-T0) equal to match the number of hardware cores.
For more information about advanced archive and compression operations, readers are encouraged to have a look at the tar and xz man pages.
If users do use tar and compression tools directly to create data archives instead of through the convenient make targets, users are required to at least confirm that expanding the archives with the expand target does work.
Doing so will ensure it will work for everyone everywhere.
7.4.1. Adding test data
Sometimes new data files need to be added to support the new tests.
This involves adding either an entirely new data archive or adding a new file to an existing data archive.
With names like hdf5_test_data.tar.xz, all the data archives are named more or less for the data format(s) in which the data files they contain are stored.
7.4.2. Adding new tests
Add code to an existing
.pyfile or create a new.pyfile copying the basic format of an existing one including boilerplat calls to functions likeTurnOffAllAnnotations(), usingdata_path()when opening a database file andExit()when terminating a test.If adding a new
.pyfile, be careful to use the correct category directory. For example, when writing tests for a new database format, add the.pyfile to the databases directory or when adding a new.pyfile to test a new plot, add it to the plots directory. To see existing categories, have a look at the directory/folder names in the tests directory. If an entirely new kind of category needs to be introduced, be sure to discuss this with other developers first.From within a
.pyfile, image results are generated with theTest()function and textual results with theTestText()function. But, see above for whyTestValueXX()is preferred over image or text results.
Once logic to produce new test results via Test(), TestText() or TestValueXX() are added to a .py file, the new tests can be run for the first time.
Test() and TestText() type tests will of course fail the first time because there are no associated baseline results defined for them.
However, current results from Test() and TestText() type tests will be written to a directory name of the form output/current/<category>/<.py-file-name>/.
The new results should be inspected for correctness.
If they are as expected, to create the baseline results simply copy the new .png or .txt file(s) to their respective place(s) in the test/baseline directory tree being careful to follow the same category and pyfile name as was introduced above.
Of course, don’t forget to git add them for eventual commit.
7.4.3. Rebaselining for different configurations
Note that if you work on a machine or software configuration different from how VisIt’s nightly testing is run, there is a chance the baseline results you create won’t match, bit-for-bit, with those same results from nightly testing.
Often there can be single-pixel shifts in position or rgb color values can be off by one or two values.
Typically the differences are imperceptible except by direct, numerical comparison.
Because only developers with access to LLNL CZ systems can generate baselines guaranteed to match nightly results there, our practice is to permit developers to commit potentially non-matching baselines and allow the nightly tests to run and maybe fail.
Then, any developer can use the rebase.py tool in test/baseline (also see the above paragraph about using rebase.py) to update the baselines to whatever nightly testing produced to create perfect matches.
To make debugging a new test case easier, add the -v (-verbose flag) or -v --vargs "-debug 5" to the run_visit_test_suite.sh command, above.
Finally, make sure to tag the test in a comment block with a space separated list of CLASSES and MODES the test supports.
7.5. Using VisIt’s test routines in other applications
VisIt’s testing infrastructure can also be used from any VisIt installation by other applications that want to write their own Visit-based tests.
7.6. Diagnosing pluginVsInstall failures
pluginsVsInstall test output is generated in the current/plugins subdirectory of the test results location.
There will be a further subdirectory for each type of plugin: databasesVsInstall, operatorsVsInstall and plotsVsInstall.
The output consists of text files containing the name of each plugin tested and either success or one of the following errors:
No installed package.Indicates a failure in install of VisIt.cmake configure failedFailure with cmake to configure the plugin for build.make failedFailure with the build of the plugin.cmake executable could not be found(rare, just for completeness)make executable could not be found(rare, just for completeness)
When a failure occurs, another output file is generated in logs/plugins subdirectory in the form <PluginName>_build_res.txt which should contain sufficient information for fixing the error.
The most likely culprit for errors is missing information in one of the following files:
src/include/visit-cmake.h.in– Holds all the #defines needed for a build (HAVE_XXX, etc).src/CMake/PluginVsInstall.cmake.in– Ensures third party include/library locations are correct for an install.src/CMake/FilterDependnecies.cmake.in– Filters library dependency paths to account for differences between locations of third party libraries used in a build vs. where they are located within an installed version of VisIt.
7.7. Regression testing on Windows
Running the regression suite manually on Windows is a good way to detect Windows-specific runtime errors that may have been inadverently introduced.
A dos-batch script (run_visit_test_suite.bat) is generated in the <build>/test directory, and is similar to the shell script created on Linux.
The generated script turns on --lessverbose mode so that output can be viewed while the test is running.
Output can be redirected using this syntax:
run_visit_test_suite.bat > test_results.txt and 2> test_general_output.txt
Windows-specific baselines are stored in the testing_baselines subdirectory in the visit-deps repo, and were generated from a Windows 10 system with NVIDIA Quadro P1000 graphics card. Most likely, running from a different system will yield a large number of failures due to minor pixel diffs. The use of fuzzy matching to ignore minor differences might be helpful here.
When first running the test suite after new tests have been added, it is generally best to copy the baselines from visit/test/baselines to visit-deps/testing_baselines to have a good starting point for comparison.