9. Preparing for a Release
9.1. Updating copyright notice dates
At the beginning of every calendar year, the copyright notice needs to be updated. There are only a handful of files that still contain copyright dates, including “/src/LICENSE”. There is a script called “update_copyright” in “/src/tools/dev/scripts” that can be used but may need updating if copyright dates were added to any new file types. This should be kept to a minimum.
9.2. Preparing for a Patch Release
Preparing for a minor release is pretty straightforward and consists of updating a few files. These consist of
VERSION
INSTALL_NOTES
gui/Splashscreen.C
Update “VERSION” and “INSTALL_NOTES” to reflect the new version number. Update “gui/Splashscreen.C” to reflect the release month and year. A ticket should be created and assigned so that the release can be tested for any obsolete code that should be removed. Testing for obsolete code involves configuring with the CMake var VISIT_REMOVE_OBSOLETE_CODE turned on, then compiling and looking for compile errors of the form: This code is obsolete in this version. Please remove it.
9.3. Preparing for a Minor Release
Preparing for a minor release consists of performing all the steps involved in preparing for a patch release, along with some additional ones, such as creating the release candidate branch and updating the splash screen.
9.3.1. Audit and update Host Profiles
Remove host profiles for any retired HPC platforms and check platform lists such as hpc.llnl.gov and the LC Ramblings Confluence page to see if any new host profiles are needed.
9.3.2. Creating the Release Candidate Branch
Creating a release candidate branch is just like creating a normal branch. Here are the steps used to create the 3.1RC.
git checkout develop
git pull
git checkout -b 3.1RC
git push --set-upstream origin 3.1RC
9.3.3. Updating the Splashscreen
The splashscreen is the first thing the user sees when running VisIt so the version number included in the splashscreen image should be up to date. Updating the splashscreen usually means just updating the version number in the current splashscreen images but in the event of a major or minor release (when the first or second digit in the version changes), the splashscreen images should be redesigned to showcase new features.
There are two image files associated with the splashscreen, both of which are XCF. XCF files are the native image format of the GIMP image-editing program. One is for the splashscreen and the second is for the icon on macOS. They are both used as the first step in the process to create the splashscreen and icon.
The rest of this section will be focused on updating the version number. Changing the images would be the same in terms of the mechanics involved except that it would involve more editing of the image files.
9.3.3.1. Changing the version on the splashscreen
Follow these steps to update the version on the splashscreen.
Go to the
src/common/iconsdirectory.The splashscreen image’s XCF files are named
VisIt3.4.xcf,VisIt3.5.xcf, etc.Copy the file from the last version to the new name for the current version.
Open the file in GIMP.
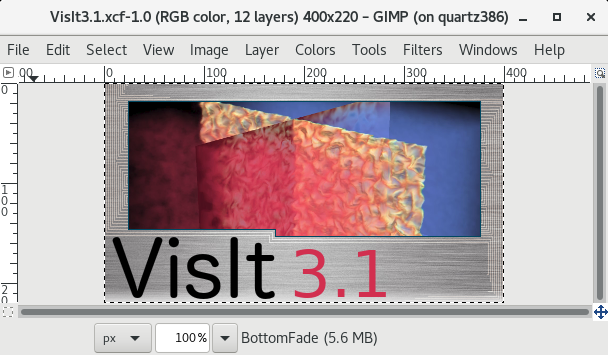
Fig. 9.85 The splashscreen in GIMP.
You’ll see that the file has several layers to it. There are six layers for each of the six splash screen images that get randomly chosen from when starting VisIt or are cycled through when you select About in the Help menu.
Now you are ready to create the png images that are actually read in by Qt. When you open the XCF file all the layers corresponding to the six different splashscreen images will be enabled. When you save the first image you will have them all shown. To save the second image you will hide the layer corresponding to the first splashscreen image. You will successively hide one additional layer until you have saved all six of the png images.
Go to File->Export As and change Name to
VisIt1.png.Click on Export.
Click on Export on the window that pops up to allow you to set the save options.
Hide
Background1.
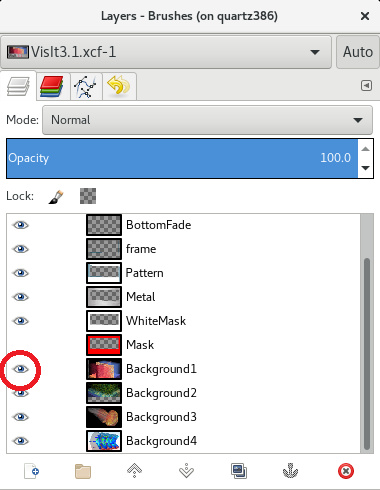
Fig. 9.86 Hiding the Background1 layer in GIMP.
Repeat steps 6 - 9, saving images
VisIt2.png,VisIt3.png,VisIt4.png,VisIt5.pngandVisIt6.png.
The images saved by GIMP result in warning messages when read by Qt. To modify the images so that the warning message disappears do the following.
convert VisIt1.png VisIt1a.png
convert VisIt2.png VisIt2a.png
convert VisIt3.png VisIt3a.png
convert VisIt4.png VisIt4a.png
convert VisIt5.png VisIt5a.png
convert VisIt6.png VisIt6a.png
mv VisIt1a.png VisIt1.png
mv VisIt2a.png VisIt2.png
mv VisIt3a.png VisIt3.png
mv VisIt4a.png VisIt4.png
mv VisIt5a.png VisIt5.png
mv VisIt6a.png VisIt6.png
Copy the files to
src/resources/images.
9.3.3.2. Changing the version on the macOS and Windows icons
On macOS and Windows systems we provide VisIt application icons.
Follow these steps to update the version number in these icons.
Go to the
src/common/iconsdirectory.Open the file
VisIt3.x-square.xcfin GIMP.Select the text layer containing the version number and change it.
Go to File->Export As and change Name to
VisIt3.5-square-macos-256x256.png.Click on Export.
Click on Export on the window that pops up to allow you to set the save options.
Select a different background image, and then repeate the process to create
VisIt3.5-square-win-256x256.png
Now you can use helper scripts that leverage ImageMagick to create a set of resized versions of these images and the final icon files.
python3 gen_vicon_pngs_from_256x256_ver.py
./gen_macos_iconset.sh
./gen_windows_icon.sh
This creates process creates VisItIcon.icns and VisIt3.5-square-win.ico.
The macOS icon will be used automatically from this location, and the windows icon
needs to be integrated into the windows build process.
9.3.3.3. Creating a new release notes file
A final step in making a release is to create the release notes file for the next
release. To do this, you must be reasonably certain what the next release’s version
number will be. Typically, we do 3-4 patch releases for each minor release. So,
if the release you are just now making is version 3.1.2, then the next release
is likely to be 3.1.3. However, if the current release is 3.1.3, the next
release might be 3.1.4 or it might be 3.2.
In any event, to make the release notes file for the next release, you need to create
an new, empty release notes file by going to src/resources/help/en_US and copying
either the minor release notes template, relnotes_minor_templ.html, or the major
release notes template, relnotes_major_templ.html to a file name of the form
relnotesA.B.C.html where A.B.C is the version number for the next release.
The .C part of the file name is missing for minor releases.
Patch release notes should go on the RC branch (e.g. 3.1RC) and minor release notes
should go on develop. Always assume there will be another patch release
and just create the next patch release file. If there isn’t another patch release, the
notes from the patch release can be incorporated into the minor release notes file.
When finishing a minor release, create the files for the next minor release and the
next patch release.
9.4. Manual Smoke Check Testing Check List
The following is a list of manual tests to perform once a release has been packaged.
9.4.1. GUI Checks
Plot Pseudocolor and Mesh plots for nodal data from curv2D.silo.
Plot Pseudocolor and Mesh plots for zonal data from multi_ucd3d.silo.
Test Navigation mode (rotate, pan, zoom).
Test rubberband zoom.
Execute a Node and Zone Pick.
Execute a Pick Query.
Execute a Lineout.
Check for Release Notes and Help.
Check VisIt manual was populated in Help.
Test “Make Movie” with dba00.pdb.
9.4.2. CLI Checks
Start VisIt with CLI and check that import numpy works.
Test import visit.
9.4.3. Additional macOS Checks
Check install names for
@rpath.Test Parallel Launch by plotting procid expr on multi_ucd3d.silo.
Make sure to test both the DMG / App Bundle package and the
tar.gzpackage.Under Options->Appearance, make sure the GUI style has the macintosh option.
Verify OSpray is installed (look at the ‘Advanced’ tab under Options->Rendering…).
Verify that the xmledit tool works from the bundle (/Application/VisIt.app/Contents/Resources/bin/xmledit).
Verify that the DMG has been signed with a Developer ID and works properly.
Try descending into
Downloads,DocumentsandDesktopfrom an instance launched by double-clicking the icon and from an instance launched from the Terminal command line.
9.5. Preparing for a Major Release
Preparing for a major release is the same as preparing for a minor release with the addition of putting VisIt through the Information Management software release process.