9. Making Movies
Making movies with VisIt runs the gamut from creating a simple movie that shows the time evolution of a simulation to movies that contain multiple image sequences, where the image sequences may contain:
Titles
Fade-ins
Image sequences that involve moving the camera around or through the data.
Image sequences where each image contains multiple components such as a 3d view of the data and a curve showing the time evolution of a value.
Image sequences where operator attributes are modified such as animating a slice plane moving through a dataset.
Simple movies can be made with the Save movie wizard and more complex movies are made using Python scripts. This tutorial will focus on creating simple movies with the Save movie wizard and using Python scripts.
9.1. Creating a movie of a simulation evolving over time
The simplest type of movie to create is a movie of a simulation evolving over time. There are several steps to making such a movie.
Create a good image for a single timestate. This is typically the first or last timestate.
Animate the movie to make sure the entire movie looks good and change things if they don’t.
Create the images and encode the movie.
9.2. Creating a good image from a single timestate
This tutorial uses the dbreak3d dataset from the VisIt tutorial data package.
The dataset simulates the evolution of water and air in a water tank after an interface holding a column of water is instantaneously removed.
9.2.1. Display the tank
Open the file dbreak3d_boundaries.silo.
Create a Subset plot of domains.
Click Draw.
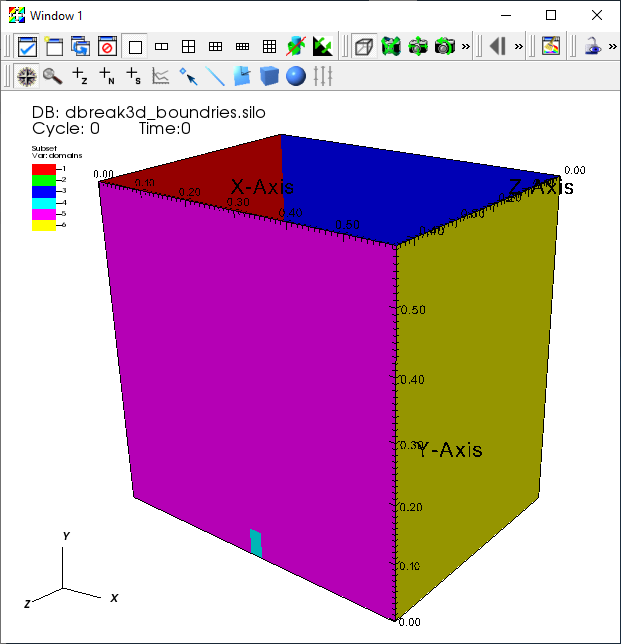
Fig. 9.55 The default Subset plot of the boundaries.
The Subset plot shows the different faces that comprise the water tank. We do not want to view all of the boundaries because they will block the fluid data, so next we turn off a few of the boundary faces that are identified as domains in the data file.
We would like to turn off the magenta and yellow boundaries. From the Subset plot legend we can see that those are domain5 and domain6.
Bring up the Subset window by clicking on the Ven Diagram next to the Subset plot in the plot list.
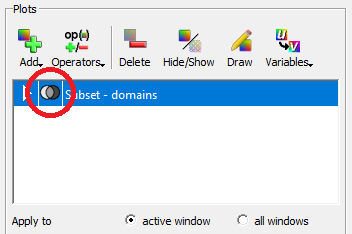
Fig. 9.56 Bringing up the Subset window from the plot list.
Click on domains to expand the list of domains and deselect domain5 and domain6.
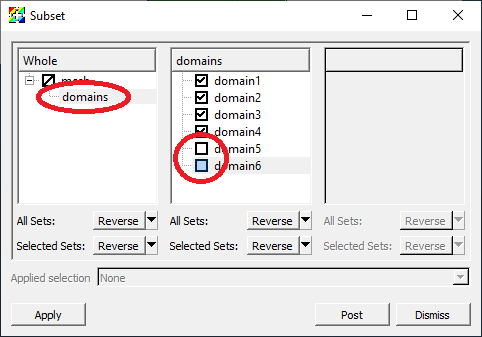
Fig. 9.57 Removing boundaries with the Subset window.
Click Apply.
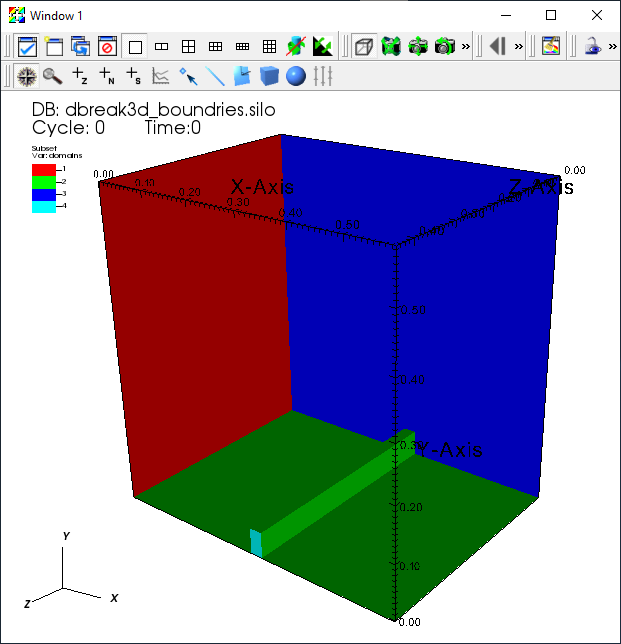
Fig. 9.58 The Subset plot with the boundaries removed.
Now let’s make all the faces the same color.
Double click on the Subset plot in the plot list to bring up the Subset plot attributes window.
Select Single and choose the light pastel green color.
Fig. 9.59 Changing the colors of the Subset plot.
Click Apply and Dismiss.
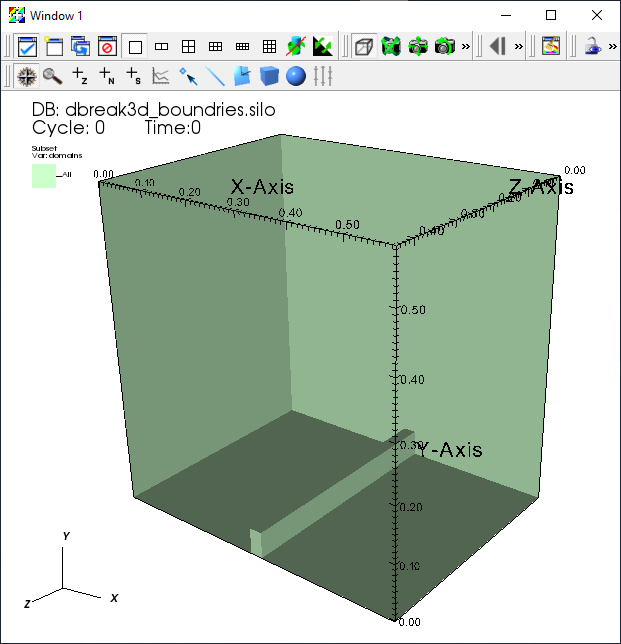
Fig. 9.60 The Subset plot boundaries in a single color.
9.2.2. Display the water
The water information is stored in the file dbreak3d_fluid.visit and contains information about the time evolution of the water. The boundary of the water can be created using the alpha1 variable. It represents the volume fraction of water in a cell. A value of 0.0 means that the cell doesn’t contain any water. A value of 1.0 means that the cell is completely filled with water. The region containing the water can be extracted by using the Isovolume operator, selecting the region where the volume fraction is between 0.5 and 1.0. Let’s get started.
Open the file dbreak3d_fluid.visit.
Create a Pseudocolor plot of alpha1.
Double click on the Pseudocolor plot in the plot list to bring up its attributes.
Change the Color table to PuBu.
Change the Opacity to Constant.
Set the Opacity slider value to 65%.
Click Apply and Dismiss.
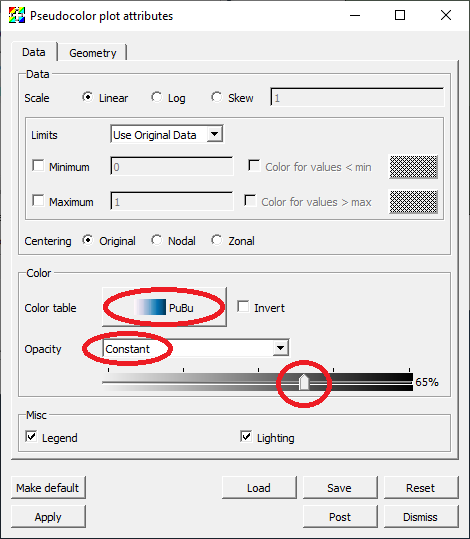
Fig. 9.61 Setting the Pseudocolor attributes for the water.
Deselect Apply operators to all plots on the main control window below the plot list. This will allow you to apply the Isovolume operator to just the Pseudocolor plot.
Go to Operators->Selection->Isovolume to add the Isovolume operator to the Pseudocolor plot.
Click on the triangle next to the Pseudocolor plot to expand the Pseudocolor plot.
Double click on the Isovolume operator to bring up its attributes.
Set the Lower bound to 0.5.
Select alpha1 as the Variable option.
Click Apply and Dismiss.
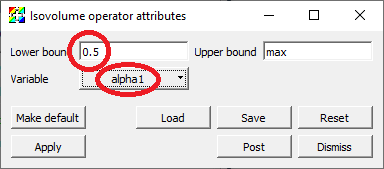
Fig. 9.62 Using the Isovolume operator to select the water.
Click Draw.
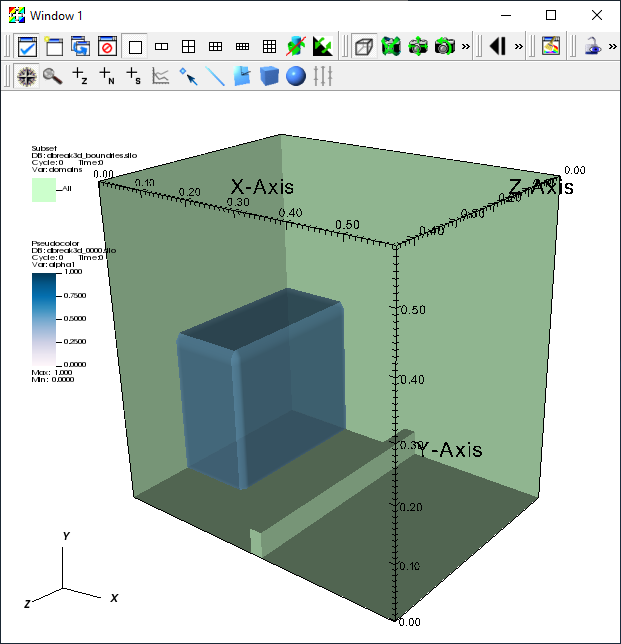
Fig. 9.63 The boundaries and the water.
9.2.3. Improve the annotations
To make the movie look more polished, we will change the window annotations, the background color, the lighting and add a time slider.
Go to Controls->Annotation to bring up the Annotation window.
Select the General tab.
Click No annotations.
Click Apply.
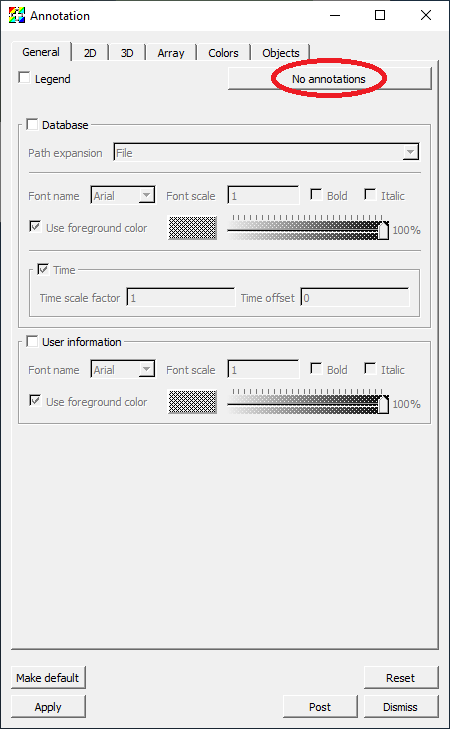
Fig. 9.64 Turning off all the annotations.
Select the 3D tab.
Select Show bounding box.
Click Apply.
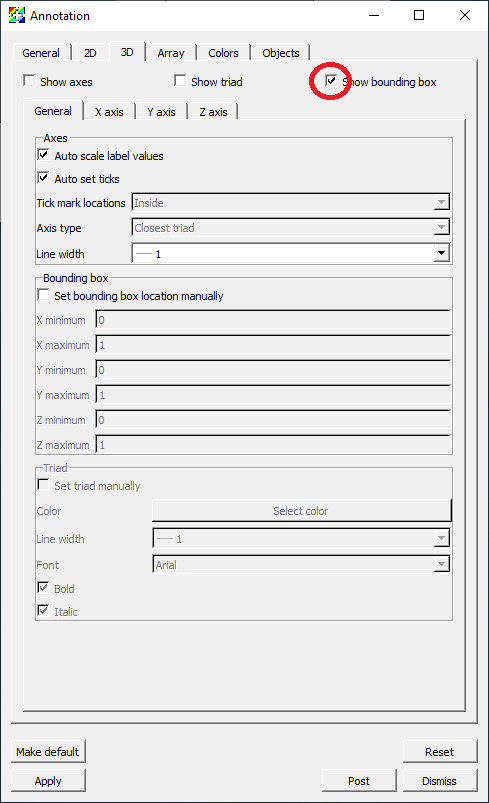
Fig. 9.65 Adding the bounding box.
Select the Colors tab.
Set the Foreground color to be the same color as our tank boundaries plot.
Set the Background style to Gradient.
Set the Gradient style to Radial.
Set Gradient color 1 to be light gray.
Set Gradient color 2 to be very dark gray.
Click Apply.
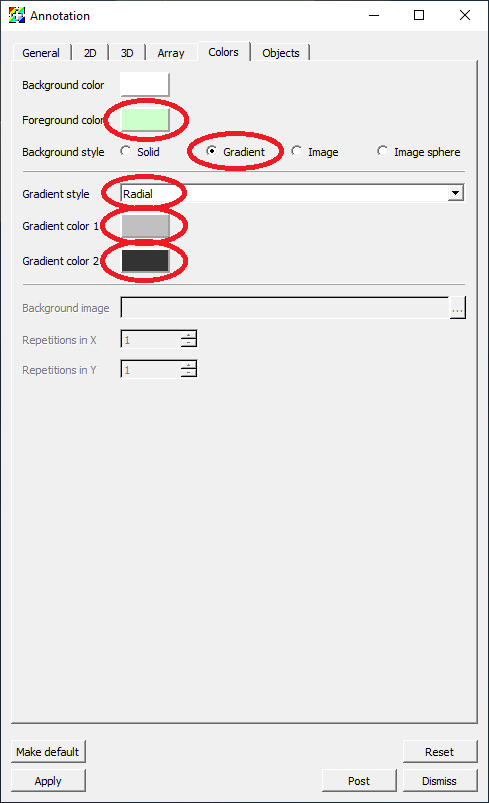
Fig. 9.66 Setting the foreground and background colors.
Select the Objects tab.
Create a new Time slider.
Click Ok when it prompts you for a name.
Set the Width to 40%.
Set the Height to 7%.
Set the Start color to light blue.
Set the End color to a darker blue.
Deselect Use foreground color.
Set the Text color to white.
Click Draw.
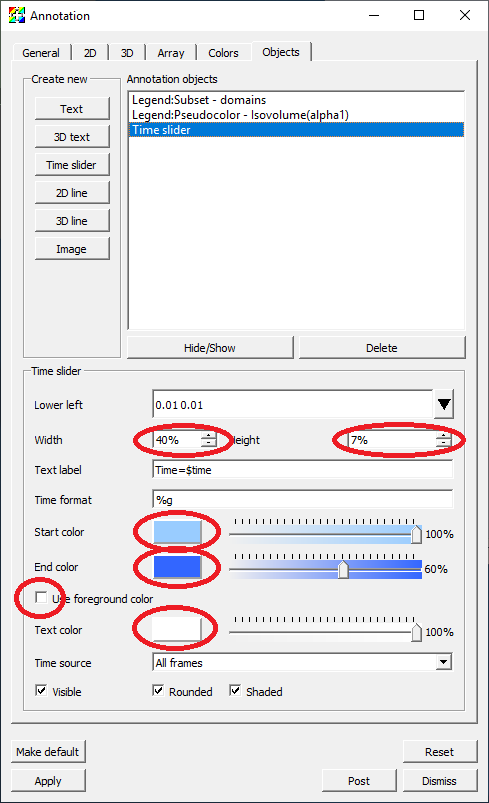
Fig. 9.67 Setting the time slider attributes.
Go to Controls->Lighting to bring up the Lighting window.
Move the light vector up and to the right.
Click Apply.
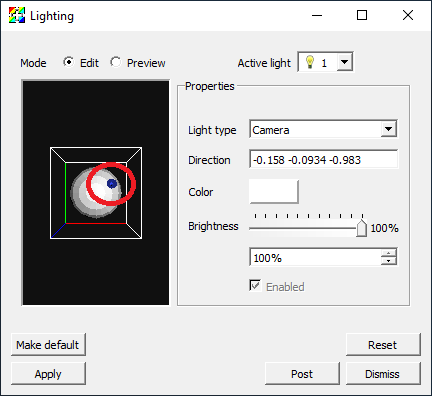
Fig. 9.68 Setting the light source position.
Move the time slider in the main control window to a later timestate where the water is splashing up.
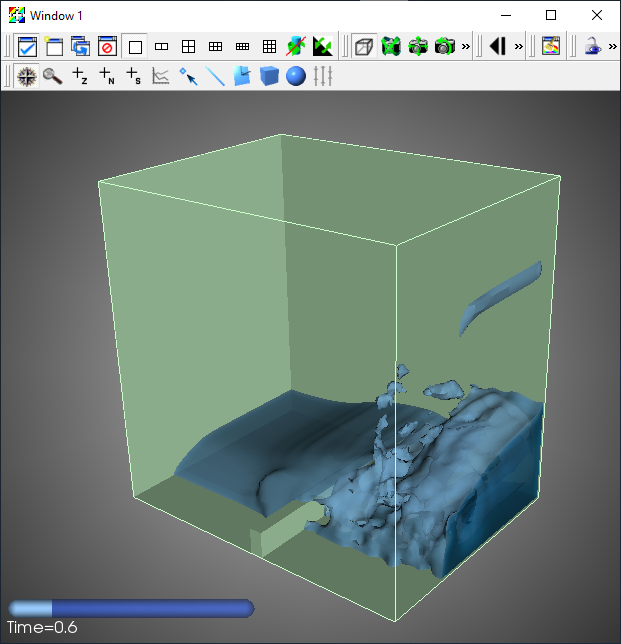
Fig. 9.69 The final result for an image in the movie.
9.3. Encoding the movie with the movie wizard
Go to File->Save movie to bring up the Save movie wizard window.
Select New simple movie and click Next.
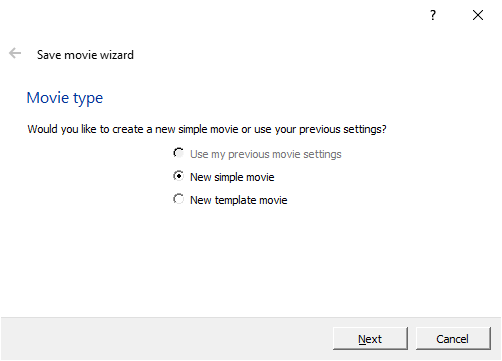
Fig. 9.70 Using the movie wizard to create a simple movie.
Select Specify movie size.
Ensure the lock aspect setting is selected. While you can encode movies with a different aspect ratio than the aspect ratio of the window on the screen, it is generally not a good idea. Objects are positioned based on a zero to one coordinate system where zero represents either the left edge or the bottom of the image and the heights and widths of objects are based on fraction of the height and width. This causes objects to change position and relative size as the aspect ratio is changed.
Change the Width to 600. The Height will automatically change to maintain the aspect ratio.
Click the right arrow button to create an entry in the Output list with the format and resolution information specified on the right hand side of the window. It is possible to change the format and resolution information and click the right arrow button to create additional entries in the Output list to encode multiple movies with different settings at once. We are just going to create a single mpeg movie.
Click Next.

Fig. 9.71 Setting the movie format and resolution.
It is possible to specify the range of timestates to use for the movie, as well as specify a stride if you have too many timestates saved. The wizard will automatically set the range of timestates. We will use all the timestates and a stride of one, so we can use the default values.
Click Next.
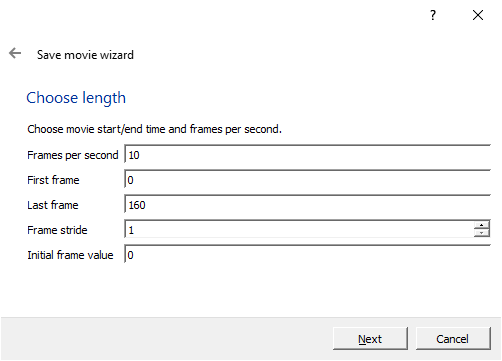
Fig. 9.72 Setting the length of the movie.
You can specify the directory and file name for the movie. We will use the current directory and name the movie dbreak3d.
Click Next.
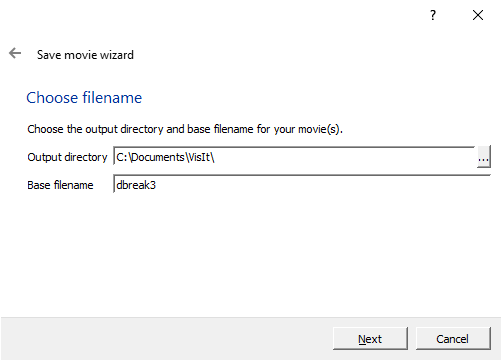
Fig. 9.73 Setting the name of the movie.
You can have VisIt send you an email when it has finished creating the movie. Since we will wait for the movie to complete, we don’t need an email message to be sent when the movie has been finished and can use the default values.
Click Next.
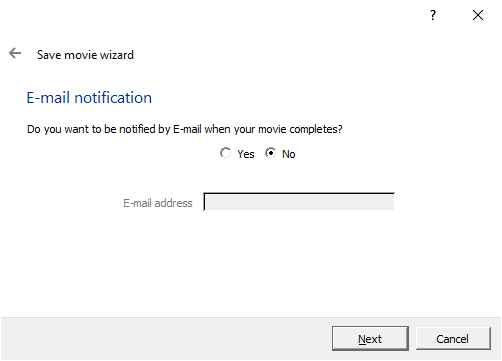
Fig. 9.74 Setting the email notification for when the movie is complete.
You can have VisIt generate the movie now using the currently allocated processors, generate the movie with a new instance of VisIt, or generate the movie at some later time. We will generate the movie now so we can use the default value.
Click Finish.

Fig. 9.75 Creating the movie with the existing processors.
This may take a few minutes depending on how fast your computer is. You may want to go get a cup of coffee.
A command window will appear while the movie is being generated. When the movie is finished the command window will disappear.
On Windows, you may get a window indicating that the VisIt Python command line interface has stopped working. If this happens, click on Close program. Your movie will have been generated properly.
9.3.1. Playing the movie
You can now play the movie with the native movie player on your system. On Linux you can use a player such as mplayer. On Mac macOS or Windows you can typically just double click on the icon for the movie. Note that on Windows you will need to play the movie with “Windows Media Player” and not “Movies & TV”.
9.4. Encoding the movie with a Python script
This section of the tutorial is primarily aimed at Linux and Mac macOS systems. There are usually folder path issues on Windows that will prevent these Python code snippets from working as shown. In particular, the images from the image saving may get saved in a different folder from where the image encoding expects to find them. If you want to get this to work on Windows, you will need to specify absolute paths for the filenames. At the moment though, the image encoding won’t work at all because there are issues with absolute paths and paths with spaces in them.
The first step in encoding a movie with a Python script is to create the images for encoding. The following snippet of Python code will loop over all the time states and save the images.
# Set the basic save options.
save_atts = SaveWindowAttributes()
save_atts.family = 0
save_atts.format = save_atts.PNG
save_atts.resConstraint = save_atts.NoConstraint
save_atts.width = 1200
save_atts.height = 1068

# Get the number of time steps.
n_time_steps = TimeSliderGetNStates()

# Loop over the time states saving an image for each state.
for time_step in range(0,n_time_steps):
    TimeSliderSetState(time_step)
    save_atts.fileName = "dbreak3d%04d.png" % time_step
    SetSaveWindowAttributes(save_atts)
    SaveWindow()
Go to Controls->Command to bring up the Commands window.
Copy and paste the code snippet above into the first tab of the Commands window.
Click Execute.
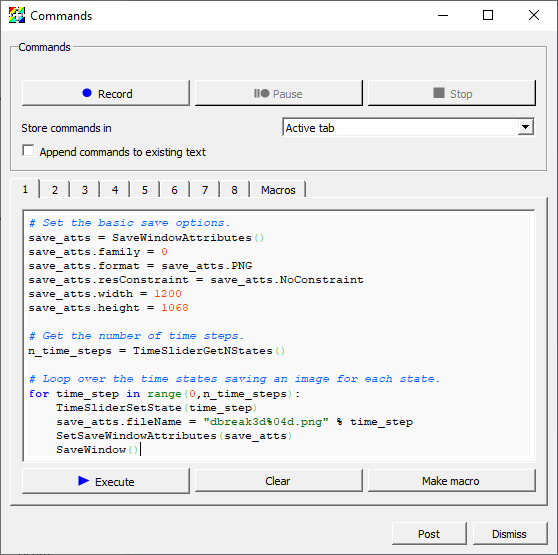
Fig. 9.76 Saving the movie images with a Python script.
The next step is to encode the movie using the encoder that comes with VisIt. You will need the “ffmpeg” encoder to be installed on your system and in your search path for the encoding module from visit_utils to function. The following snippet of Python code will load the visit movie encoding module and encode the movie.
from visit_utils import *

encoding.encode("dbreak3d%04d.png","dbreak3d.mpg",fdup=2)
The first argument specifies the file naming pattern for the input files. You can use the same format string used to create the images. The movie encoder doesn’t support format strings that have multiple digit sequences in them, so it is best to keep the name of the input images simple, with only a single digit sequence.
The second argument is the name of the output file. The extension determines the file format to create. The available options are: “mpg4”, “mpg”, “wmv”, “gif”, “avi”, “mov”, “swf”, and “divx”. “mp4” is usually the best choice and plays on most platforms (Linux, macOS and Windows). “mpg” is lower quality, but should play on any platform.
The last argument specifies the number of times each frame is duplicated. We are specifying duplicating each image twice. This option is useful if you don’t have a lot of timesteps and want to extend the length of the movie. Movies typically play at 30 frames per second so if you only have, for example, 60 frames, the movie will only play for about 2 seconds.
Copy and paste the code snippet above into the second tab of the Commands window.
Click Execute.
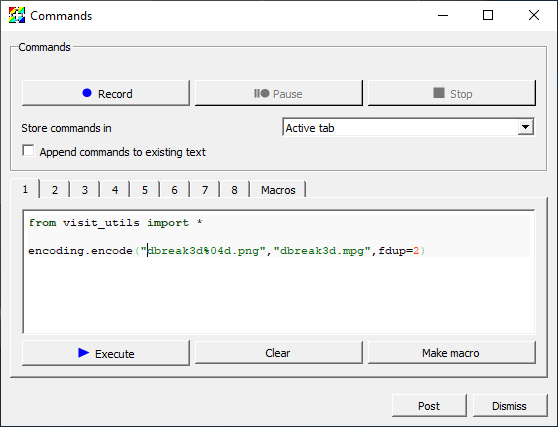
Fig. 9.77 Encoding the movie images with a Python script.
9.5. Other Tips for Making Quality Movies
9.5.1. Ensure that limits are appropriate and consistent across the entire movie
The objects in simulations typically change in size or move in position. Because of this the view that may be appropriate at the first timestep isn’t appropriate at later timestates. For example, suppose a simulation were modeling the explosion of a supernova. As the simulation progresses the supernova grows in size and at some point most of the supernova may be outside the view. One possible solution would be to set the size based on the supernova at the last timestate. If this isn’t acceptable it may be necessary to zoom out at a few key points in the simulation to ensure that the supernova is still within the view.
Another common issue is that VisIt by default will set the extents for things like the Pseudocolor plot based on the limits of the current time state. Typically the limits will change over time, which will result in the meaning of a specific color changing over time. This is typically not desired behavior for movies. In this case, the limits in the Pseudocolor plot should be set so that they are appropriate for the entire time series.
9.5.2. Selecting the resolution
You should always select an aspect ratio for your movie that shows off your content the best. One strong consideration is minimizing the amount of white space in your movie. If your simulation is primarily square then you will probably want your movie to have a roughly one-to-one aspect ratio. If it is wider than it is tall then you proably want something closer to a two-to-one or three-to-two (width-to-height) aspect ratio. Another important consideration is the type of device you will be displaying you movie on. These days monitors tend to be wide screen and a good resolution to have in mind is HDTV (1920 by 1080). It is probably best to try and add annotations to your movie to fill the white space so that you can get as close to an HDTV aspect ratio (16 x 9) as possible.
9.5.3. Rendering images gives the most flexibility
If you want to create a movie to show to many people or will be using it in multiple situations it is best to save images and then manually encode them using the movie encoding tools in VisIt, or if you want a really high quality movie with sound then you can use a third party movie encoding tool.
If you anticipate using your movie in multiple situations you should encode it at the highest resolution you expect to need it and then encode multiple movies at different resolutions. To create the different resolution movies, you would first resize the images to the desired size and then encode the movie. A good trick for generating higher quality anti-aliased movies is to save the images at quadruple the resolution (two times in each direction) and then resizing them to a quarter of that resolution before encoding the movie.
9.5.4. Resizing images
A good tool for resizing image is ImageMagick’s convert tool. It is installed on most Linux and Mac macOS operating systems. If you don’t have ImageMagick installed on your systems and in your search path the following code snippet will fail. The following snippet of Python code will run convert to resize the images created earlier to one half their resolution.
from subprocess import call

for time_step in range(0,n_time_steps,4):
    file1 = "dbreak3d%04d.png" % time_step
    file2 = "dbreak3d_600x534_%04d.png" % time_step
    call(["convert", file1, "-resize", "600x534", file2])
Copy and paste the code snippet above into the third tab of the Commands window.
Click Execute.
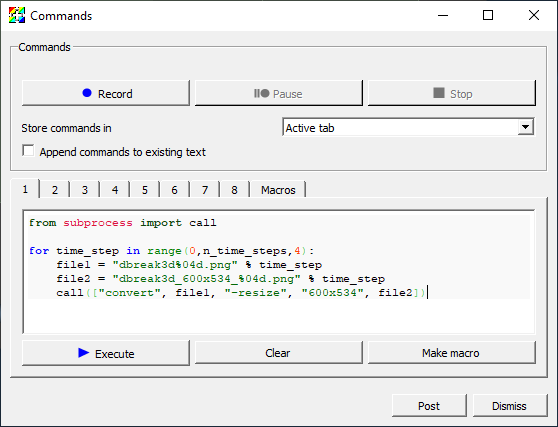
Fig. 9.78 Resizing the movie images with a Python script.
Convert can also be used to do other types of image manipulations such as cropping a flipping images. To learn more about convert google ImageMagick convert.
9.5.5. Higher quality encoding with ffmpeg
You can get higher quality encoding using ffmpeg instead of VisIt’s built-in mpeg2encode. If VisIt finds ffmpeg in your search path it will use that instead of the built in encoder.
You can obtain ffmpeg from the ffmpeg download site. Scroll down a bit until you get to a section labeled Get packages & executable files. Click on the icon representing the OS you desire, this will change the text below the three logos. Choose and click one of the options and you will be taken to a page with downloads or package information.
You may be able to install ffmpeg on Linux with the standard package manager for the flavor of Linux you are running. For example, to install on Ubuntu:
apt-get update
apt-get install -y ffmpeg