8. Remote Usage
VisIt can be used remotely in several different manners. Some use capabilities native to VisIt, such as running VisIt in client/server mode, and some use external mechanisms, such as VNC. We will also touch briefly on using batch allocations in an interactive manner.
VisIt can run remotely in the following ways:
-
Easiest to setup and convenient to use.
Lowest interactivity performance.
-
More complex to set up.
Convenient to use.
Provides high interactivity performance.
-
More complex to set up.
Provides highest interactivity performance.
8.1. Using X Display forwarding though ssh
When VisIt is running with X display forwarding through ssh, it is completely running on the remote system and sending all its graphics commands over ssh. In one sense this is the easiest to use since you just launch VisIt on you remote system and you are ready to go. Since you are typically already logged into the remote system and already in the directory of interest there is no additional setup required, such as entering passwords or navigating the remote directory structure. Unfortunately it is also the lowest performing option. Graphical user interfaces typically send lots of small messages back between the remote system and the local display. If there is a high latency between them then simple operations such as clicking on buttons and bringing up new windows may take a long time. Furthermore, the rendering performance of the visualization windows suffers because VisIt can’t leverage the graphics processing unit on the local system.
When using X Display forwarding you need to have an X Server running on the display of your local system. In the case of Linux and macOS, both will have X Servers running by default. In the case of Windows you will need to install a X Server on your system and enable it. Fortunately, most people will already have an X Server installed on their system if they are using ssh to login to the supercomputing center.
Typically, X display forwarding is enabled by default and all you need to do is launch VisIt on the remote system once you have ssh’ed to the remote system.
When starting ssh from a command line you will need to use the “-Y” option.
ssh -Y
Some X Servers may need to have their default options set for use with VisIt. This is primarily because VisIt uses OpenGL for rendering and not all X Servers are configured properly to work with OpenGL.
8.1.1. Configuring X-Win32 for use with VisIt
The default setting X-Win32 sometimes are not set to work well with OpenGL. This isn’t always the case and will depend on the graphics card installed on your system. If VisIt crashes on your system you will need to do the following.
Bring up the X-Win32 control panel.
Go to the Window tab.
Turn off Use Direct2D.
Turn on Use Software Renderer for OpenGL.
Click Apply.
At this point you should exit all the windows associated with X-Win32 and re-establish you connections to the remote system.
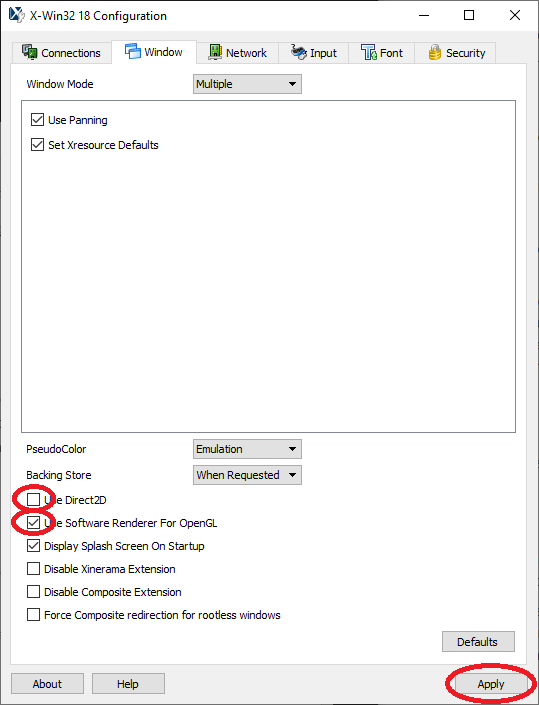
Fig. 8.92 The X-Win32 control panel
8.2. Using VNC
When using VNC it looks and behaves just like you were logged into an X Window display running at the supercomputing site that is constrained to a single window and is separate from the windowing system running on your local system. It provides all the conveniences of X display forwarding but at a much higher interactivity level since the networking between the remote computer and the VNC server will provide high bandwidth and low latency. Ideally you would do all your interactions with the supercomputer center through the VNC client. The one draw back is that the VNC server compresses the video stream it sends to the VNC client in order to provide high interactivity. This may result in small compression artifacts in the images you see in the VNC client.
This portion of the tutorial on using VNC will focus on using RealVNC at the Lawrence Livermore National Laboratory (LLNL). Using VNC at other computer centers will be similar, but unique to each site.
8.2.1. Installing VNC
If your system is an LLNL managed system you can install it via the LLNL workstations catalog for macOS or Windows. Alternatively, you can download the RealVNC client and install it on your desktop. VNC clients not supplied by RealVNC will not work at LLNL.
8.2.2. Installing RealVNC on an LLNL managed Windows system
Select LANDESK Management->Portal Manager from the Start menu.
Click on RealVNC Viewer in the list of software packages.
Click Launch to install the package.
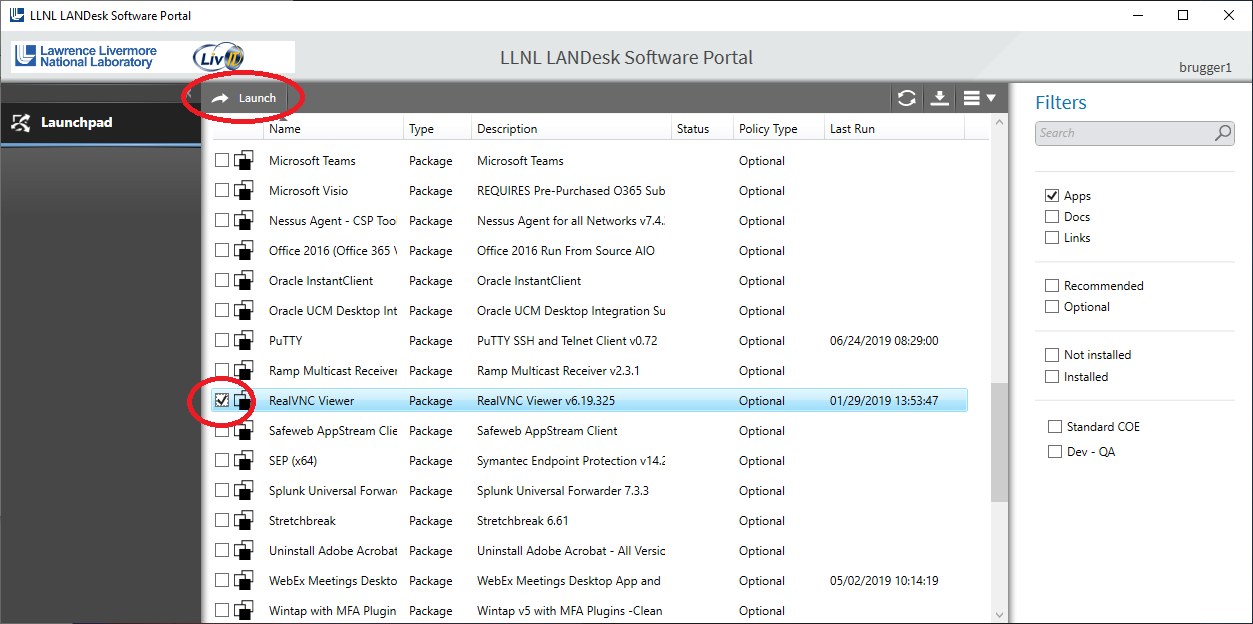
Fig. 8.93 The LLNL LANDesk Software Portal
8.2.3. Installing RealVNC on an LLNL managed Mac system
Start MacPatch from Applications->MacPatch.app.
Select the Software tab and scroll down until you find the RealVNC Viewer.
Click the Install button in the right column to install the package.
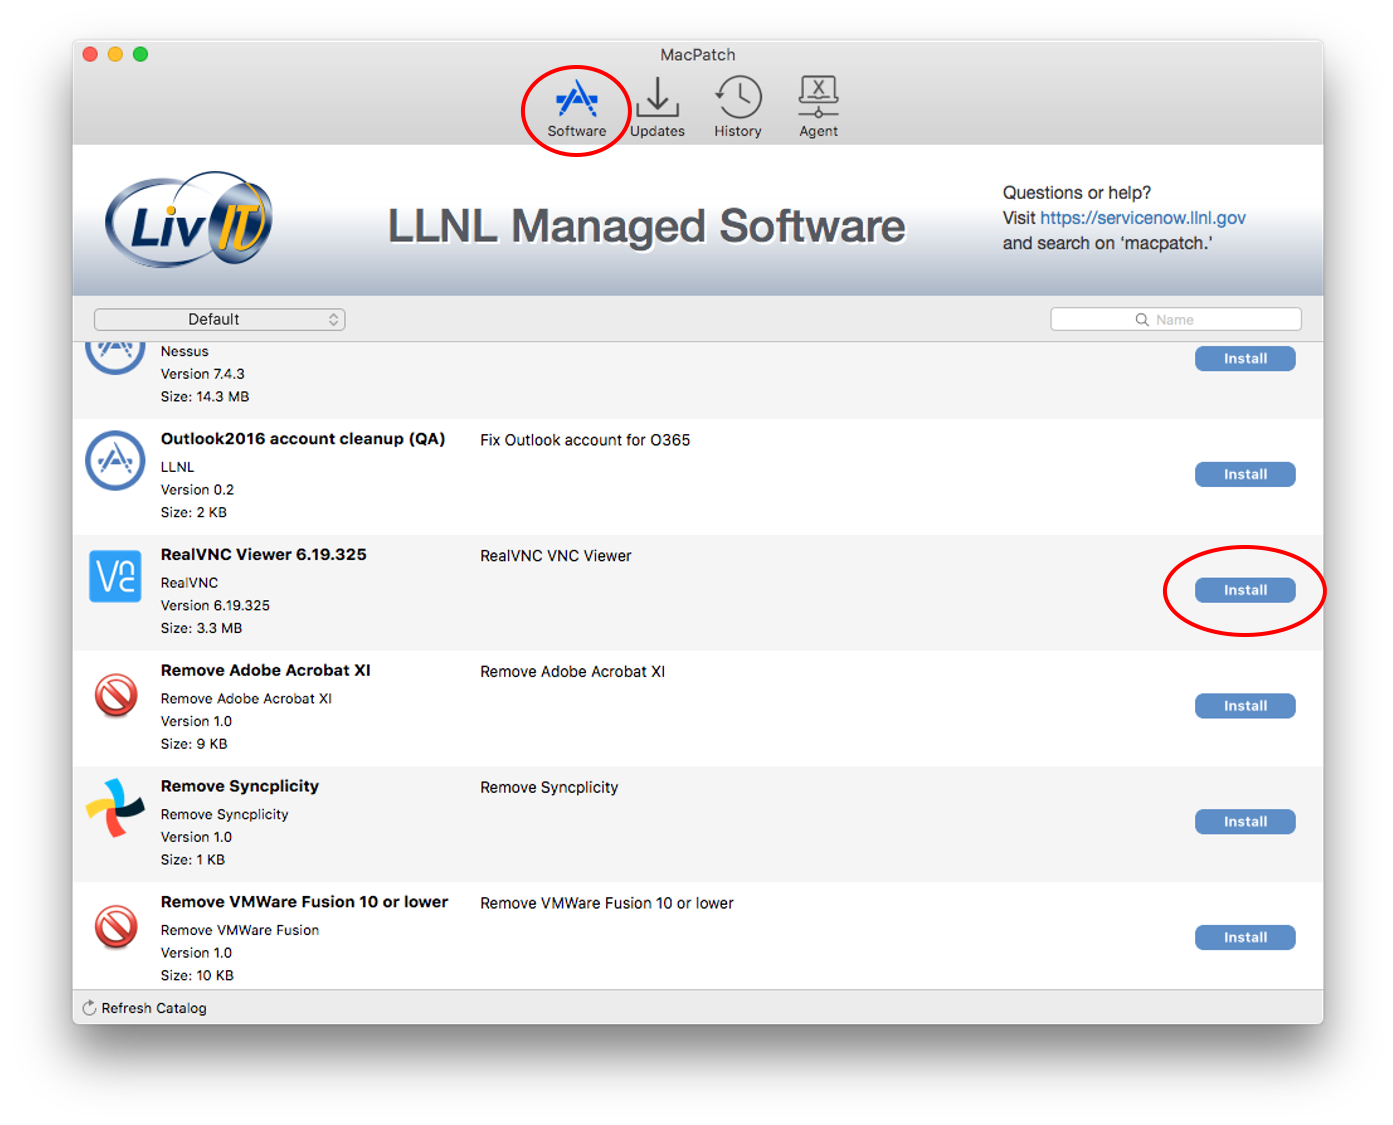
Fig. 8.94 MacPatch: LLNL Managed Software
8.2.4. Starting up the RealVNC client
There is a lot of additional content on using RealVNC at Livermore Computing.
At this point we will focus on running RealVNC on Windows. Other than starting the Viewer, everything should be pretty much the same for Windows, macOS and Linux.
Select RealVNC->VNC Viewer from the Start menu.
This will bring up the VNC Viewer.
Now we are ready to create the profiles for logging into the CZ and RZ.
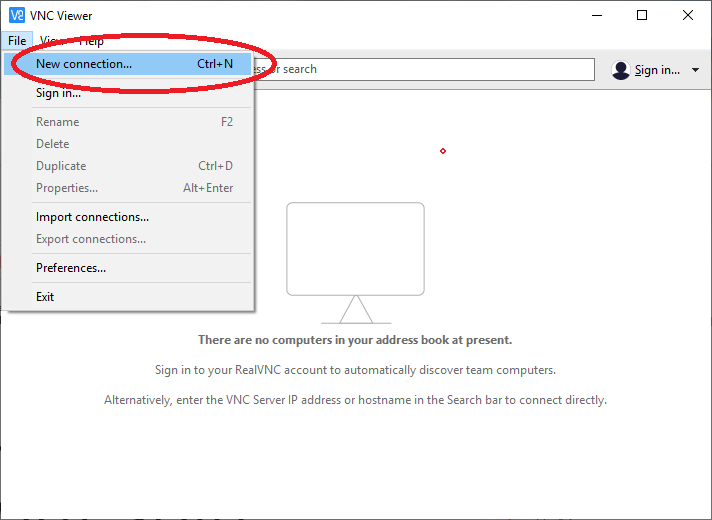
Fig. 8.95 The VNC Viewer
Select File->New connection….
This will bring up the Properties window.
Change the VNC Server field to “czvnc.llnl.gov:5999”.
Change the Name field to “CZ VNC”.
Click Ok.
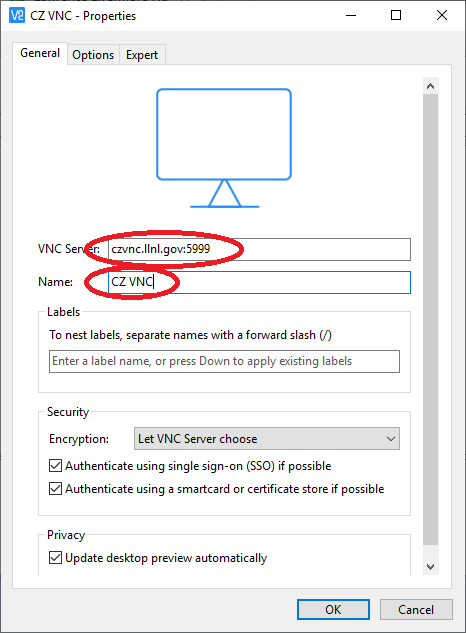
Fig. 8.96 The VNC Viewer Properties window
This will create a profile for logging into the CZ VNC.
Now do the same for the RZ.
Select File->New connection….
Change the VNC Server field to “rzvnc.llnl.gov:5999”.
Change the Name field to “RZ VNC”.
Click Ok.
Your VNC Viewer window should now contain two connection profiles.
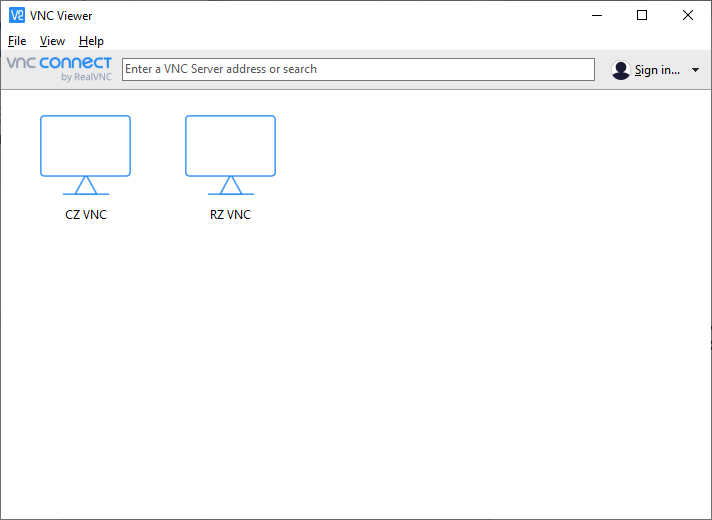
Fig. 8.97 The VNC Viewer with two profiles
Now we are ready to login to one of the systems.
Double click on the CZ VNC icon
This will bring up a login window.
Enter your CZ username and password.
This will bring up a Linux desktop. The resolution of the desktop will probably be low if you have never used the VNC server before. This is so that it isn’t too large if you are on a laptop.
To change the resolution of the display dynamically, bring up a terminal and use the xrandr command.
Select Applications->Terminal
Enter “xrandr” in the terminal to get a list of supported resolutions.
Enter “xrandr -s 1280x720” in the terminal to change the resolution to 1280 by 720.
Change the resolution back to something more appropriate to your screen.
Recommended resolutions are:
Dell laptop running Windows: 1280 x 720
A high-resolution external monitor: 1920 x 1200
A Mac laptop: 1680 x 1050 (Retina Display) or 1440 x 900
When using VisIt you should ssh to another CZ machine so that you don’t overload the VNC server. You should use version 3.1.1 of VisIt for the best performance on a VNC client. Versions prior to 3.0.0 will not work properly with VNC.
Enter “ssh quartz”.
Enter “visit -v 3.1.1”.
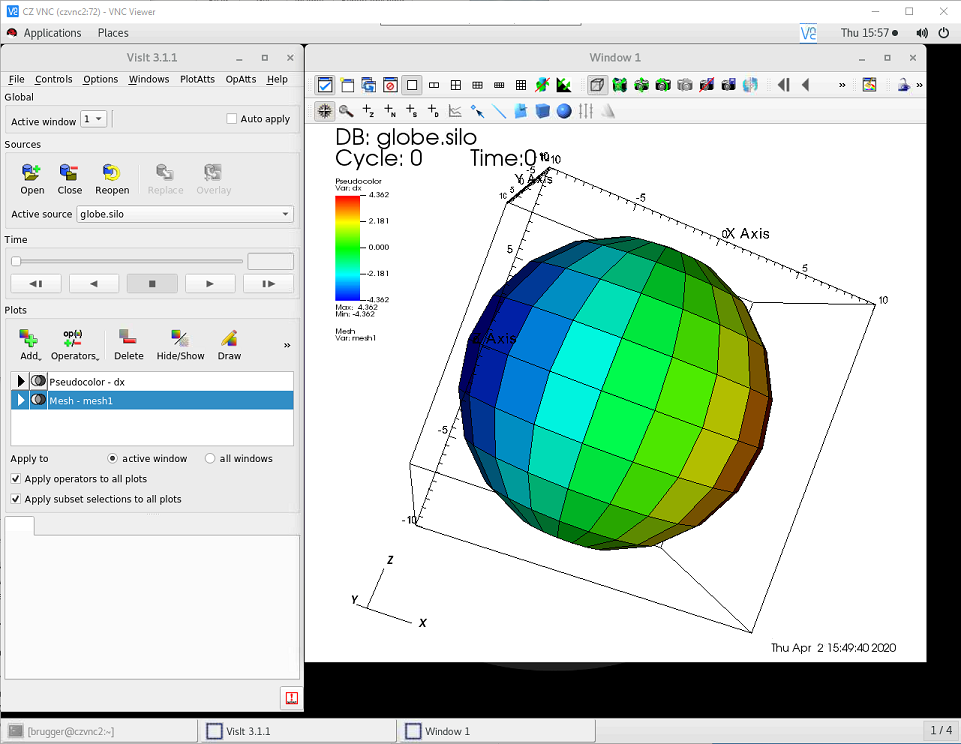
Run VisIt as normal.
8.2.5. VNC Rendering Performance
VisIt uses a heuristic to switch between direct rendering in the viewer and scalable rendering via the engine. For smaller mesh sizes, datasets are sent to viewer for rendering with OpenGL. Scalable rendering uses VisIt’s engine, which can leverage many MPI tasks to render, composite the result, and then only send an image back to the viewer for display.
Direct rendering can cause contention in a shared VNC environment with many users. If rendering seems slow, we recommend configuring VisIt to always use scalable rendering.
Select Options Menu -> Rendering
In the Advanced tab, set Use scalable rendering to Always
Click Apply
Select Options Menu->Save Settings to save for future sessions
For more details about Scalable rendering see the Scalable rendering documentation.
8.2.6. Troubleshooting VNC issues
Sometimes you can’t see anything because the default screen is too large. There are two solutions to this issue, one is to reduce the resolution of the desktop and the other is to have the window scale automatically. To reduce the desktop resolution:
Use the scroll bars to navigate to upper left hand corner and bring up a terminal.
From the terminal use the “xrandr” command to change the resolution as described here.
To have the desktop scale automatically:
Go to the slide-out menu at the top center and rest your mouse below the title bar.
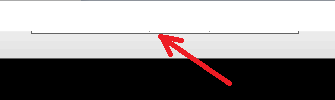
Fig. 8.99 The slide-out menu
Click the Scale automatically icon.
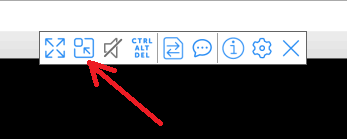
Fig. 8.100 Clicking on the Scale automatically icon
The window should now resize and you can use the VNC client.
Sometimes the response gets really slow when the VNC server is under heavy load. One solution is to reduce the picture quality.
Go to the slide-out menu at the top center and rest your mouse below the title bar.
Click the Properties icon.
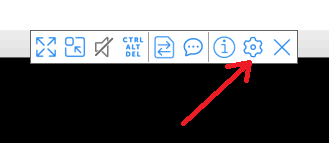
Fig. 8.101 Clicking on the Properties icon
Click on the Options tab.
Set the Picture quality to Low.
Click Ok.
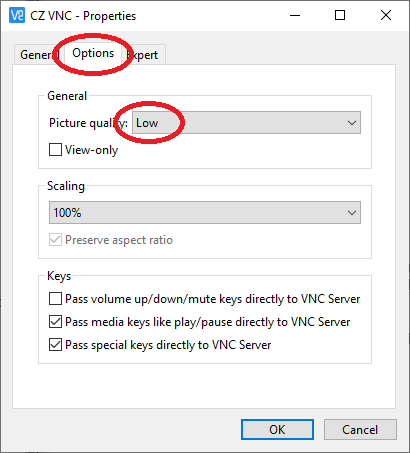
Fig. 8.102 Setting the Picture quality to Low
8.3. Using client/server
When VisIt is running in a client/server mode, a portion of VisIt is running on your local system and a portion is running on a remote compute resource such as a supercomputing center. This will always give better performance than running on a remote system using X display forwarding, since interactions with the graphical user interface will be faster and VisIt will be able to leverage the graphics processing unit on your local system. The portion running on your local system is referred to as the client and the portion running on the remote compute resource is referred to as the server. The client is responsible for the graphical user interface and the rendering window, while the server is responsible for accessing the data on the remote system, processing it, and sending back geometry to be rendered or images to be displayed.
When running in client/server mode, VisIt makes use of host profiles that provide information on how to run VisIt on the remote system, such as where VisIt is installed and information about the batch system. VisIt comes with host profiles for many different supercomputing systems. This portion of the tutorial will use the Livermore Computing Center at LLNL.
8.3.1. Installing the host profiles for your computer center
The first thing you will need to do is make sure you have the host profiles installed for the remote system. You can check this by bringing up the Host profiles window.
Select Options->Host profiles… to bring up the Host profiles window.
If the list of Hosts is blank or doesn’t contain the host of interest, you will need proceed with steps 4 - 10.
Click the Dismiss button.
Select Options->Host profiles and configuration setup… to bring up the Setup Host Profiles and Configuration window.
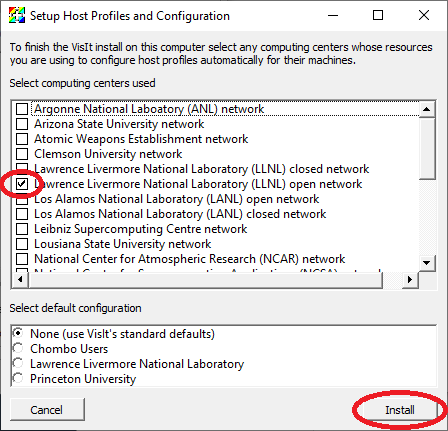
Fig. 8.103 The Setup Host Profiles and Configuration
Click on the Lawrence Livermore National Laboratory (LLNL) open network.
Click Install.
Restart VisIt.
Select Options->Host profiles… to bring up the Host profiles window.
You should now see the host profiles for LLNL.
Click the Dismiss button.
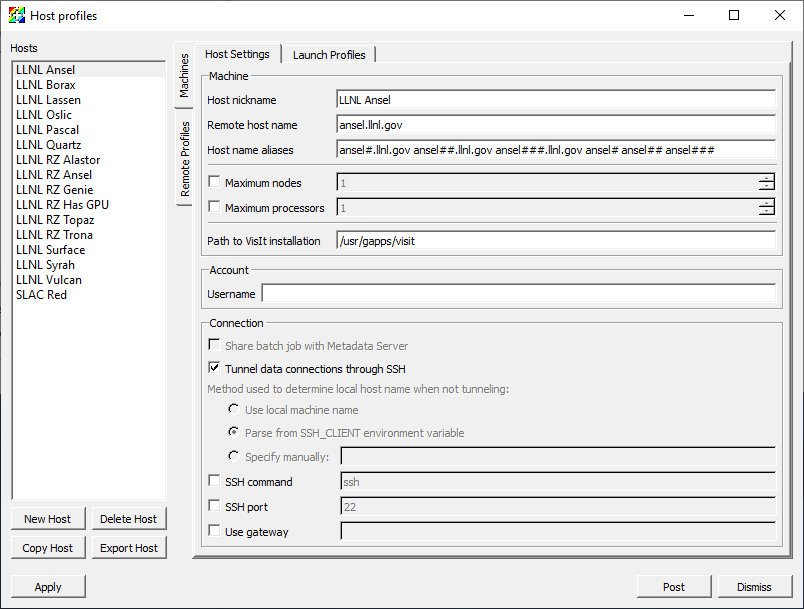
Fig. 8.104 The Host profiles window with the host profiles for LLNL
8.3.2. Connecting to a remote system
You are now ready to connect to the remote system.
Click on the Open icon in the Sources section of the main window to bring up the File open window.
Click on the Host pulldown menu and select LLNL Quartz.
This will bring up a window to enter your password.
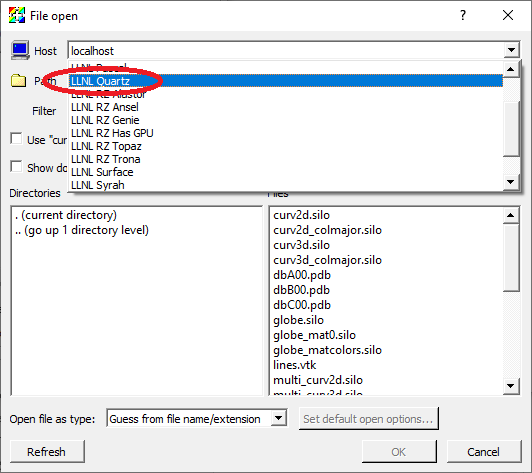
Fig. 8.105 The File open window
If your username is different on the remote system from the one on your local system you will need to click on Change username and change your username.
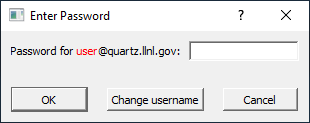
Fig. 8.106 The Enter Password window
The File open will now open to your home directory on the remote system.
You are now ready to open files, create plots and do everything you are used to doing with VisIt.
8.3.3. File locations when running client/server
When running in client/server mode some files are stored on the local system and some are stored on the remote system. Most files are stored or saved on the local system. Some examples include:
Images
Movies
Host profiles
Settings
Color tables
The main exception is when exporting data. Those results are saved on the remote system. This is usually what you want since you will most likely want to open it on the remote system for further processing.
The window that exports databases is unable to browse the remote file system, so you will need to carefully type in the path to the directory to save it in.
8.4. Using batch systems interactively
When VisIt normally uses the batch system, it submits the parallel compute engine to the batch system and then the compute engine runs until it exits. Sometimes VisIt exits because of a crash. Once that happens you will lose the rest of the batch allocation and you will need to submit a batch job, which may not always happen immediately. One way around this is to get a batch job and then run all of VisIt in batch system using X display forwarding (ideally from within a VNC client).
One such mechanism is mxterm, a utility available at LLNL. It submits a batch job and pops up an xterm. From the xterm, the user can start VisIt as many times as they want until the batch job time limit expires. There may be similar mechanisms available at other supercomputing centers. If not, it would be fairly straightforward to create such a script for the batch system at your supercomputing center.
8.4.1. Using mxterm
The basic mxterm command is:
mxterm <nnodes> <ntasks> <nminutes> <-q queue_name>
An example that gets 1 node with 36 tasks for 30 minutes in the pdebug queue.
mxterm 1 36 30 -q pdebug
When the job starts an xterm window will appear on your screen.
When using an mxterm, you will need to use the mxterm profile when starting your compute engine.
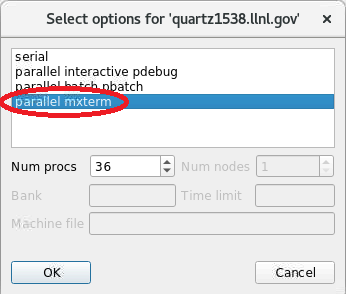
Fig. 8.107 Selecting the mxterm host profile